Your First Workflow
Register your first task and trigger its first run.
Welcome to Render Workflows! Follow these steps to register your first task and trigger its first run.
1. Install the Render CLI
You'll use the Render CLI to create a starter project with our Hello World template.
Use any of the following methods to install the Render CLI or upgrade to the latest version:
Run the following commands:
Run the following command:
- Open the CLI's GitHub releases page.
- Download the executable that corresponds to your system's architecture.
If you use an architecture besides those provided, you can build from source instead.
We recommend building from source only if no other installation method works for your system.
-
Install the Go programming language if you haven't already.
-
Clone and build the CLI project with the following commands:
After installation completes, open a new terminal tab and run render with no arguments to confirm.
2. Initialize a starter project
-
From your machine's development directory, run
render workflows initto generate a starter project with your first task definition:Command not found? Make sure you've upgraded to the latest version of the Render CLI.
-
The
initcommand prompts you for the folowing, in order:Prompt Description Language
Choose whichever supported language you prefer (currently TypeScript or Python).
Template
Choose Hello World for this tutorial.
Output directory
The CLI creates a new directory for your project at the specified path (default
./workflows-demo).Install dependencies?
Choose Yes.
Initialize a Git repository?
Choose Yes.
Running in non-interactive mode?
To skip prompts in scripts and agents, you can pass all options directly, like so:
For details, run
render help workflows init. -
Commit all of the files in your new project directory to Git:
The anatomy of a workflow
The following excerpts from workflows init starter projects illustrate the bare minimum syntax for defining a workflow:
- You import
taskfrom the Render SDK for TypeScript, which is the template's only dependency aside from TypeScript itself. - You define tasks by calling
task(...)once for each, providing options and a function definition. - No additional initialization is required when using the TypeScript SDK.
- You define a task by first initializing a
Workflowsapp, then applying the@app.taskdecorator to any function. - You call
app.start()on startup to initiate both task registration and run execution on Render. - The
Workflowsclass is imported from the Render SDK for Python, which is the template's only dependency.
3. Push your project
Render will deploy your project by pulling its source from a linked repo on GitHub, GitLab, or Bitbucket.
Create a new repository for your project with any of these providers and push your local repo to it.
4. Create a workflow service
-
In the Render Dashboard, click New > Workflow:

The workflow creation form appears.
-
Link the GitHub/GitLab/Bitbucket repo with your workflow's task definitions.
-
Complete the remainder of the creation form. See guidance for important fields:
Field Description Language
- Choose Node for TypeScript or Python 3 for Python.
- Choose Docker if you're deploying a workflow project that builds from a Dockerfile.
- For details, see Using Docker.
Region
Your workflow's task runs will execute in the specified region.
This determines which of your other Render services they can reach over your private network.
Build Command
If you're using the Hello World template from
render workflows init, this is the following:Otherwise, provide the command that Render should use to install dependencies and build your code.
You don't provide a build command if you're using Docker.
Start Command
If you're using the Hello World template from
render workflows init, this is the following:Otherwise, provide the command that Render should use to start your workflow.
-
Click Deploy Workflow. Render kicks off your workflow's first build, which includes registering your tasks.

That's it! After the build completes, your tasks are officially registered. You can view them from your workflow's Tasks page in the Render Dashboard:

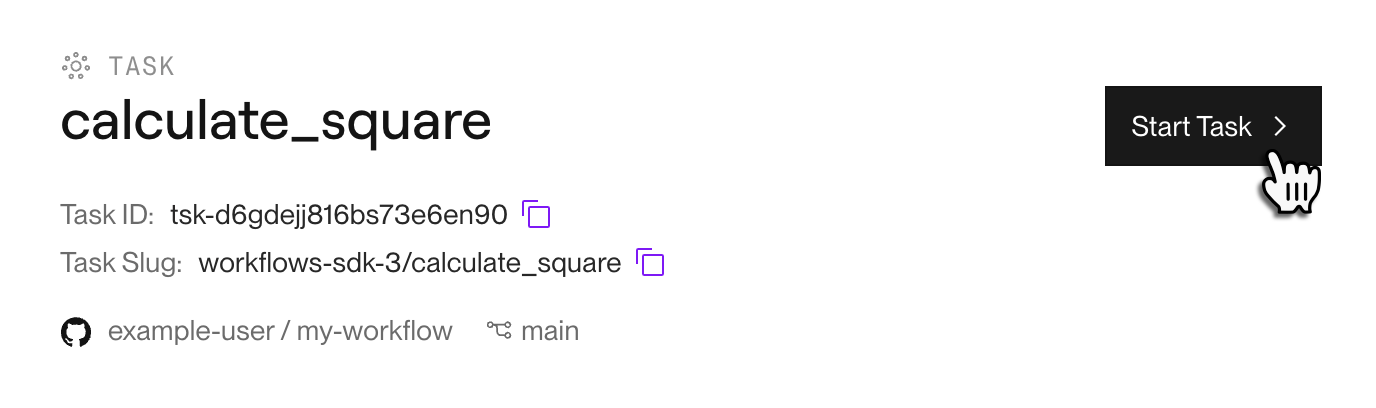
5. Trigger a task run
Now that we've registered a task, let's run it! The quickest way to trigger our first run is in the Render Dashboard:
-
From your workflow's Tasks page, click a task to open its Runs page.
-
Click Start Task in the top-right corner of the page:
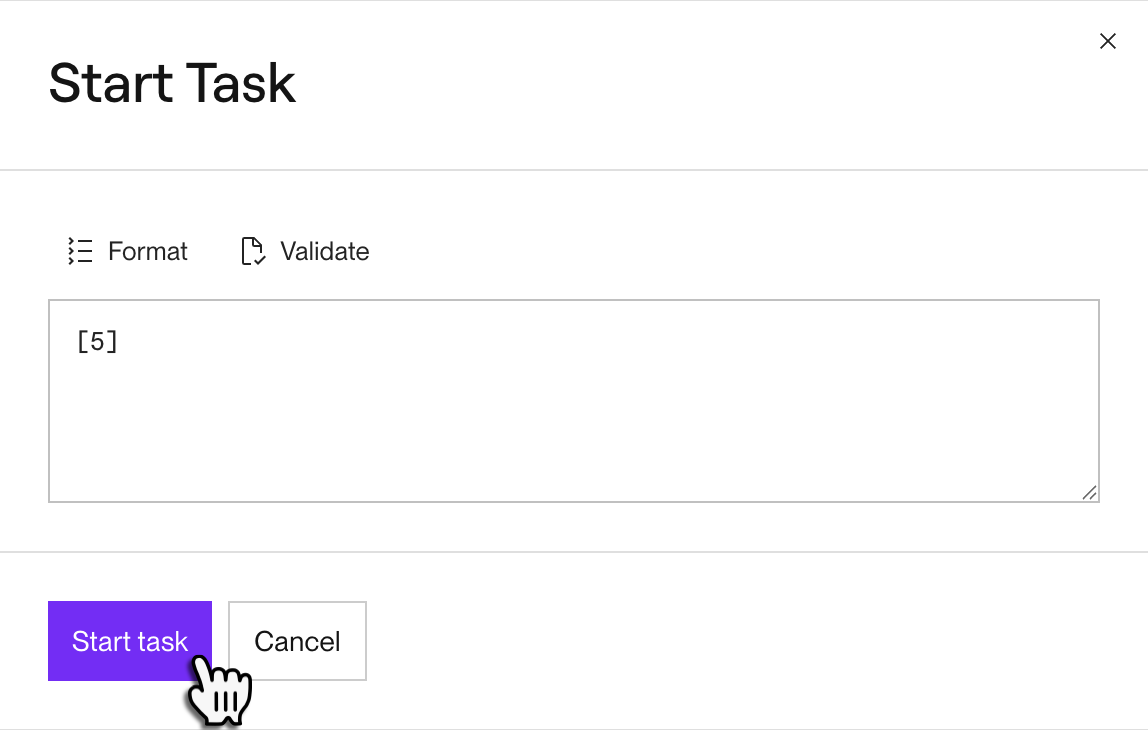
A dialog appears for providing the task's input arguments:
-
Provide the task's input arguments as a JSON array (e.g.,
[5]for a task that takes a single integer argument, or[]for a task that takes zero arguments). -
Click Start task.
Your new task run appears at the top of the Runs table.


Next steps
Congratulations! You've registered your first workflow task and triggered its first run. Now it's time to start designing your own tasks and triggering runs from application code:
- Define advanced tasks with retries, chaining, and more.
- Trigger task runs from your application code.
- Test task runs locally for faster development.
Using Docker
You can optionally build your workflow service from a Dockerfile. As with other Render service types, this is useful if you need to install libraries or perform build-time operations that aren't supported by Render's native language runtimes.
During 4. Create a workflow service, note the following changes:
- Set the Language field to Docker.
- You do not provide a Build Command (the field is hidden entirely for Docker-based workflows).
- Set your service's Start Command to the command that Render should use to start your workflow (e.g.,
npm startorpython main.py).- This field is currently always required, even if your Dockerfile defines a
CMD/ENTRYPOINTdefault.
- This field is currently always required, even if your Dockerfile defines a
- Specify your Dockerfile Path if the Dockerfile isn't in your repo's root directory.
Docker-specific limitations
We'll address these limitations in future releases:
- Workflows do not currently support pulling a prebuilt Docker image from a container registry.
- It is not currently possible to create a Docker-based workflow service using the Render CLI or API (Dashboard only).
- Docker-based workflows do not currently support local execution using the Render CLI's task server.