Create and Connect to Render Postgres
Migrating a large database from Heroku?
The Render team can help you orchestrate your migration to minimize downtime, even for apps with multi-terabyte databases.
Render Postgres databases provide fully managed, scalable storage of relational data.
All paid Render Postgres databases provide point-in-time recovery and on-demand logical exports. Larger instances support read replicas and high availability for improved performance and reliability.
Quickstarts
Here are a few Render quickstarts that include a Render Postgres database as part of their application stack:
Create your database
-
Go to dashboard.render.com/new/database, or click + New > Postgres in the Render Dashboard.
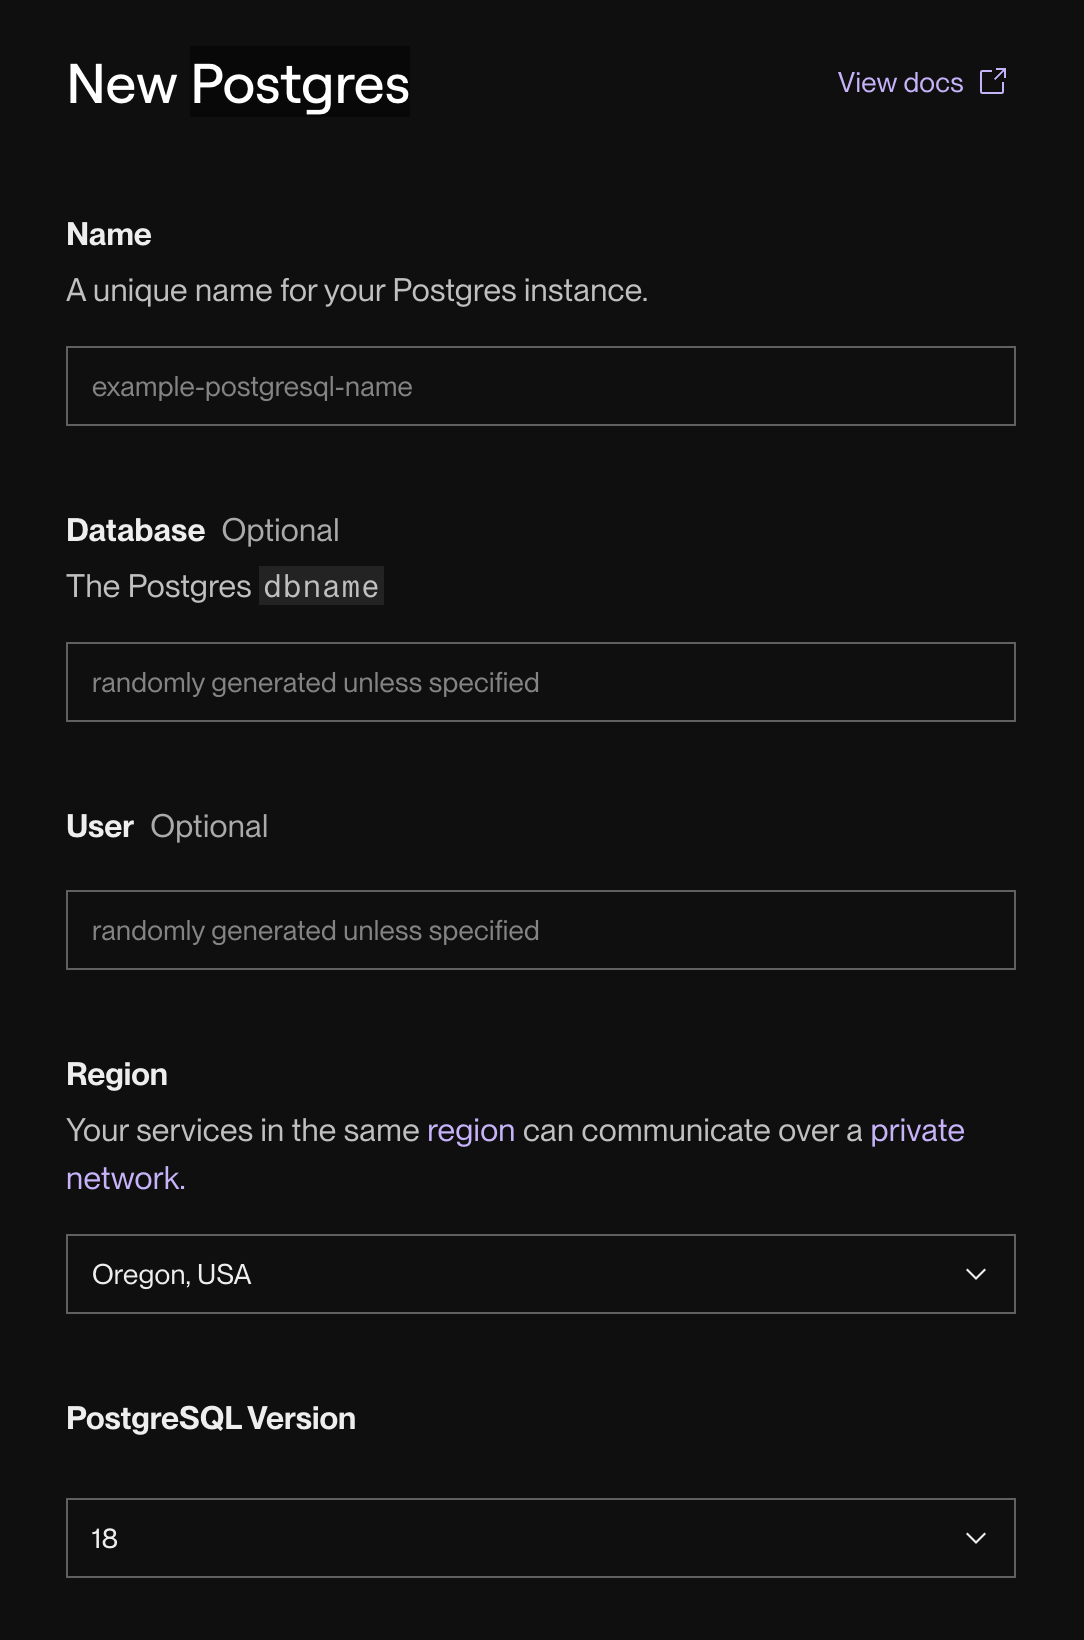
This form appears:
-
Provide a helpful Name for your database.
- You can change this value at any time.
-
Optionally fill in the Database and/or User fields if you want to set your PostgreSQL
dbnameand/or username.- Render generates values for either of these that you don't specify.
- You can't change these values after creating your database.
-
Choose a Region to run your database in.
- Choose the same region as your services that will connect to the database. This minimizes latency and enables communication over your private network.
-
Optionally change the PostgreSQL Version if you want to use an older version.
- Major versions 13 through 18 are available for all new instances.
- Versions 11 and 12 are available for workspaces that have at least one existing database on the corresponding version.
-
Scroll down and select a compute plan for your database. This determines its available CPU and RAM.
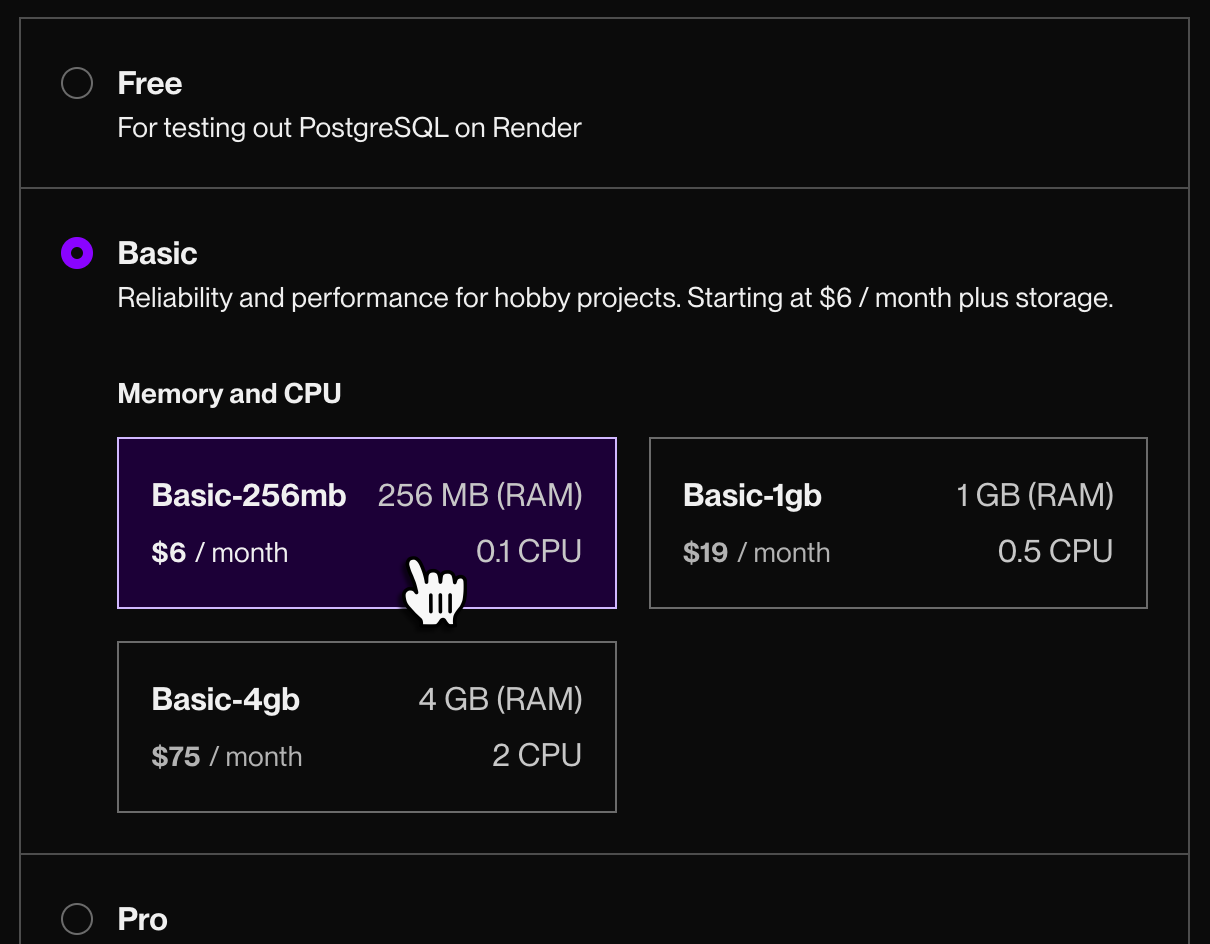
You can change your compute plan later.
-
Scroll down and set your database's initial storage, in GB.
- You can specify 1 GB or any multiple of 5 GB.
- You can increase your storage later, but you can't decrease it.
-
Optionally enable Storage Autoscaling.
- Whenever your database is 90% full, Render automatically increases its storage by 50%, rounded up to the nearest multiple of 5 GB. You can't reduce storage after increasing it. Learn more.
-
Click Create Database.

You're all set! Your new database's status updates to Available in the Render Dashboard when it's ready to use.
1. Install the CLI
Use any of the following methods to install the Render CLI or upgrade to the latest version:
Homebrew installation
Run the following commands:
WinGet installation
Run the following command:
Installing with curl
Run the following command:
Direct download
- Open the CLI's GitHub releases page.
- Download the executable that corresponds to your system's architecture.
If you use an architecture besides those provided, you can build from source instead.
Building from source
We recommend building from source only if no other installation method works for your system.
-
Install the Go programming language if you haven't already.
-
Clone and build the CLI project with the following commands:
After installation completes, open a new terminal tab and run render with no arguments to confirm.
2. Create your database
Run render pg create to walk through an interactive wizard:
To skip the wizard, provide flags directly. For example:
Supply the following options to configure your database:
| Option | Description |
|---|---|
|
|
A name for your database. You can change this value at any time. |
|
|
Optionally set the PostgreSQL You can't change this value after creating your database. |
|
|
Optionally set the PostgreSQL username. Render generates a value if you don't specify one. You can't change this value after creating your database. |
|
|
The region to create the database in. Choose the same region as your connecting services to minimize latency and enable communication over your private network. |
|
|
Optionally specify a PostgreSQL version. Defaults to the latest supported version (18).
|
|
|
Specify a compute plan to determine your database's available RAM, CPU, and connection limit. |
|
|
Set your database's initial storage in GB.
|
|
|
Optionally enable storage autoscaling. |
For the full list of options, see the pg create reference.
You're all set! After successfully running the command, the Render CLI returns your new database's details.
Using the Render API, make a request to the Create Postgres instance endpoint.
Connect to your database
Every Render Postgres database has two different URLs for incoming connections:
- An internal URL for connections from your other Render services hosted in the same region
- An external URL for connections from everything else
Use the internal URL wherever possible. It minimizes query latency by enabling communication over your private network.
Both URLs are available from the Connect menu in the top-right corner of your database's page in the Render Dashboard:

You can fetch your database's connection details and credentials using render pg get with the --include-sensitive-connection-info flag:
For more options, see the pg get reference.
Use the Retrieve Postgres connection info API endpoint to retrieve your database's connection details.
How you connect to your database depends on your code: some frameworks expect a single connection string or URL in an environment variable, while others need multiple connection parameters in a configuration file. See Quickstarts for examples.
At a minimum, your app needs to know your database's hostname, port, username, password, and database name (such as mydb in the official PostgreSQL tutorial).
Render Postgres uses the default PostgreSQL port 5432. You can usually leave this port unspecified.
Internal connections
To use the internal URL, your connecting service and your database must belong to the same account and region.
Wherever possible, connect to your database using its internal URL. Internal connection details are available on your database's Info page in the Render Dashboard:
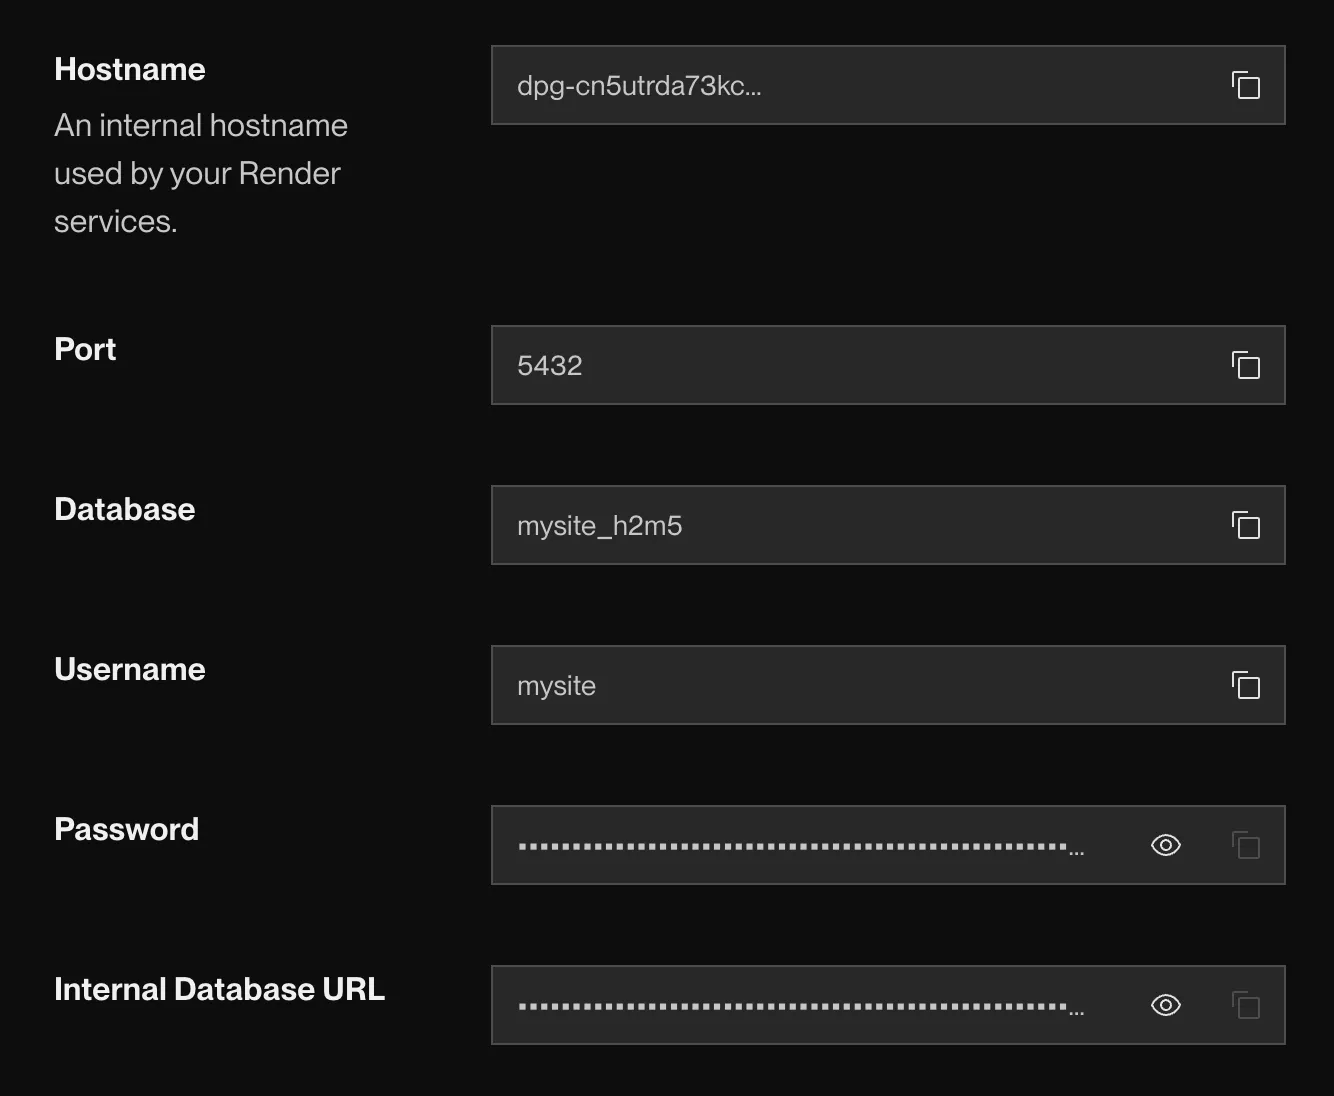
You can view both individual details and the assembled internal URL, which has the following format:
Use whichever format your framework expects for database credentials.
SSL modes for internal connections
Internal connections optionally support TLS using self-signed certificates.
Because these certificates are self-signed, internal connections do not support sslmode=verify-ca or sslmode=verify-full. To require TLS and prevent plaintext fallback, set sslmode=require.
For more details on sslmode, see the PostgreSQL documentation.
External connections
External URL connections are slower because they traverse the public internet.
To minimize latency, use your database's internal URL when connecting from a Render service running in the same region.
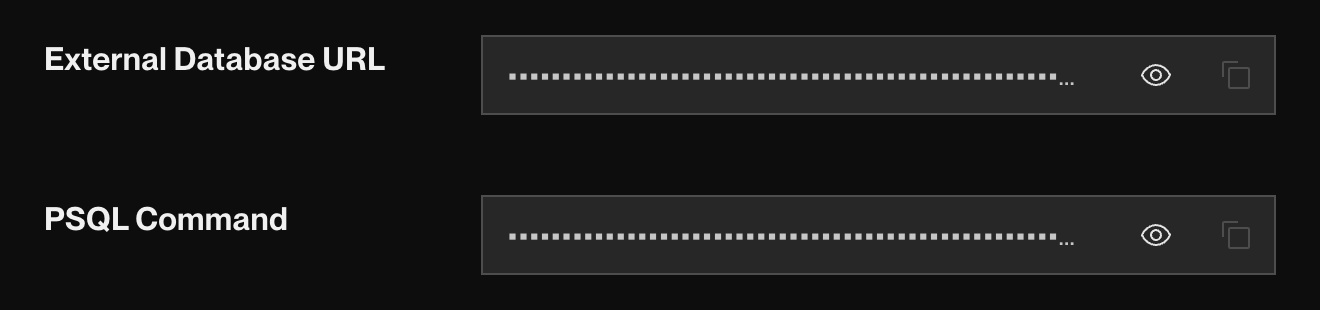
Tools and systems outside of Render can connect to your database via its external URL, available from its Info page in the Render Dashboard:

Most database clients understand the external URL, which has the following format:
You can also run the provided PSQL Command directly in your terminal to start a psql session.
External connections to your database are always encrypted in transit using Render-managed TLS certificates. Render rejects external connections that set sslmode=disable. Set sslmode=require to require TLS.
Common external connection issues
"FATAL: No SNI information found"
Make sure your PostgreSQL client always connects using your database's full external connection URL, not an IP address that the hostname resolved to during a previous connection attempt.
TLS handshake errors
Confirm that your PostgreSQL client supports TLS version 1.2 or higher, and that it supports any of the following cipher suites:
Click to show
TLS_AES_128_GCM_SHA256TLS_AES_256_GCM_SHA384TLS_CHACHA20_POLY1305_SHA256TLS_ECDHE_RSA_WITH_AES_128_GCM_SHA256TLS_ECDHE_RSA_WITH_CHACHA20_POLY1305_SHA256TLS_ECDHE_RSA_WITH_AES_256_GCM_SHA384
Restricting external access
These rules apply only to connections that use your database's external URL.
Your Render services in the same region as your database can always connect using your database's internal URL.
By default, your Render Postgres instance is accessible from any IP address (if the connection uses valid credentials). You can modify this default behavior by restricting access to a set of IPs or even disabling external access entirely.
In the Render Dashboard, go to your database's Info page and scroll down to the Networking section:
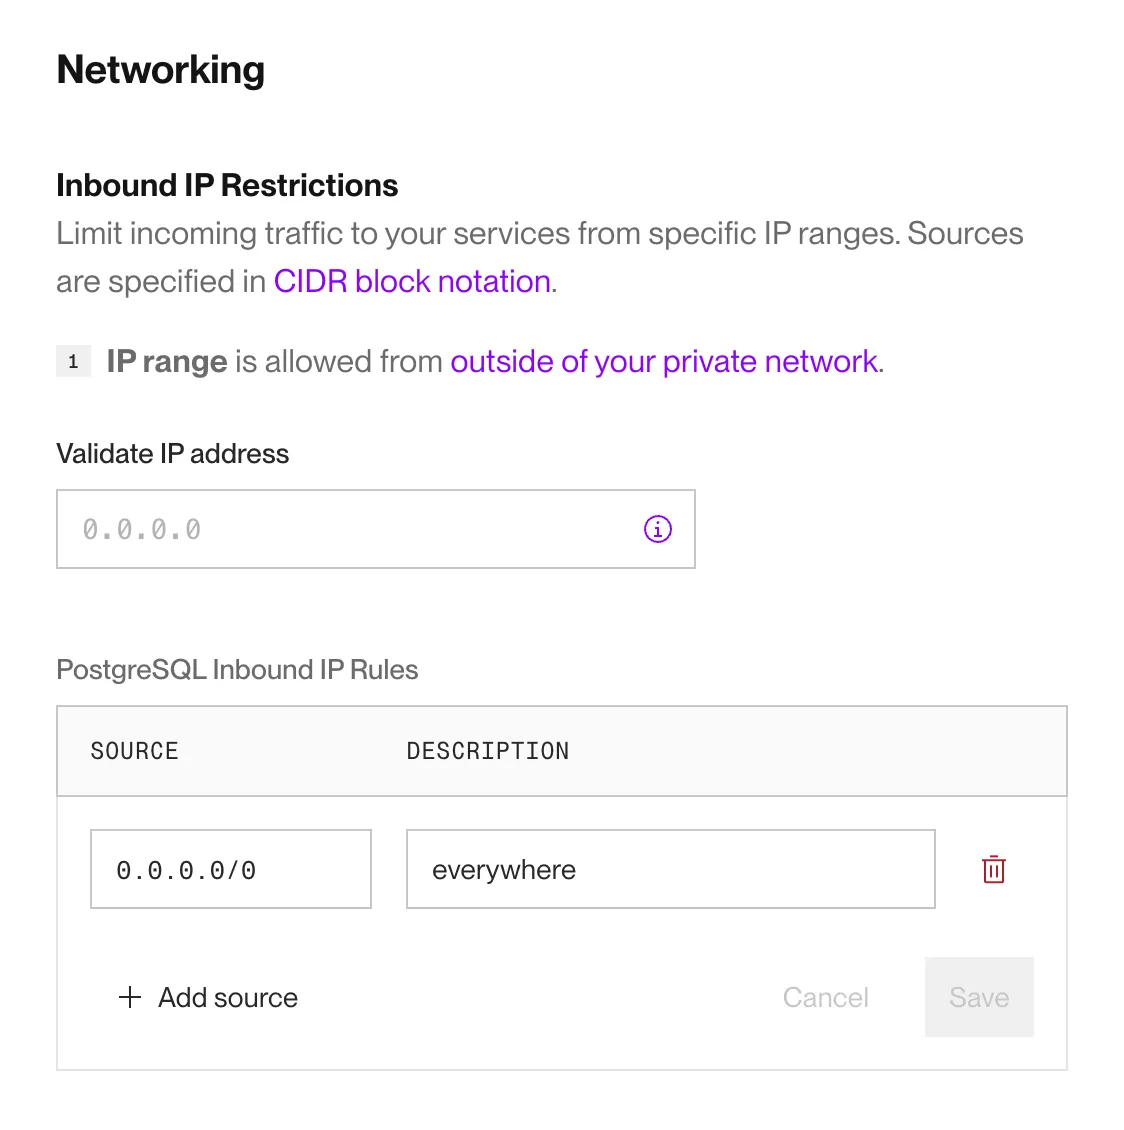
You can specify IP address blocks using CIDR notation. The default block is 0.0.0.0/0, which allows access from any IP address.
Set your database's IP allow list using the render pg update command with the --ip-allow-list flag:
Passing --ip-allow-list to this command replaces your database's existing IP allow list.
Make sure to include all address blocks you want to allow, including any existing blocks.
- Repeat the flag for each address block you want to allow.
- Provide IP address blocks in CIDR notation.
To completely disable external access to your database, use the --clear-ip-allow-list flag:
For more options, see the pg update reference.
Use the Update Postgres instance API endpoint. Provide IP address blocks in CIDR notation in the ipAllowList parameter.
Connection limits
Your database's maximum number of simultaneous connections depends on its compute plan's total memory (RAM):
| Memory | Max Connections |
|---|---|
|
< 8 GB | 100 connections |
|
8 GB <= memory < 16 GB | 200 connections |
|
16 GB <= memory < 32 GB | 400 connections |
|
>= 32 GB | 500 connections |
If you're approaching your connection limit, consider upgrading your compute plan or implementing connection pooling.
Databases on a legacy instance type support fewer connections:
View legacy instance connection limits
| Memory | Max Connections |
|---|---|
|
<= 6 GB | 97 connections |
| Between 6 GB and 10 GB | 197 connections |
|
>= 10 GB | 397 connections |
You can move your database to a flexible plan by changing its compute plan.
Adding storage
You set your database's initial storage during creation. Any time after that, you can increase your database's storage to any higher multiple of 5 GB, up to 16 TB.
Need more than 16 TB of storage?
Please contact support in the Render Dashboard.
You can increase storage automatically or manually.
Note the following:
- After you increase a database's storage, you can't increase it again for 6 hours.
- It is not possible to reduce a database's storage.
- Databases on a legacy instance type have a fixed storage capacity.
- You can move your database to a flexible plan by changing its compute plan.
Storage autoscaling
You can automatically add storage to your database whenever it's running low. With storage autoscaling enabled, Render detects when your database is 90% full and permanently increases its storage by 50%, rounded up to the nearest multiple of 5 GB.
Here are some example increases:
| Original Storage | New Storage |
|---|---|
| 1 GB | 5 GB |
| 10 GB | 15 GB |
| 25 GB | 40 GB |
Enable storage autoscaling with any of the following methods:
Dashboard
From your database's Plan page in the Render Dashboard, scroll down to the Storage Autoscaling section and toggle the switch:

CLI
Enable storage autoscaling using the render pg update command with the --disk-autoscaling flag:
To disable autoscaling:
For more options, see the pg update reference.
API
Use the Update Postgres instance API endpoint. Set the enableDiskAutoscaling parameter to true.
That's it! Render will automatically add storage to your database whenever it's 90% full.
Increasing storage manually
Manually add storage to your database with any of the following methods:
Dashboard
-
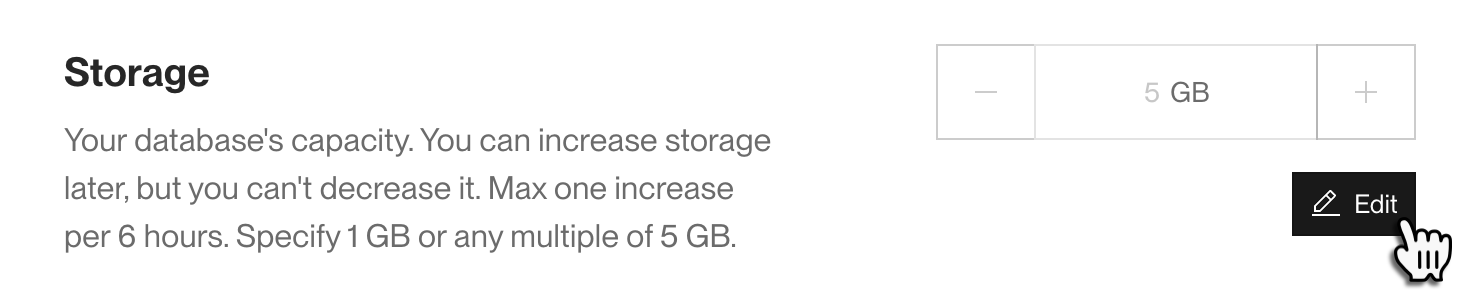
From your database's Plan page in the Render Dashboard, scroll down to the Storage section and click Edit:
-
Specify any multiple of 5 GB greater than the current storage capacity.
-
Click Save.

That's it! The additional storage becomes available within a minute or two.
CLI
Increase your database's storage using the render pg update command with the --disk-size-gb flag:
Provide any multiple of 5 GB greater than the current storage capacity.
For more options, see the pg update reference.
API
Use the Update Postgres instance API endpoint. Provide the new value in the diskSizeGB parameter.
Provide any multiple of 5 GB greater than the current storage capacity.
Running out of storage
If your database exceeds its storage limit, it becomes unhealthy. Render automatically suspends the database to prevent data loss or other unexpected behavior.
To restore your database:
-
In the Render Dashboard, scroll to the bottom of your database's Info page and click Resume Database.
-
Wait a minute or two for the database to finish resuming.
-
Follow the steps to manually add storage capacity.
- If you wait too long after resuming, Render will suspend your database again. In this case, return to step 1.
Your database will become healthy within a few minutes.
Changing your compute plan
You can change your Render Postgres database's compute plan, which determines its available CPU and RAM. View available compute plans.
Your database will be unavailable temporarily during the change.
- With high availability enabled, your database is unavailable for only a few seconds.
- Otherwise, it's unavailable for a few minutes.
Schedule your change during off hours to minimize user impact.
-
From your database's Plan page in the Render Dashboard, scroll down to the Compute section and click Edit.
-
Select a new compute plan from the list.
- If your database currently uses a legacy instance type, you won't be able to move back to a legacy instance type after changing.
-
Click Save.
That's it! Your new instance will be available within a few minutes.
Change your database's compute plan using the render pg update command with the --plan flag:
If your database currently uses a legacy instance type, you won't be able to move back to a legacy instance type after changing.
For more options, see the pg update reference.
Use the Update Postgres instance API endpoint. Provide the new plan in the plan parameter.
If your database currently uses a legacy instance type, you won't be able to move back to a legacy instance type after changing.
Adding multiple databases to a single instance
You can create additional databases in your Render Postgres instance with the following steps:
-
In your terminal, open a psql session to your instance using the PSQL Command provided in the Render Dashboard:
-
Run
CREATE DATABASE <name>, providing the name for your new database.
You're all set! Use your instance's same internal and external URLs to connect, except substitute your new database's name as the final component:
Encryption
Render Postgres databases are encrypted at rest using AES-256 data encryption. This encryption applies to both primary and replica instances, along with all backups.
- External connections to your database are always encrypted using Render-managed TLS certificates.
- Internal connections optionally support TLS encryption using self-signed certificates.
Metrics and logs
Dashboard
View a variety of metrics for your database (disk usage, active connections, etc.) from its Metrics page in the Render Dashboard:

For details, see Service Metrics.
Datadog
The Datadog integration provides additional metrics related to your PostgreSQL instance's host and disk. You can also use the Datadog UI to create dashboards and alerts for your database.
For details, see the Datadog integration docs.
Viewing slow query logs
Queries that take longer than 2 seconds are logged with a line that starts with duration: followed by the SQL statement. Here's an example:

Deleting your database
Render does not retain backups or snapshots of a deleted database instance!
Make sure to download any necessary backups before deleting your database.
You can delete a database instance in the Render Dashboard. Scroll down to the bottom of your database's Info page and click Delete Database.
Additional topics
See articles on the following: