Render MCP Server
Manage your Render resources from Claude Code, Codex, and Cursor.
Render's Model Context Protocol (MCP) server enables you to manage your Render infrastructure directly from compatible AI apps, such as Claude Code, Codex, and Cursor:
Using natural language prompts, you (and your agents) can:
- Create new services and redeploy existing ones
- Query your databases
- Analyze metrics and logs
...and more! For inspiration, see some example prompts.
What is MCP?
Model Context Protocol (MCP) is an open standard for connecting AI apps and agents to external tools and data. An MCP server exposes a set of actions that AI apps can invoke to help fulfill relevant user prompts (e.g., "Find all the documents I edited yesterday").
To perform an action, an MCP server often calls an external API, then packages the result into a standardized format for the calling application.
How it works
The Render MCP server is hosted at the following URL:
You can configure compatible AI apps (such as Claude Code, Codex, and Cursor) to communicate with this server. When you provide a relevant prompt, your tool intelligently calls the MCP server to execute supported platform actions:

In the example diagram above:
- A user prompts Cursor to "List my Render services".
- Cursor intelligently detects that the Render MCP server supports actions relevant to the prompt.
- Cursor directs the MCP server to execute the
list_services"tool", which calls the Render API to fetch the corresponding data.
To explore the implementation of the MCP server itself, see the open-source project:
Setup
1. Connect to the MCP server
The Render MCP server supports two authentication methods:
- OAuth (currently only supported for Claude Code, Codex, and Cursor)
- API key (for all other AI tools and non-interactive environments)
See instructions for each authentication method below:
OAuth grants access to all workspaces and services available to your account.
Before proceeding, make sure you're comfortable granting these permissions to your AI app. The Render MCP server supports potentially destructive operations, including modifying a service's environment variables and triggering deploys.
Select the tab for your app:
Claude Code setup
-
Run the following command:
-
Open Claude Code and run
/mcp. -
Select render, then choose Authenticate.
-
Complete the authorization flow in your browser to connect your Render account.
For more details, see the Claude Code MCP documentation.
Codex setup
-
Run the following command:
-
Complete the authorization flow in your browser to connect your Render account.
For more details, see the Codex MCP documentation.
Cursor setup
-
Open the following link in your browser to pre-fill the Render MCP server configuration in Cursor:
-
In Cursor, click Install to add the MCP server.
-
Click Connect next to the Render MCP server, and complete the authorization flow in your browser.
For more details, see the Cursor MCP documentation.
-
Create an API key from your Account Settings page:
Render API keys are broadly scoped. They grant access to all workspaces and services your account can access.
Before proceeding, make sure you're comfortable granting these permissions to your AI app. The Render MCP server currently supports only one potentially destructive operation: modifying an existing service's environment variables.
-
Configure your AI app to use Render's hosted MCP server. Most compatible apps define their MCP configuration in a JSON file (such as
~/.cursor/mcp.jsonfor Cursor).Select the tab for your app:
Claude Code setup
Run the following command, substituting your API key where indicated:
You can include the --scope flag to specify where this MCP configuration is stored. For more details, see the Claude Code MCP documentation.
Claude Desktop setup
Add the configuration below to your Claude Desktop MCP settings. By default, this file is located at the following paths based on your operating system:
- macOS:
~/Library/Application Support/Claude/claude_desktop_config.json - Windows:
%APPDATA%\Claude\claude_desktop_config.json
Replace <YOUR_API_KEY> with your API key.
For more details, see the Claude Desktop MCP documentation.
Codex setup
Add the following configuration to ~/.codex/config.toml:
Replace <YOUR_API_KEY> with your API key.
For more details, see the Codex MCP documentation.
Cursor setup
Add the following configuration to ~/.cursor/mcp.json:
Replace <YOUR_API_KEY> with your API key.
For more details, see the Cursor MCP documentation.
Jules setup
-
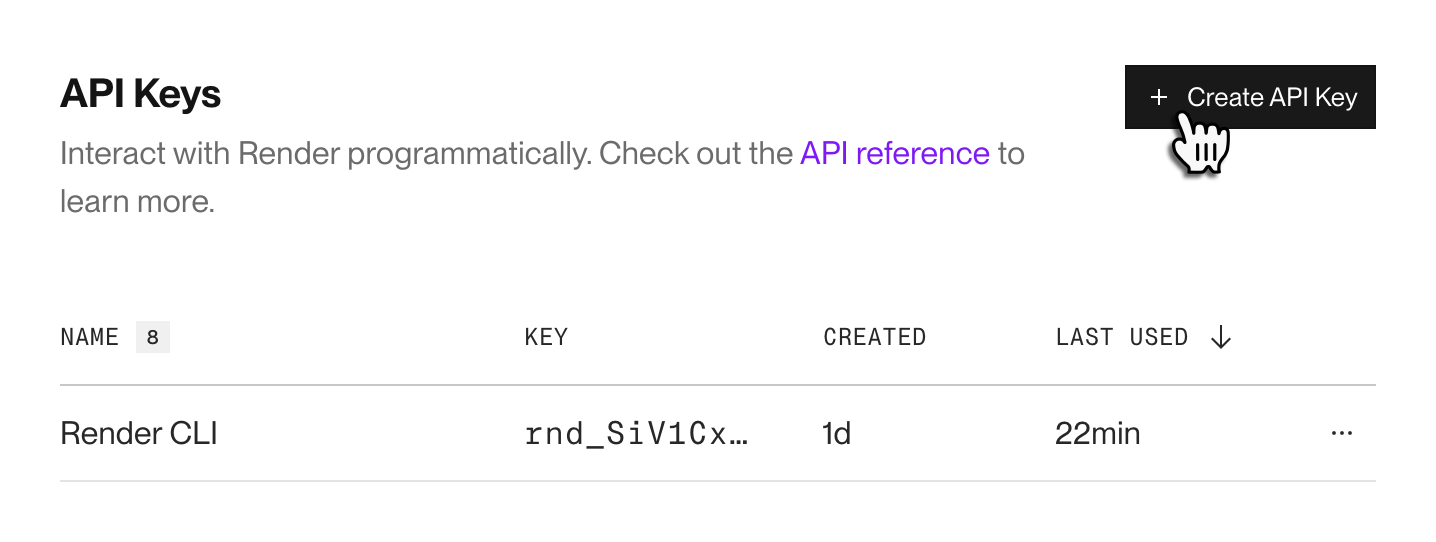
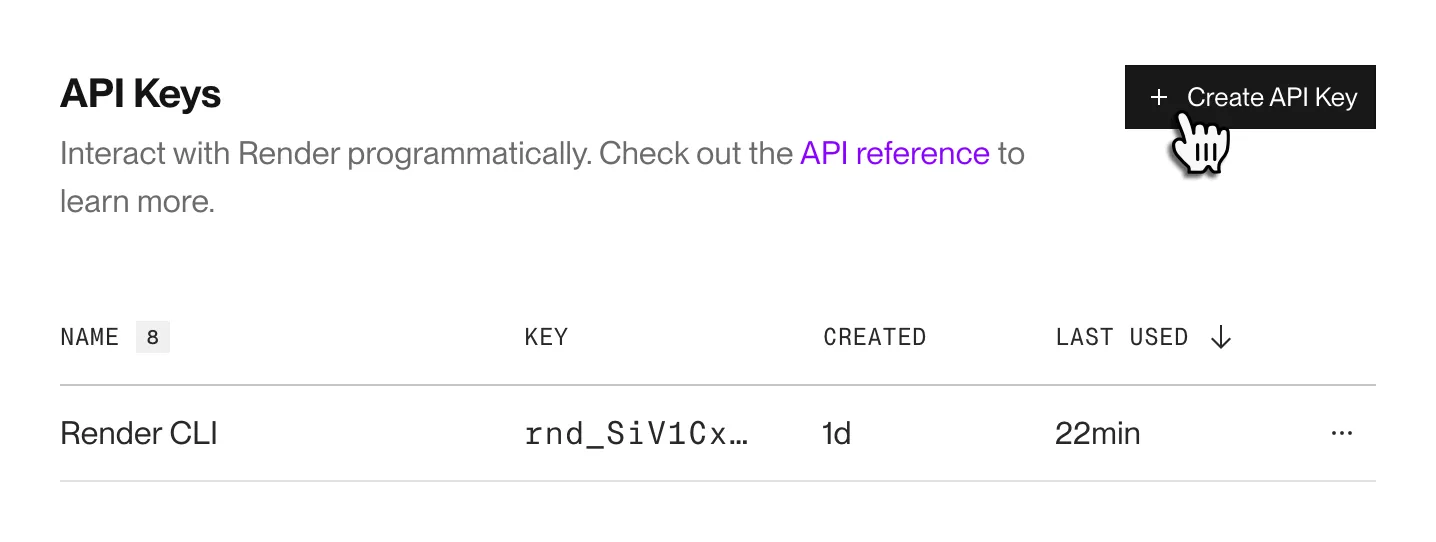
Go to dashboard.render.com/jules and create a Jules API key:

-
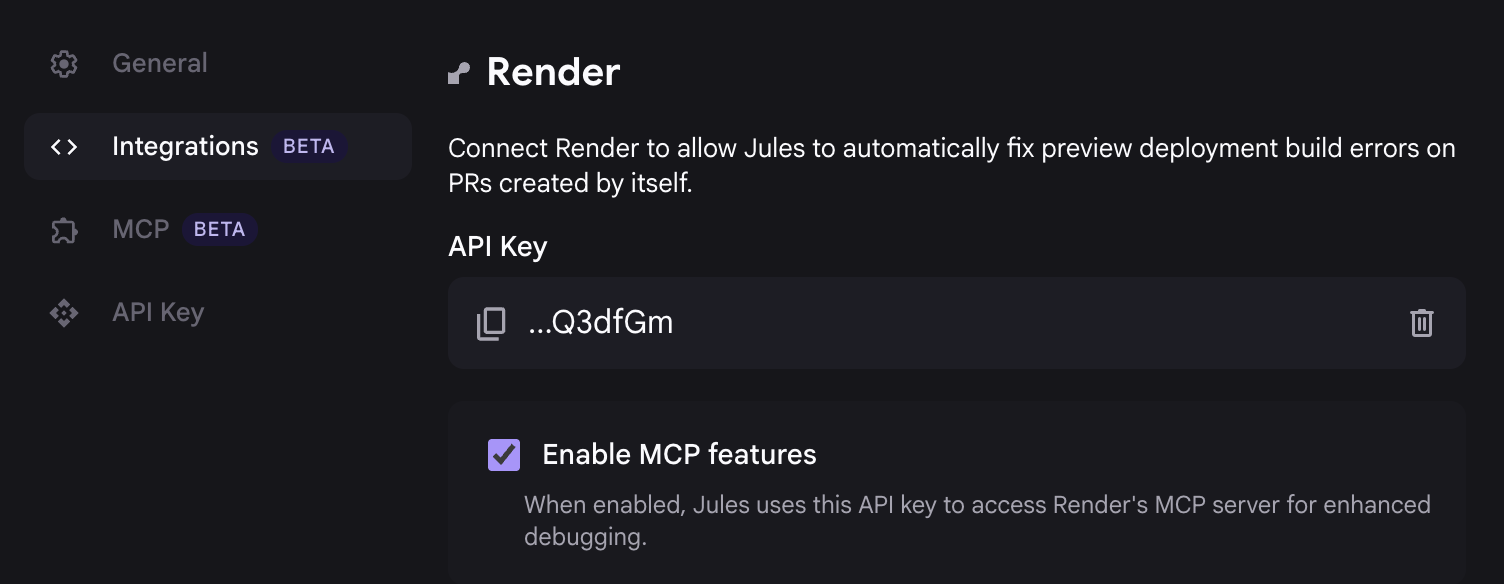
Open your Jules integration settings.
-
Under Render, paste your Jules API key and save the changes.
-
Confirm that Enable MCP features is checked:


Render's Jules integration can also monitor your service's pull requests and automatically push fixes to address issues. Learn more.
Windsurf setup
Add the following configuration to ~/.codeium/windsurf/mcp_config.json:
Replace <YOUR_API_KEY> with your API key.
For more details, see the Windsurf MCP documentation.
Setup for other apps
See the documentation for other popular AI apps:
2. Set your workspace
To start using the Render MCP server, you first tell your AI app which Render workspace to operate in. Each MCP server action is scoped to the selected workspace.
You can set your workspace with a prompt like:
Set my Render workspace to [WORKSPACE_NAME]

If you don't set your workspace, your app usually directs you to specify one if you submit a prompt that uses the MCP server (such as List my Render services):

With your workspace set, you're ready to start prompting! Get started with some example prompts.
Example prompts
Your AI app can use the Render MCP server to perform a wide variety of platform actions. Here are some basic example prompts to get you started:
Service creation
Create a new database named user-db with 5 GB storage
Deploy an example Flask web service on Render using https://github.com/render-examples/flask-hello-world
Deploys
Redeploy the API service and clear the build cache
Data analysis
Using my Render database, tell me which items were the most frequently bought together
Query my read replica for daily signup counts for the last 30 days
Service metrics
What was the busiest traffic day for my service this month?
What did my service's autoscaling behavior look like yesterday?
Troubleshooting
Pull the most recent error-level logs for my API service
Why isn't my site at example.onrender.com working?
Supported actions
The Render MCP server provides a "tool" for each platform action listed below (organized by resource type). Your AI app (the "MCP host") can combine these tools however it needs to perform the tasks you describe.
For more details on all available tools, see the project README.
| Resource Type | Supported Actions |
|---|---|
|
Workspaces |
|
|
Services |
|
|
Deploys |
|
|
Logs |
|
|
Metrics |
|
|
Render Postgres |
|
|
Render Key Value |
|
Running locally
We strongly recommend using Render's hosted MCP server instead of running it locally.
The hosted MCP server automatically updates with new capabilities as they're added. Run locally only if required for your use case.
You can install and run the Render MCP server on your local machine as a Docker container, or by running the executable directly:
Docker setup
This method requires docker.
With this configuration, your AI app pulls and runs the Render MCP server as a Docker container.
Add JSON with the format below to your tool's MCP configuration (substitute <YOUR_API_KEY> with your API key):
The mcpServers key above might differ for specific tools. For example, Zed uses context_servers and GitHub Copilot uses servers. Consult your tool's documentation for details.
Local executable setup
With this configuration, your AI app runs the Render MCP server executable directly.
-
Install the MCP server executable using one of the methods described in Local installation, then return here.
-
Add JSON with the format below to your tool's MCP configuration (substitute your API key and the path to your MCP server executable):
The
mcpServerskey above might differ for specific tools. For example, Zed usescontext_serversand GitHub Copilot usesservers. Consult your tool's documentation for details.
Local installation
Follow these instructions only if you're running the MCP server locally and without Docker.
We strongly recommend instead using Render's hosted MCP server, because it automatically updates as new capabilities are added.
View installation methods
This method requires macOS or Linux.
-
Run the following
curlcommand: -
Note the full path where the install script saved the downloaded executable. The output includes a message like the following:
-
Open the MCP server's GitHub releases page.
-
Under the most recent release, download and unzip the executable that corresponds to your system's architecture.
- If a release asset isn't available for your architecture, select a different installation method.
-
Move the executable to the desired directory and note its full path.
Note for macOS users:
You might need to grant a system exception to run the downloaded executable, because it's from an "unknown developer." Learn more.
We recommend building from source only in the following cases:
- No other installation method works for your system.
- You're making custom changes to the MCP server.
-
Install the Go programming language if you haven't already.
-
Clone the MCP server repository and build the executable:
This creates a
render-mcp-serverexecutable in the repo's root directory. -
Note the full path to the newly built executable.
Limitations
The Render MCP server attempts to minimize exposing sensitive information (like connection strings) to your AI app's context. However, Render does not guarantee that sensitive information will not be exposed. Exercise caution when interacting with secrets in your AI app.
Note the following additional limitations:
-
The MCP server supports creation of the following resources:
- Web services
- Static sites
- Cron jobs
- Render Postgres databases
- Render Key Value instances
Other service types are not yet supported.
-
The MCP server does not support all configuration options when creating services.
- For example, you cannot create image-backed services or set up IP allowlists. If there are options you'd like to see supported, please submit an issue on the MCP server's GitHub repository.
-
The MCP server supports limited changes to existing Render resources:
- You can trigger a new deploy for a service, optionally clearing the build cache.
- You can modify an existing service's environment variables.
- To perform other modifications or deletions, use the Render Dashboard or REST API.
-
The MCP server does not support modifying scaling settings or other operational service controls.