Private Link Connections
Securely connect your Render infrastructure to AWS-hosted cloud services.
Private links require a Pro workspace plan or higher.
For details, see the pricing page.
You can create same-region private links in your workspace to securely connect your Render services to AWS-hosted providers:

Use a private link to connect to:
- AWS-hosted providers like Snowflake or MongoDB Atlas
- Resources in your own AWS VPC, such as an EC2 instance or an Aurora database
Pricing for private links
Always confirm the latest pricing on the pricing page.
Render applies an additional charge of $30 per month to workspaces with private links. This charge covers support for up to three private links. If you require additional private links, please contact us.
If your workspace consumes all of its monthly included outbound bandwidth, then additional bandwidth over a private link connection is billed at a rate of $0.03 per GB. This rate is significantly lower than the rate for bandwidth over the public internet ($0.15 per GB).
Setup
Creating a private link requires setup both in the Render Dashboard and with the provider you're linking to:
1. Render
-
Open the Render Dashboard.
-
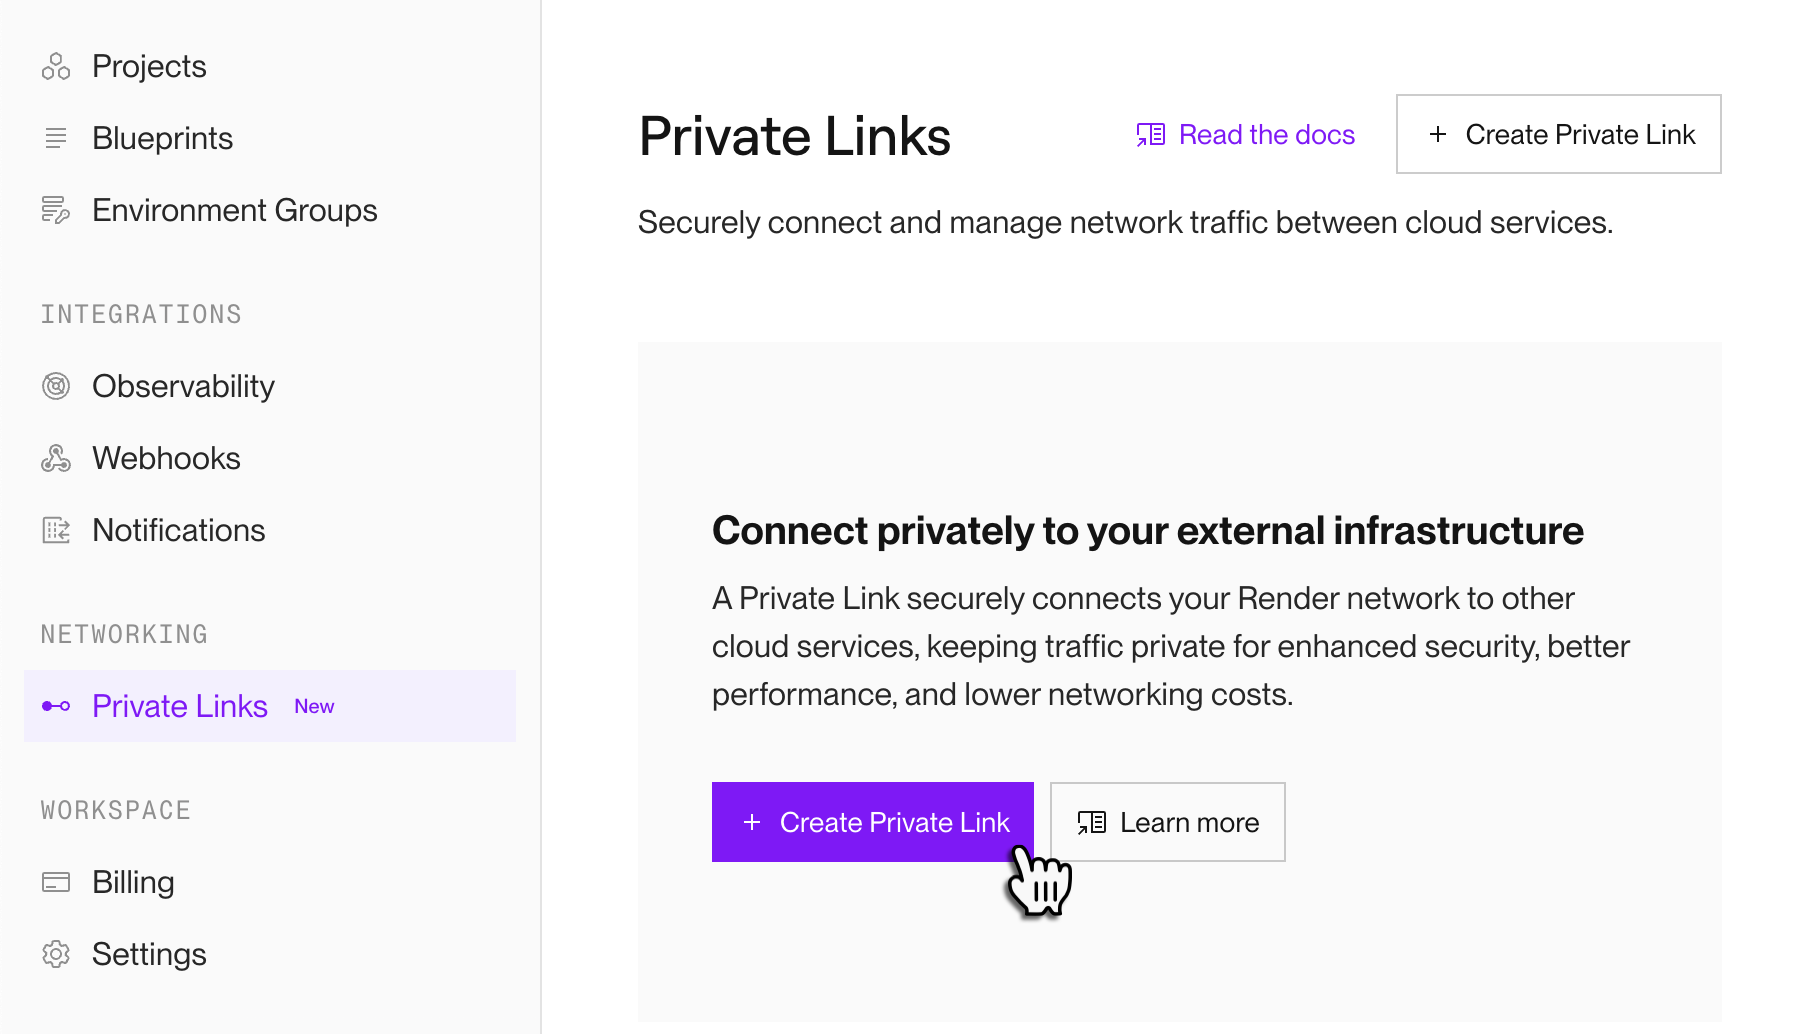
From your workspace home, select Private Links in the left pane.
-
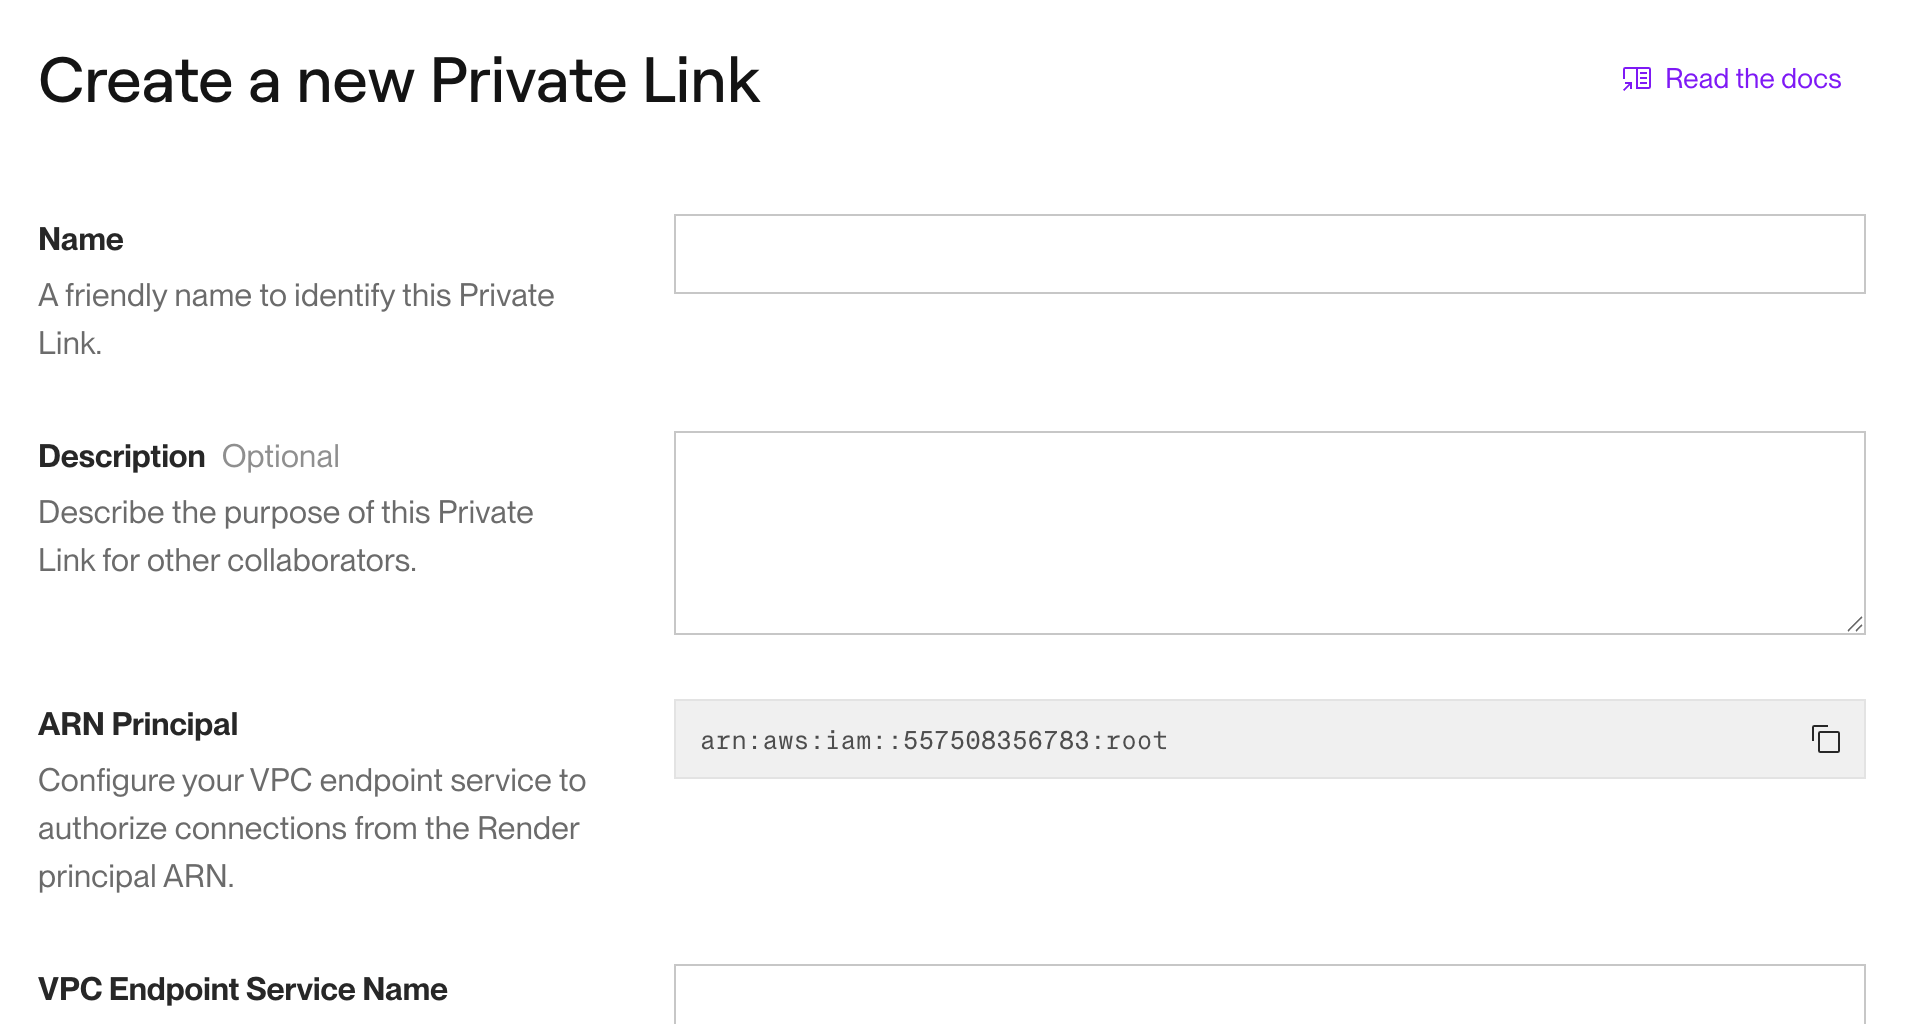
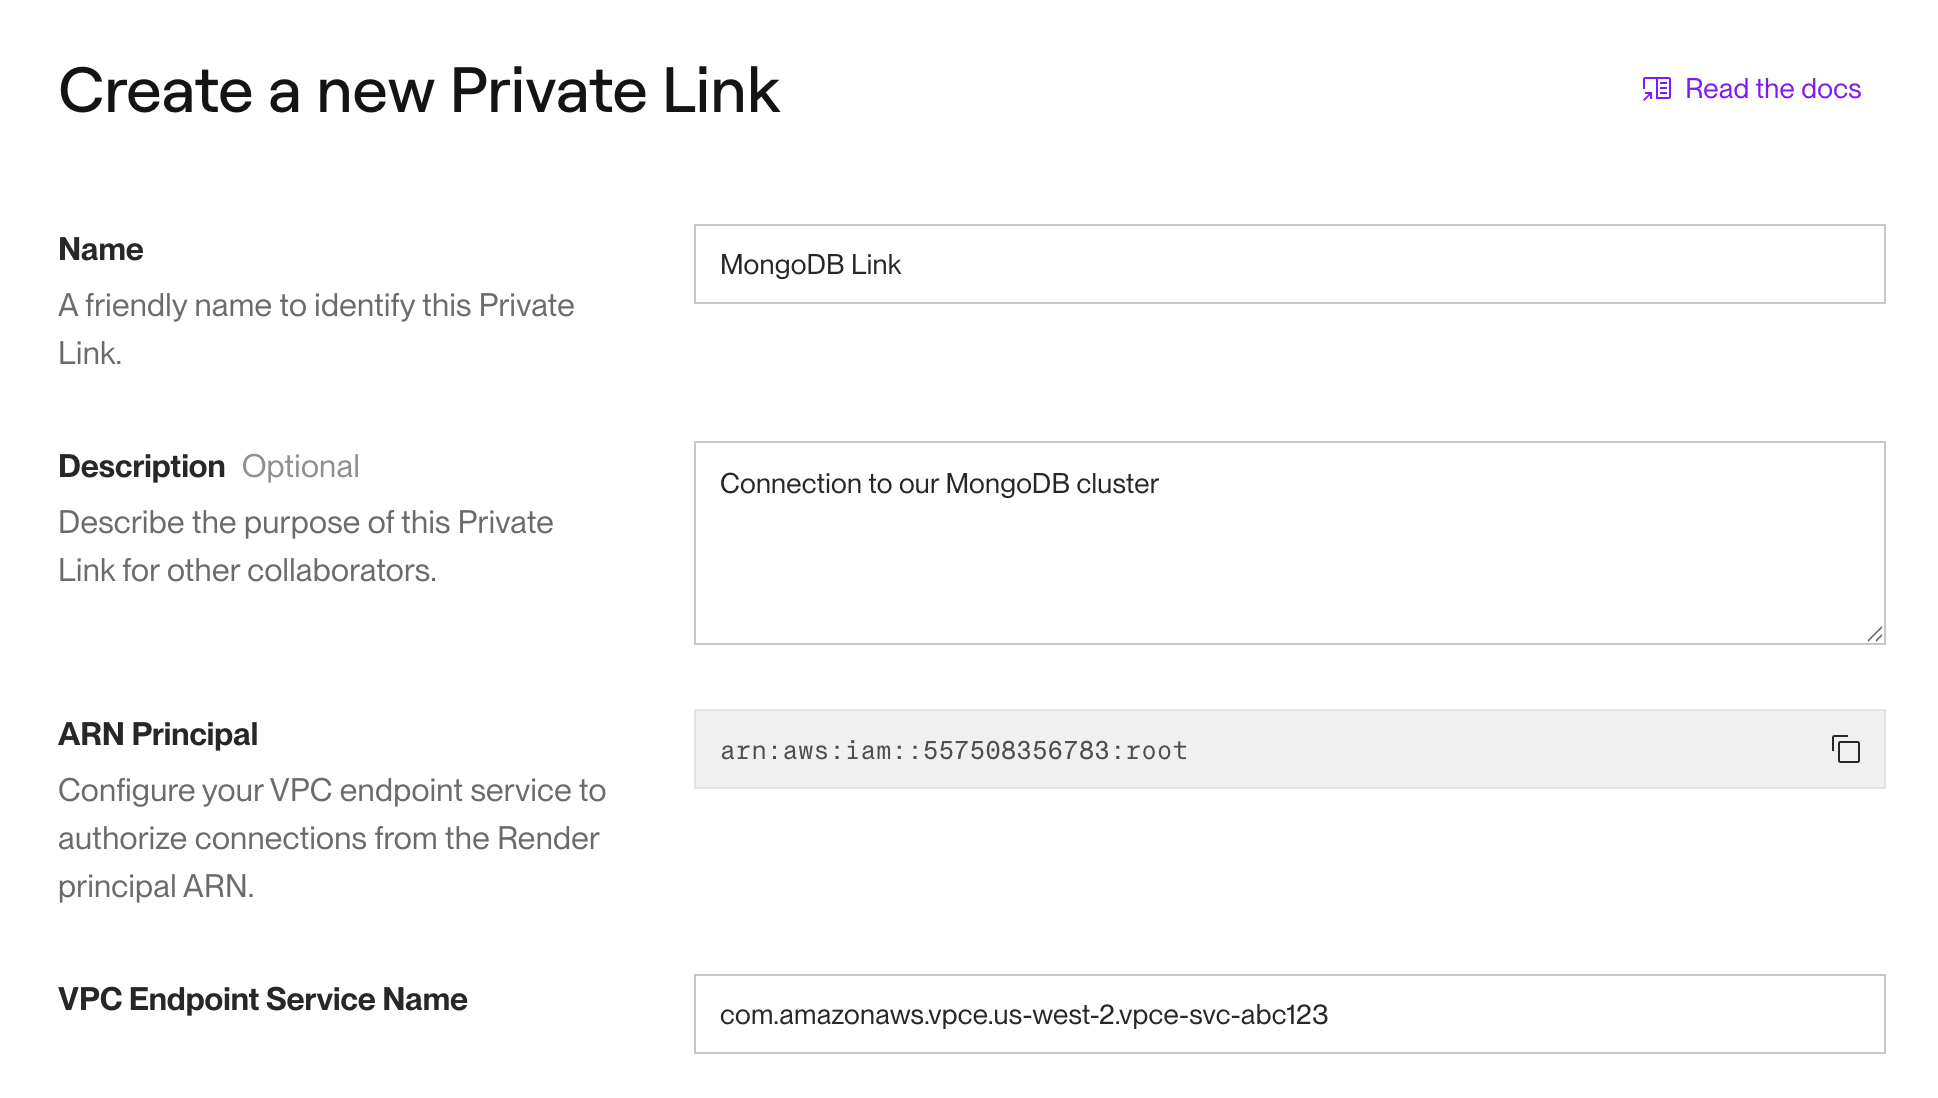
Click Create Private Link. The creation form appears:
-
Copy the value of the ARN Principal field.
- Some systems use this value to authorize the incoming private link connection.


2. External provider
-
Open your provider's dashboard.
-
Create a VPC endpoint service in the same region as the resource you're linking to.
This process varies by provider. See guidance for popular providers in the tabs below:
MongoDB Atlas
Your MongoDB Atlas cluster must be hosted on AWS.
-
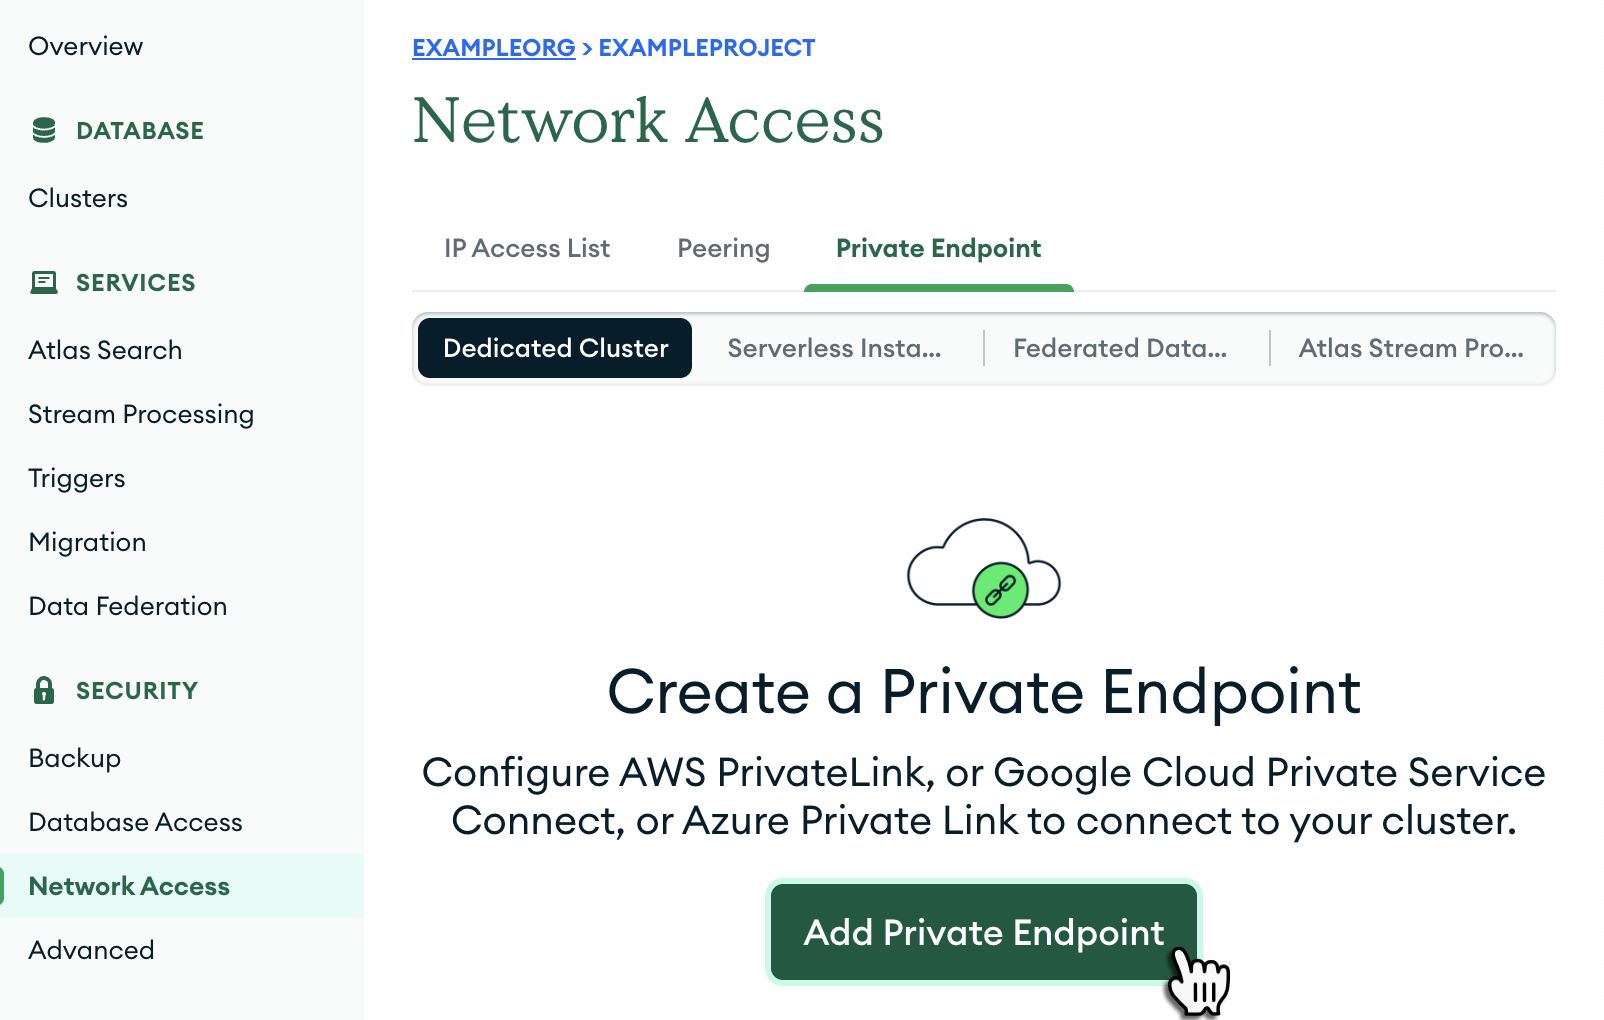
In the Atlas UI, select the project containing your cluster and open its Network Access page.
-
Select the Private Endpoint tab:
-
Click Add Private Endpoint.
The endpoint creation dialog appears.
-
Under Cloud Provider:
- Select AWS.
- Select the same region where your cluster is hosted.
-
Under Interface Endpoint, wait for your endpoint service to become ready:

-
Close the endpoint creation dialog (you'll finish configuring the endpoint later).
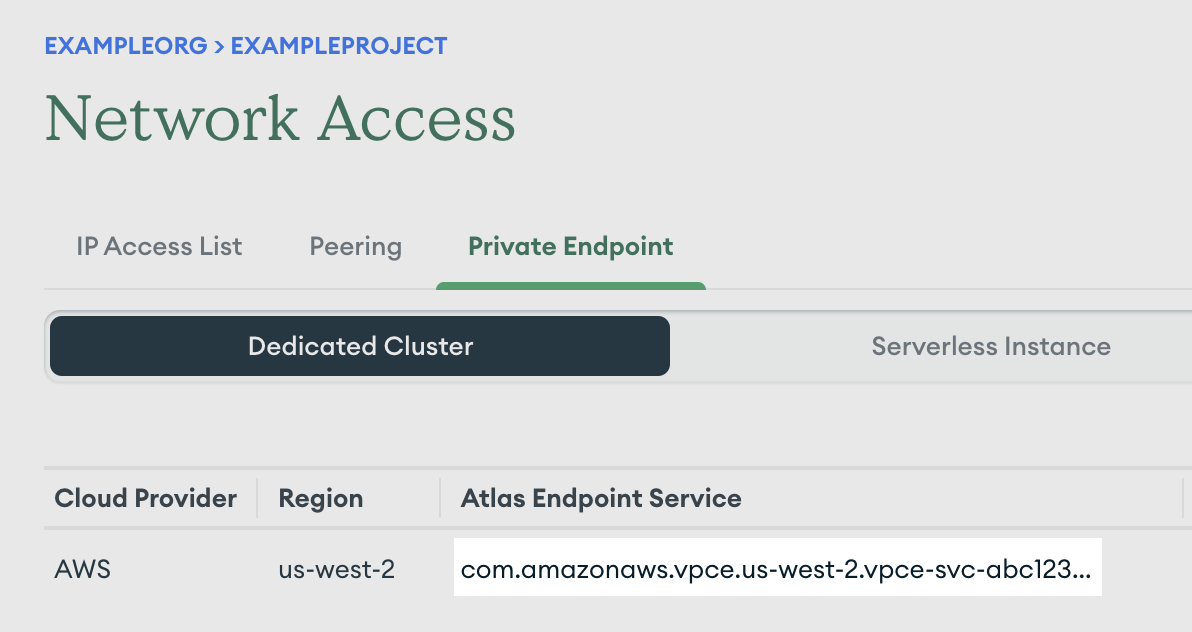
Your new endpoint appears in the Private Endpoint tab:
-
Copy your new endpoint's Atlas Endpoint Service value.
You'll provide this value to Render in the next step.


Snowflake
As described in the Snowflake documentation, authorizing a managed cloud service like Render first requires contacting Snowflake support.
In your message to Snowflake support:
-
Request a VPC endpoint service in the same AWS region as your Snowflake database.
-
Provide the ARN Principal value you copied in the Render Dashboard.
-
Request the name of the created VPC endpoint service. The service name resembles the following:
You'll provide the endpoint service name to Render in the next step.
Also complete any additional actions indicated by Snowflake support.
Self-managed VPC (EC2, Aurora, etc.)
-
Follow the steps in the AWS documentation to create an endpoint service in your VPC.
- To simplify connecting later, disable the Require acceptance for endpoint option.
- Your private link will only be able to access resources that are registered to the network load balancer (NLB) you apply to your endpoint service.
-
Follow the steps in the AWS documentation to allow a principal for your endpoint service.
- Provide the ARN Principal value you copied in the Render Dashboard.
- By adding an allowed principal this way, your endpoint service rejects connections from other principals.
-
Copy the name of your new endpoint service. This value resembles the following:
You'll provide this value to Render in the next step.
Crunchy Bridge
Your Crunchy Bridge cluster must be hosted on AWS, in the same region as your Render services.
-
Open the Crunchy Bridge dashboard and select your cluster.
-
Open the Networking tab.
-
Click Set Up Private Link, then Enable Private Link.
-
Under Settings, copy the VPC endpoint service name. This value resembles the following:
You'll provide this value to Render in the next step.
3. Render
-
Return to the private link creation form in the Render Dashboard:
-
Provide a Name and Description for your private link.
- These values are for your team's reference only.
-
Provide the VPC Endpoint Service Name you obtained from your provider.
This value resembles the following:
The Region field automatically populates based on the provided value.
-
Under Access Policy, choose either Allow All or Limit to Selected Environments:
Access Policy Description Allow All
All of your services hosted in the same region as the private link can access it.
Limit to Selected Environments
You specify which of your project environments can access the private link.
A service can access the private link if both of the following are true:
- The service belongs to one of the selected environments.
- The service is hosted in the same region as your private link.
You can't add or remove environments after creating a private link.
To change environment access, you must delete and recreate the private link.
-
Click Create Private Link.
Your browser redirects to your private link's details page:
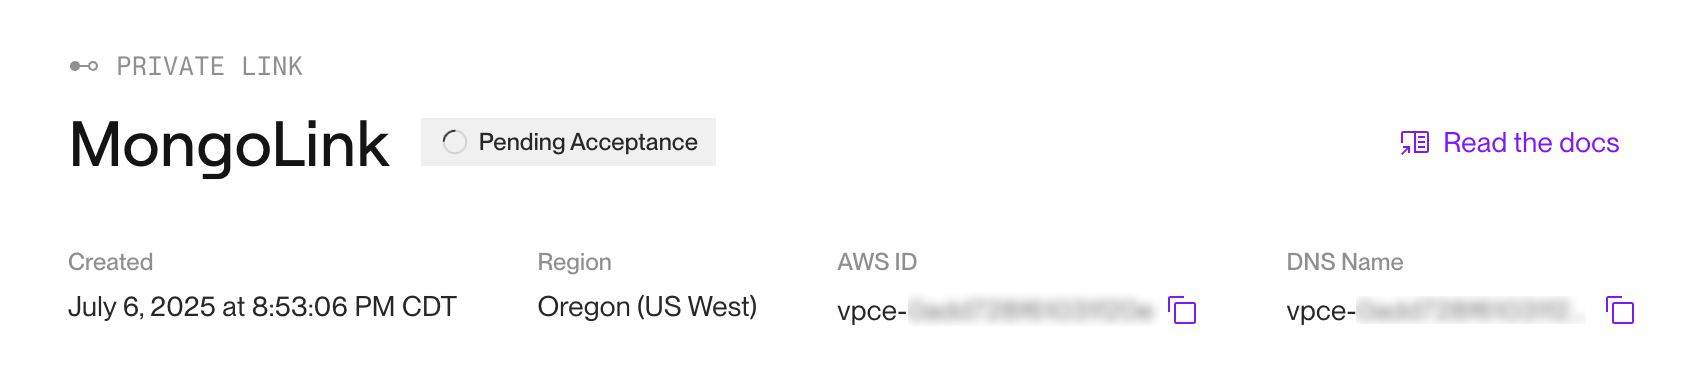
For now, your private link has the status Pending Acceptance.
-
Copy your private link's AWS ID.
You might need to provide this value to your provider in the next step.


4. External provider
-
Return to your provider's dashboard.
-
Finalize your connection according to your provider:
MongoDB Atlas
-
In the Atlas UI, return to the Private Endpoint tab for your project.
-
Click the Edit button for your endpoint. The in-progress endpoint creation dialog appears.
-
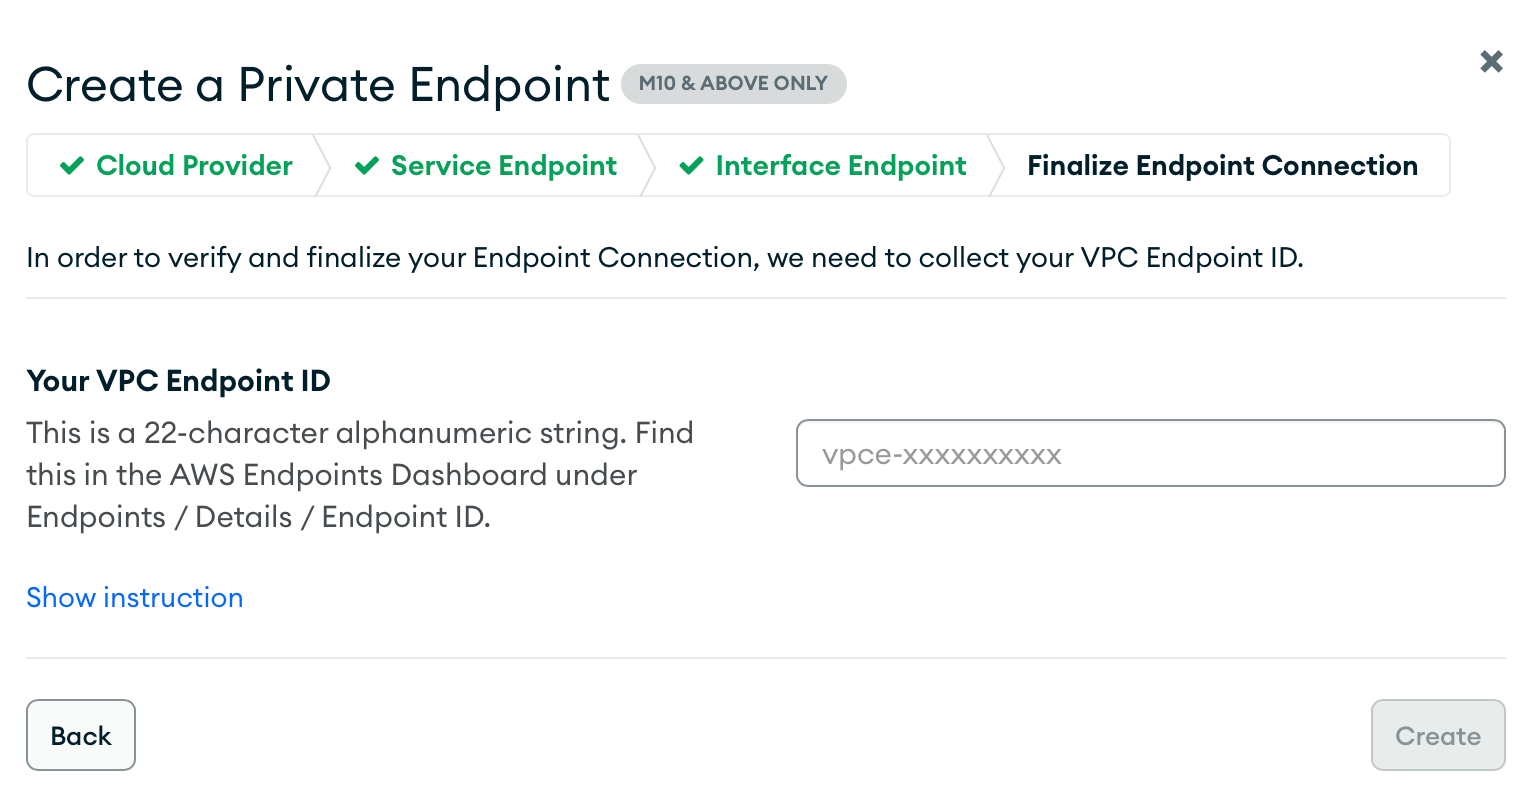
Advance to the Finalize Endpoint Connection tab:
-
In the Your VPC Endpoint ID field, provide the AWS ID value you copied in the Render Dashboard.
-
Click Create.
MongoDB Atlas begins deploying your finalized endpoint. When the deploy completes, your endpoint's status updates to available in both the Atlas UI and the Render Dashboard:

You're ready to start connecting from your Render infrastructure.
Snowflake
If required, contact Snowflake support to finalize your connection (such as by authorizing Render's incoming private link connection).
When the connection is finalized, your private link's status updates to Available in the Render Dashboard:

You're ready to start connecting from your Render infrastructure.
Self-managed VPC (EC2, Aurora, etc.)
If your endpoint service requires accepting incoming connections, follow the steps in the AWS documentation to accept the incoming connection from Render.
When the connection is finalized, your private link's status updates to Available in the Render Dashboard:
You're ready to start connecting from your Render infrastructure.
Crunchy Bridge
On your Crunchy Bridge cluster's Networking tab, approve the pending connection request from Render.

When the connection is finalized, your private link's status updates to Available in the Render Dashboard:
You're ready to start connecting from your Render infrastructure.
Connecting from your Render services
After your private link is fully established, you can start connecting to your provider from your Render infrastructure.
Connection details vary by provider type:
MongoDB Atlas
-
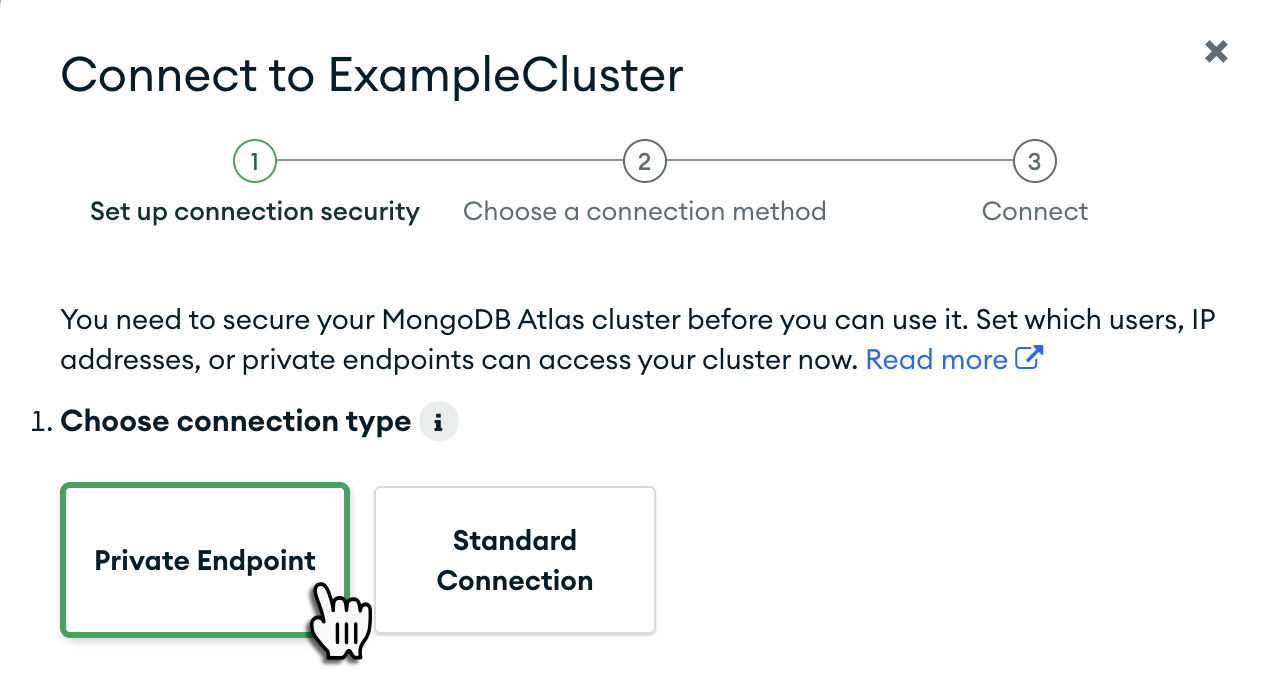
In the Atlas UI, select your cluster and open its Connect dialog:
-
Select the Private Endpoint connection type.
-
Select whichever connection method your Render service will use (usually a language-specific driver). All displayed methods will use the private connection URL accessible via your private link.
-
Apply the corresponding changes to your Render service and deploy.

Snowflake
Your Render services can connect to Snowflake using your Snowflake private connectivity URL. For details, see the Snowflake docs.
Self-managed VPC (EC2, Aurora, etc.)
To connect to a particular resource (such as an EC2 instance or Aurora cluster):
- In the Render Dashboard, open your private link's details page.
- Copy the DNS Name for your private link.
- Update your Render service's configuration to use your private link's DNS name.
- Deploy your Render service.
Crunchy Bridge
Test your private link connection using the following steps:
-
In the Render Dashboard, open your private link's details page.
-
Copy the DNS Name.
-
Open your service's Shell page and run:
- Replace
<USER>,<PASSWORD>, and<DATABASE>with the values from your Crunchy Bridge connection string. - Replace
<DNS_NAME>with the DNS Name you copied in the previous step.
Run any database query at the PostgreSQL prompt to confirm your connection works.
- Replace
After confirming the connection works, update your Render service's connection URLs to start using your private link.
To learn more about using private links with Crunchy Bridge, see Provider-specific considerations.
Provider-specific considerations
Crunchy Bridge
Connecting with TLS
Private links use generated DNS names that won't match the hostname on Crunchy Bridge's TLS certificate. Append sslmode=require to your connection string to require an encrypted connection without hostname verification.
For more details, see the Crunchy Bridge documentation.
Restricting public access
By default, Crunchy Bridge clusters accept connections from all inbound IP ranges. To allow traffic only through your private link:
- Open the Crunchy Bridge dashboard and select your cluster.
- Open the Networking tab.
- Under Firewall Rules, remove the
0.0.0.0/0rule.
After you remove the rule, any connection to your Crunchy Bridge cluster that doesn't use the private link fails.
Handling failovers
Crunchy Bridge failovers don't require any changes to your private link.
As with other Postgres clients, a failover terminates active connections, and clients can reconnect to the new primary instance at the same URL. To enable reconnection, make sure your clients include retry functionality in their connection logic.
To validate failover behavior against your own private link setup, use the Crunchy Bridge CLI to trigger an instance refresh:
To learn more about high availability and failovers, see the Crunchy Bridge documentation.
Limitations
-
Private links require a Pro workspace or higher.
-
By default, a workspace can have up to three private links.
- If you require additional private links, please contact us.
-
Private links support connections initiated from your Render infrastructure to an external provider, but not the reverse.
-
Your external provider must be hosted in an AWS VPC.
-
Your external provider must support creating a VPC endpoint service.
-
Certain Render customers might not be able to create private links in the Oregon region.
- If you encounter this issue, please reach out to support in the Render Dashboard.
-
If you select Limit to Selected Environments as your private link access policy, you can't add or remove project environments after creating a private link.
-
Private DNS is not supported. Instead, use the DNS Name from your private link's details page in the Render Dashboard.
- You can still establish a TLS-encrypted connection by either disabling hostname verification or enabling SNI override in your client.
-
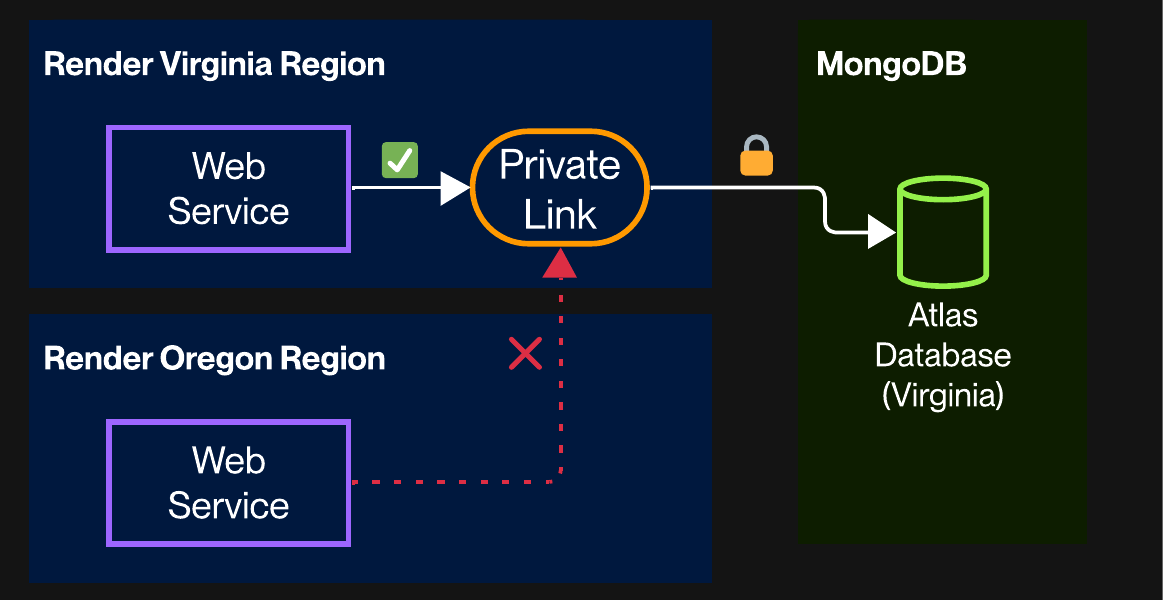
You can currently only create private links in the same region as the VPC endpoint service you're linking to.
-
Your services in other regions cannot access the private link:
-
