Web Services
Host dynamic web apps (Express, Django, etc.) at a public URL.
Render helps you host web apps written in your favorite language and framework: Node.js with Express, Python with Django or FastAPI—you name it. Render builds and deploys your code with every push to your linked Git branch. You can also deploy a prebuilt Docker image.
Every Render web service gets a unique onrender.com subdomain, and you can add your own custom domains. Web services can also communicate with your other Render services over your private network.
Your web service must bind to a port on host 0.0.0.0 to receive HTTP requests from the public internet. The default expected port is 10000 (you can configure this).
If you don't want your app to be reachable via the public internet, create a private service instead of a web service.
Deploy a template
You can get started on Render by deploying one of our basic app templates:
- Express (Node.js)
- Django (Python)
- Ruby on Rails
- Gin (Go)
- Rocket (Rust)
- Phoenix (Elixir)
- Laravel (PHP)
Don't see your framework? Browse more quickstarts.
Deploy your own code
You can deploy your web service from a linked GitHub/GitLab/Bitbucket repo, a public Git repository URL, or a prebuilt Docker image.
-
Sign up for Render if you haven't yet.
-
In the Render Dashboard, click New > Web Service:
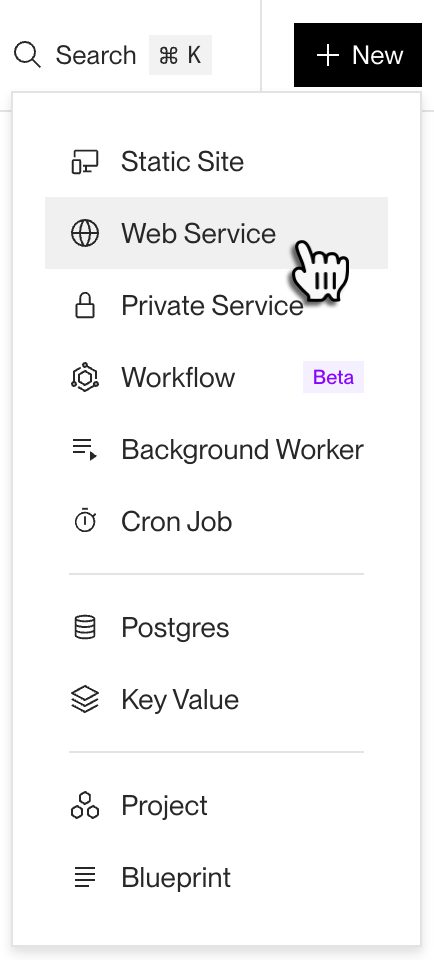

Select the source for your web service's code:
-
Select Git Provider, then connect your GitHub, GitLab, or Bitbucket account if you haven't yet.
-
Select a repository from one of your linked provider accounts.
- You can deploy any public or private repo that your account has access to.
-
In the service creation form, provide the following details:
Field Description Name
A name to identify your service in the Render Dashboard. Your service's
onrender.comsubdomain also incorporates this name.Region
The geographic region where your service will run.
Your services in the same region can communicate over their shared private network.
Branch
The branch of the repository to use to build your service.
Language
Your app's programming language. The service deploys to a runtime that includes the chosen language's build tools and dependencies.
Render natively supports these languages and also provides a Docker runtime for building and running a custom image from a
Dockerfile.Build Command
The command for Render to run to build your service from source.
Common examples include
npm installfor Node.js andpip install -r requirements.txtfor Python.Start Command
The command for Render to run to start your built service.
Common examples include
npm startfor Node.js andgunicorn your_application.wsgifor Python. -
Choose an instance type to run your service on:
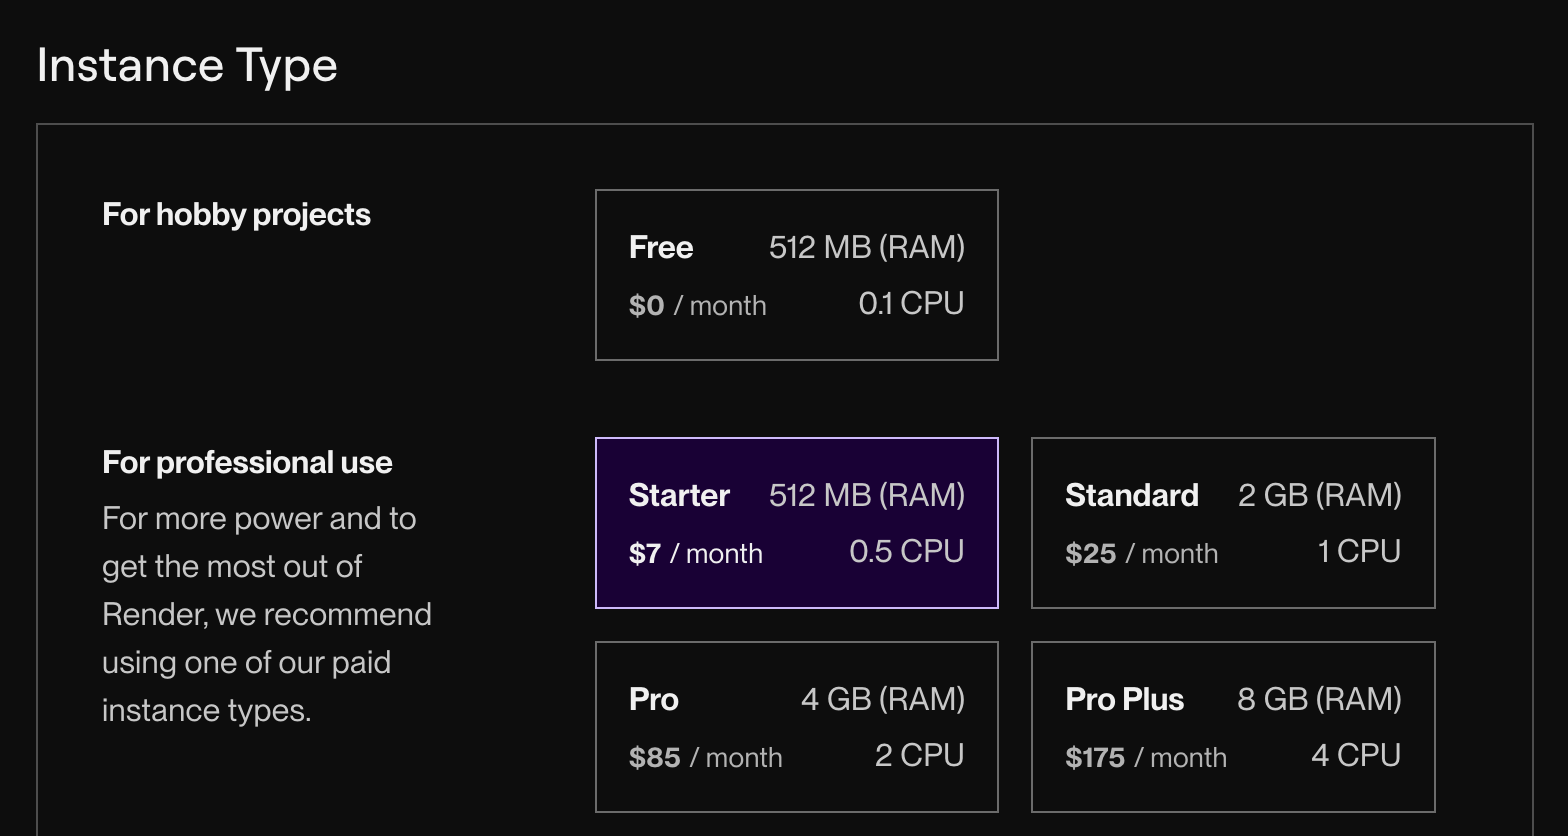
If you choose the Free instance type, note its limitations.
-
Under the Advanced section, you can set environment variables and secrets, add a persistent disk, set a health check path, and more.
-
Click Create Web Service. Render kicks off your service's first build and deploy.
- You can view the deploy's progress from your service's Events page in the Render Dashboard.

Use this method only to deploy a public repository you don't belong to.
Because this method does not use your Git provider credentials, Render does not support auto-deploys or pull request previews for services that use it.
-
Select Public Git Repository.
-
Enter the URL of a public Git repository (e.g.,
https://github.com/render-examples/express-hello-world) and click Connect. -
In the service creation form, provide the following details:
Field Description Name
A name to identify your service in the Render Dashboard. Your service's
onrender.comsubdomain also incorporates this name.Region
The geographic region where your service will run.
Your services in the same region can communicate over their shared private network.
Branch
The branch of the repository to use to build your service.
Language
Your app's programming language. The service deploys to a runtime that includes the chosen language's build tools and dependencies.
Render natively supports these languages and also provides a Docker runtime for building and running a custom image from a
Dockerfile.Build Command
The command for Render to run to build your service from source.
Common examples include
npm installfor Node.js andpip install -r requirements.txtfor Python.Start Command
The command for Render to run to start your built service.
Common examples include
npm startfor Node.js andgunicorn your_application.wsgifor Python. -
Choose an instance type to run your service on:
If you choose the Free instance type, note its limitations.
-
Under the Advanced section, you can set environment variables and secrets, add a persistent disk, set a health check path, and more.
-
Click Create Web Service. Render kicks off your service's first build and deploy.
- You can view the deploy's progress from your service's Events page in the Render Dashboard.
-
Select Existing Image.
-
Enter the path to your Docker image (e.g.,
docker.io/library/nginx:latest) and click Connect.- For images in private registries, add your registry credentials.
-
In the service creation form, provide the following details:
Field Description Name
A name to identify your service in the Render Dashboard. Your service's
onrender.comsubdomain also incorporates this name.Region
The geographic region where your service will run.
Your services in the same region can communicate over their shared private network.
-
Choose an instance type to run your service on:
If you choose the Free instance type, note its limitations.
-
Under the Advanced section, you can set environment variables and secrets, add a persistent disk, set a health check path, and more.
-
Click Create Web Service. Render pulls your Docker image and kicks off its initial deploy.
- You can view the deploy's progress from your service's Events page in the Render Dashboard.
- Services deployed from prebuilt images don't support auto-deploys. To update your service, you must redeploy manually.
Did your first deploy fail? See common solutions.
Port binding
Every Render web service must bind to a port on host 0.0.0.0 to serve HTTP requests. Render forwards inbound requests to your web service at this port (it is not directly reachable via the public internet).
We recommend binding your HTTP server to the port defined by the PORT environment variable. Here's a basic Express example:
Adapted ever-so-slightly from here
The default value of PORT is 10000 for all Render web services. You can override this value by setting the environment variable for your service in the Render Dashboard.
If you bind your HTTP server to a different port, Render is usually able to detect and use it.
If Render fails to detect a bound port, your web service's deploy fails and displays an error in your logs.
The following ports are reserved by Render and cannot be used:
180121801319099
Binding to multiple ports
Render forwards inbound traffic to only one HTTP port per web service. However, your web service can bind to additional ports to receive traffic over your private network.
If your service does bind to multiple ports, always bind your public HTTP server to the value of the PORT environment variable.
Connect to your web service
Connecting from the public internet
Your web service is reachable via the public internet at its onrender.com subdomain (along with any custom domains you add).
If you don't want your service to be reachable via the public internet, create a private service instead of a web service.
Render's load balancer terminates SSL for inbound HTTPS requests, then forwards those requests to your web service over HTTP. If an inbound request uses HTTP, Render first redirects it to HTTPS and then terminates SSL for it.
Connecting from other Render services
See Private Network.
Additional features
Render web services also support the following capabilities:
- Zero-downtime deploys
- Free, fully-managed TLS certificates
- Custom domains (including wildcards)
- Manual or automatic scaling
- Persistent disks
- Edge caching for static assets
- WebSocket connections
- Service previews
- Instant rollbacks
- Maintenance mode
- HTTP/2
- DDoS protection
- Brotli compression
- Support for Blueprints, Render's Infrastructure-as-Code model