Deploy Temporal
Temporal is a great way to manage asynchronous workflows. Blueprints make it effortless to deploy a production-ready Temporal cluster to Render!
Looking to orchestrate long-running, distributed tasks without managing infrastructure?
Currently in beta, Render Workflows is a fully managed orchestration and execution engine with automatic retries and rapid spin-up.
One-Click Deploy
Click Deploy to Render below and follow the prompts to deploy Temporal to Render.
Manual Deploy
-
Create a new repository using the
render-examples/temporalGitHub template. Therender.yamlblueprint defines the following components:- Temporal cluster:
- A PostgreSQL database.
- An Elasticsearch instance, for advanced visibility.
- One private service for each Temporal service: frontend, matching, history, and worker.
- The Temporal web UI.
- Example app from render-examples/sample-temporal-app:
app-workflow-triggerruns a simple HTTP server with two routes:/for health checking./trigger-workflowfor kicking off theTransferMoneyworkflow.
app-workerexecutes any triggered workflows. To plug in your own application code, replace the configuration for these two services.
- Temporal cluster:
-
Click the "Deploy to Render" button, and wait for your services to deploy.
-
To verify that your Temporal cluster is healthy, access the any of the four Temporal services (
temporal-frontend,temporal-history,temporal-matching, ortemporal-worker) using either the web shell or SSH, and try these commands: -
We will use the
app-workflow-triggerservice to trigger a Temporal workflow. Navigate to theapp-workflow-triggerservice page, and click on its public URL. Expect a plain text response that says "OK!". -
To trigger a new workflow, append
/trigger-workflowto the URL. Expected sample output: -
To check that your
app-workerservice executed the workflow, you can navigate to its "Logs" page and see: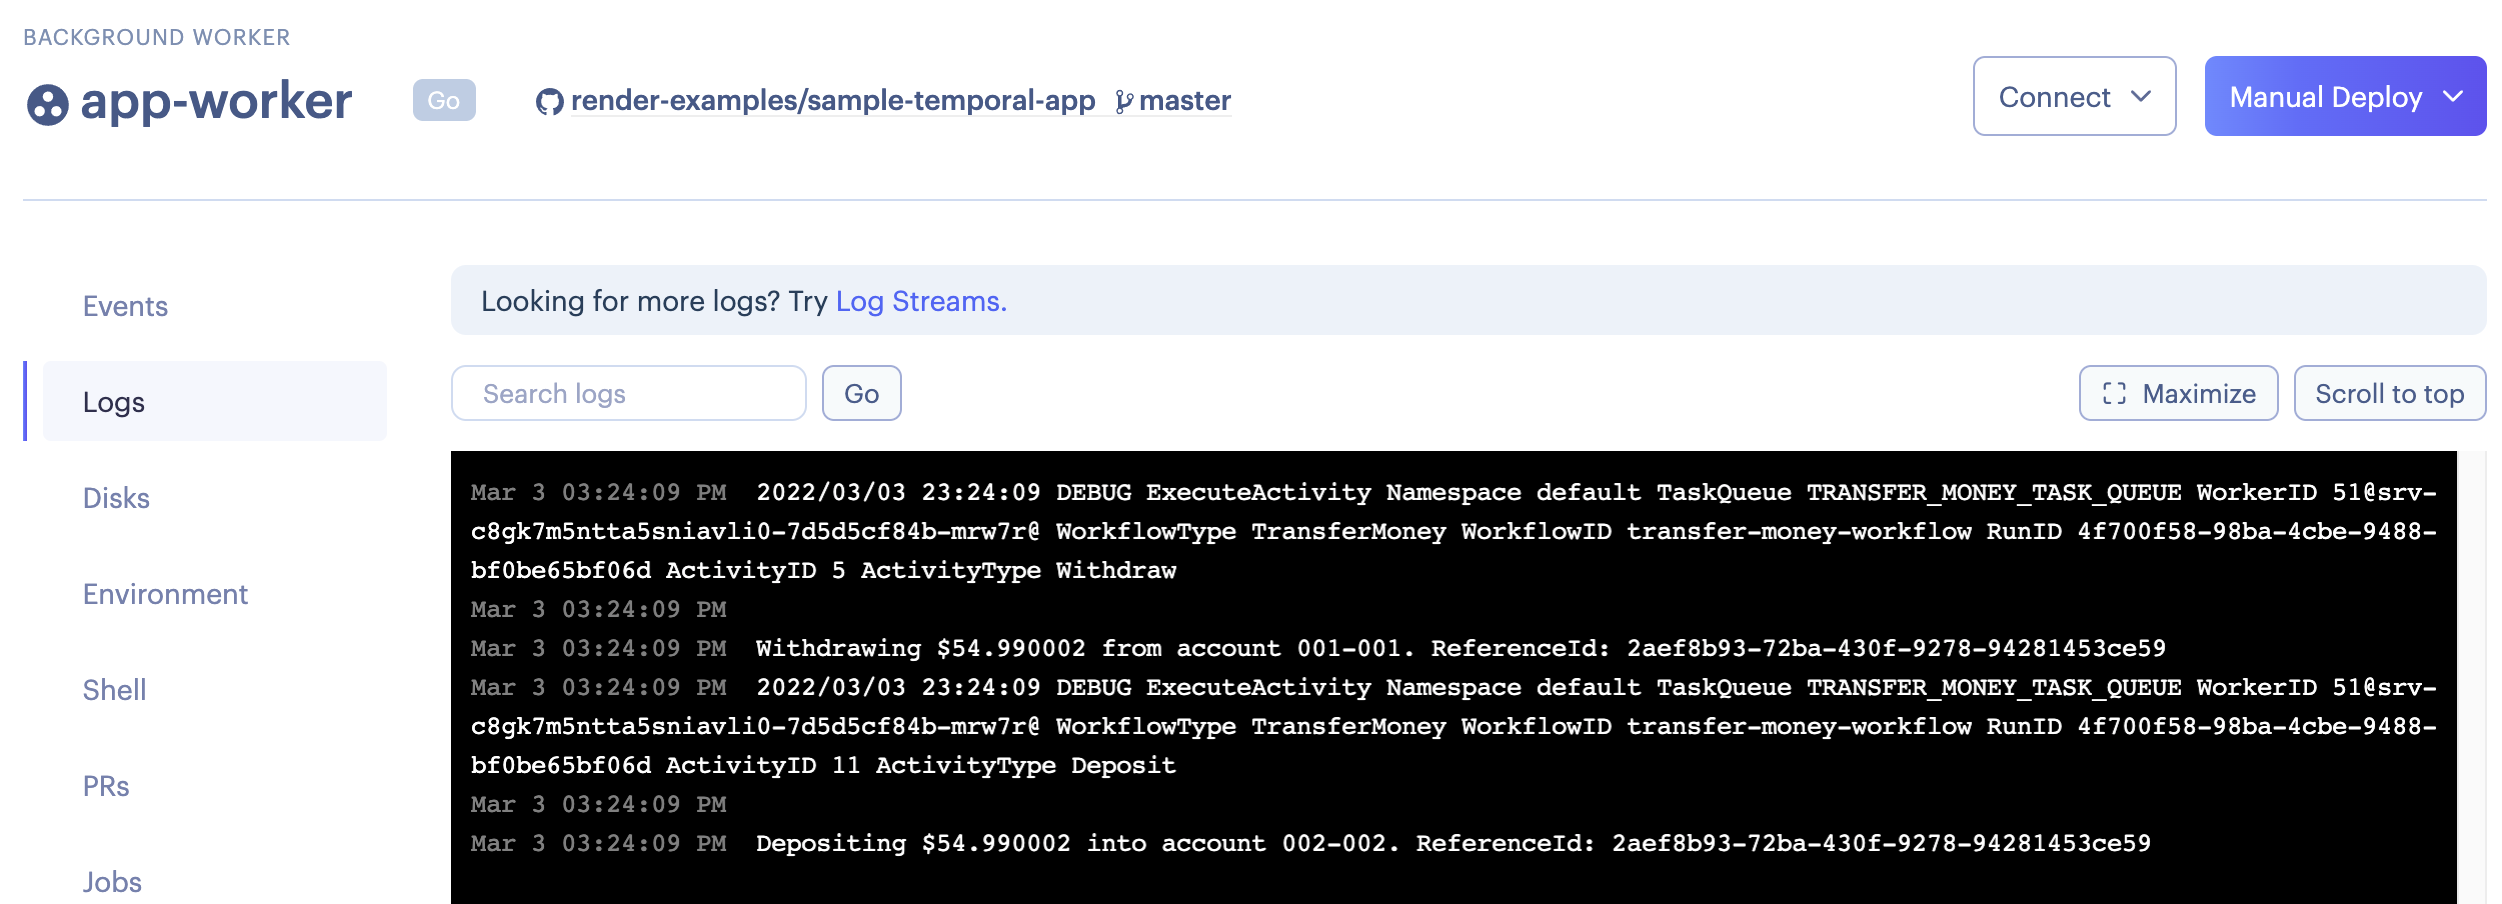

UI Access
Temporal ships with a web UI for viewing workflow executions. Rather than configuring authentication, our Blueprint runs the UI as a private service called temporal-ui. You can use SSH port forwarding to securely access the service:
-
Configure SSH for your account, if you haven't already.
-
Navigate to the
temporal-uiprivate service page, and copy the service address. -
Navigate to the shell for the
app-workerservice, and copy the SSH address. -
Start an SSH port forward from your local machine to the
temporal-uiservice via theapp-workerservice. If thetemporal-uiservice address istemporal-ui-hpb3:8088and theapp-workerSSH address issrv-c8vpm5g39ip9bkcn73tg@ssh.oregon.render.com, then you would run this command to port forward the Temporal UI tolocalhost:8088: -
Visit
http://localhost:8088in a browser to see the executed workflows:

External Access to Your Temporal Cluster
Our Temporal Blueprint assumes you have the flexibility to host both your Temporal workers and the application code where you trigger Temporal workflows on Render. With this setup, all your components can communicate securely, using any protocol, within a private network Render automatically configures for you. If you need direct access to one of your private services, you can use the web shell or SSH, as described above.
If you would prefer to host your workers or application code elsewhere, consider using one of the following workarounds. A workaround is necessary because Temporal uses gRPC and mTLS, but Render doesn't yet have native support for gRPC and mTLS over external connections.
Extend Your Private Network with Tailscale
Deploy a Tailscale subnet router to run in the same private network as your Temporal cluster. This allows you to securely access your Render private services, using any protocol, from other machines where you have Tailscale running. With this approach, you can run both your workers and your application code somewhere other than Render, and still connect to your Temporal cluster on Render using gRPC and mTLS.
Deploy a REST to gRPC Proxy Server
For some use cases it may be impractical to install Tailscale alongside your application code. This may apply, for example, if you'd like to trigger Temporal workflows from serverless functions running outside of Render.
For these cases, consider deploying a REST to gRPC proxy server alongside your Temporal cluster on Render. This server exposes the Temporal workflow service as a collection of REST API endpoints, and is secured using Bearer token authentication. With this approach, you still need to run your workers on Render, but the application code that starts and interacts with Temporal workflows can run anywhere.
Uncomment the rest-to-grpc-proxy web service definition in the render.yaml
file, and
sync your corresponding Render Blueprint. Attach an AUTH_TOKEN environment
variable to the service. API requests must include this token in the
Authorization header. The repository includes a sample javascript
client
that demonstrates how to trigger workflow executions. It also includes an
OpenAPI
schema
that can be used to generate client bindings in your language of choice.
Alternatives
If you prefer to get started with a smaller Temporal deployment, check out temporalio/temporal-render-simple. In this repository, Temporal is configured to run all four core services as a single Render service. While it could suffice for experimentation or low-load use cases, this configuration is not recommended for production: the Temporal components cannot be scaled independently, and the entire cluster can be taken down by failures on the temporal service.
If your Temporal cluster is deployed elsewhere, you can opt to run just your workers on Render, as background workers, and have them connect to the remote Temporal frontend service.
Custom Autoscaling
The default autoscaling parameters offered in the render-examples/temporal example are based on CPU and memory. However, you might want to scale up or down your app-worker services (note that this is not referring to the temporal-worker service) programmatically, using the Render API. One way to do this would be to use the client-side Schedule to Start task latency metric to inform scaling decisions; you can find more information in this Temporal community thread.