Deploy a Rails 8 App on Render
Run Rails 8 on Render's native Ruby runtime.
Welcome! This guide walks you through creating a Rails 8 app and deploying it on Render. The app will use a Render Postgres database as its backing datastore.
Deploying an earlier version of Rails? See this quickstart.
Have an existing Rails 8 app you want to deploy? Skip straight to Update your app for Render.
1. Create a Rails project
First, let's set up your local development environment and initialize a new Rails project.
Install Rails
-
If you haven't yet, complete the steps in the official Rails installation guide to install both Ruby and Rails on your development machine.
-
After you complete the final installation step (
gem install rails), run the following in your terminal to verify that Rails installed successfully and that you installed the version you expect:
Create a new project
In this step, we'll create a Rails project with the name mysite. You can use a different name if you prefer.
-
In your terminal, navigate to the directory where you'll create your project (such as
~/Development). -
Run the following command to generate a new project:
The
--skip-solidoption instructs Rails to omit automatic configuration for the new Solid Cache, Solid Queue, and Solid Cable features in Rails 8.To simplify your initial deployment, we recommend that you configure these features individually as needed after you're up and running on Render.
-
From your new project's root directory, create local PostgreSQL databases for your app:
Database creation failed?
Make sure you've installed and started PostgreSQL locally, then check your project's
config/database.ymlfile. You probably need to provide values for your local PostgreSQL database'susernameand/orpassword:
Your Rails app is ready to run locally. To verify, start your development server:
To see your app in action, visit localhost:3000 in your browser. You should see the default Rails landing page:

Commit all of your project changes and push them to a new repository on GitHub/GitLab/Bitbucket. You can deploy your app to Render from any of these.
Add a basic homepage
Next, let's add a simple static homepage to your app.
-
In your project directory, create a new controller with the
rails generate controllercommand:This sets the controller's name to
Homepageand sets up an action namedindex.The generator creates several files in your project:
-
Open the file
config/routes.rband add the highlighted line below: -
Open the file
app/views/homepage/index.html.erband replace its contents with the following: -
Verify your changes by returning to
localhost:3000in your browser. If you stopped your local server, restart it first:Your site's root path now displays the following:

-
Commit your changes and push them to your Git provider.

Now that we have a basic Rails app, let's prepare it for production on Render.
2. Update your app for Render
Before we deploy your app, let's get it Render-ready. To achieve this, we will:
- Create a build script for Render to run with each deploy
- Swap SQLite for Postgres as your app's database (if you haven't already)
Create a build script
Render builds your app before each deploy by running a build command that you specify. Rails apps usually run multiple commands as part of a build, so let's create a script that combines them.
-
Create a file named
render-build.shin your repo'sbindirectory. Paste the following into it and save:If your project performs additional build tasks, add them to this script as well.
-
Make sure the script is executable:
-
Commit and push your changes to your Git provider.
We'll configure Render to execute this script each time your app is deployed.
Swap SQLite for Postgres
Skip this step if your app is already configured to use Postgres.
For example, if you set up a basic starter app in Create a Rails project above, you're all set.
Production Rails apps on Render should not use SQLite. Instead, they should connect to a separately hosted database, such as Render Postgres.
Why not use SQLite?
Most importantly, because Render services have an ephemeral filesystem. This means that changes to local files (including SQLite databases) are lost after each deploy. You can attach a persistent disk to preserve local files, but this disables zero-downtime deploys.
Additionally, you can't safely scale your app to multiple instances if it uses SQLite. Each instance uses its own local database, resulting in immediate data fragmentation.
A Render Postgres database provides a persistent, shared store that multiple apps and instances can use.
-
Update your project to use PostgreSQL with the following command:
Alternatively, in your your
Gemfile, swap the gem for your database driver fromsqlite3topg.Before:
After:
-
Run
bundle installto update yourGemfile.lock, then commit and push your changes.
We’ll connect to your Render database by setting the DATABASE_URL environment variable, so you don’t need to make any other changes to your config/database.yml file.
Your app is now ready to deploy on Render.
3. Deploy on Render
To deploy your app on Render, we'll create two services:
- A web service that runs your Rails executable and receives incoming requests
- A Render Postgres database that stores your app's data
Render provides a free instance type for each of these to help you get started.
Create your Render services
You can create these services in either of the following ways:
- Create each service separately in the Render Dashboard
- Choose this if you prefer to configure your services in a web interface.
- Define both services in a
render.yamlfile and deploy them together using Render Blueprints- Choose this if you prefer to configure your services in your IDE.
Use the tabs below to view instructions for each method:
Creating services in the Render Dashboard
You'll complete all of these steps in the Render Dashboard:
-
Create a new Render Postgres database by following these steps.
- Feel free to start with the Free instance type. You can upgrade later.
-
After you deploy your database, note the following values:
- The database's region
- The database's internal database URL
-
Still in the Render Dashboard, click + New > Web Service.
-
Connect your Git provider to Render if you haven't already.
-
Choose your Rails project's repo from the list.
-
Configure the rest of your web service's settings according to the table below:
Property Value Language
Ruby
Region
Select the same region as your database.
Build Command
bin/render-build.shPre-deploy Command
bin/rails db:migrateThe pre-deploy command requires a paid instance type.
If you're starting on the Free instance type, you can keep database migration logic in your build script.
Start Command
bin/rails serverEnvironment Variables
See the next step.
-
Set the following environment variables for the web service:
Key Value DATABASE_URLThe internal database URL for the database you created above
RAILS_MASTER_KEYPaste the contents of your app's
config/master.keyfile.WEB_CONCURRENCY2(If you don't set this value, Rails determines a value based on the runtime's physical CPU count. This might result in your application running out of memory. We recommend setting this value to
2as a default, but also optimizing this value for your own application.) -
Click Deploy Web Service.
That's it! Your app will be live at its unique .onrender.com URL as soon as the initial build and deploy are complete.
Creating services with a Blueprint
-
Create a file named
render.yamlin your project's root directory and paste in the YAML content below:This file defines configuration for your Rails web service, along with the Render Postgres database that it connects to.
Don't forget to commit and push this change to your remote repository.
If you don't set
WEB_CONCURRENCY, Rails determines a value based on the runtime's physical CPU count. This might result in your application running out of memory immediately on boot. We recommend setting this value to2as a default, but also optimizing this value for your own application. -
In the Render Dashboard, go to the Blueprint page and click New Blueprint Instance. Select your repository (after giving Render the permission to access it, if you haven't already).
-
In the deploy window, set the value of the
RAILS_MASTER_KEYto the contents of yourconfig/master.keyfile. Then click Approve.
That's it! Your app will be live on your .onrender.com URL as soon as the build finishes.
Next steps
After your app is up and running, explore common architecture patterns and configuration options:
Access the Rails console
Only paid instance types support shell connections to your service.
You can access the Rails console in either of the following ways:
-
Open your service's Shell page in the Render Dashboard and run
rails c: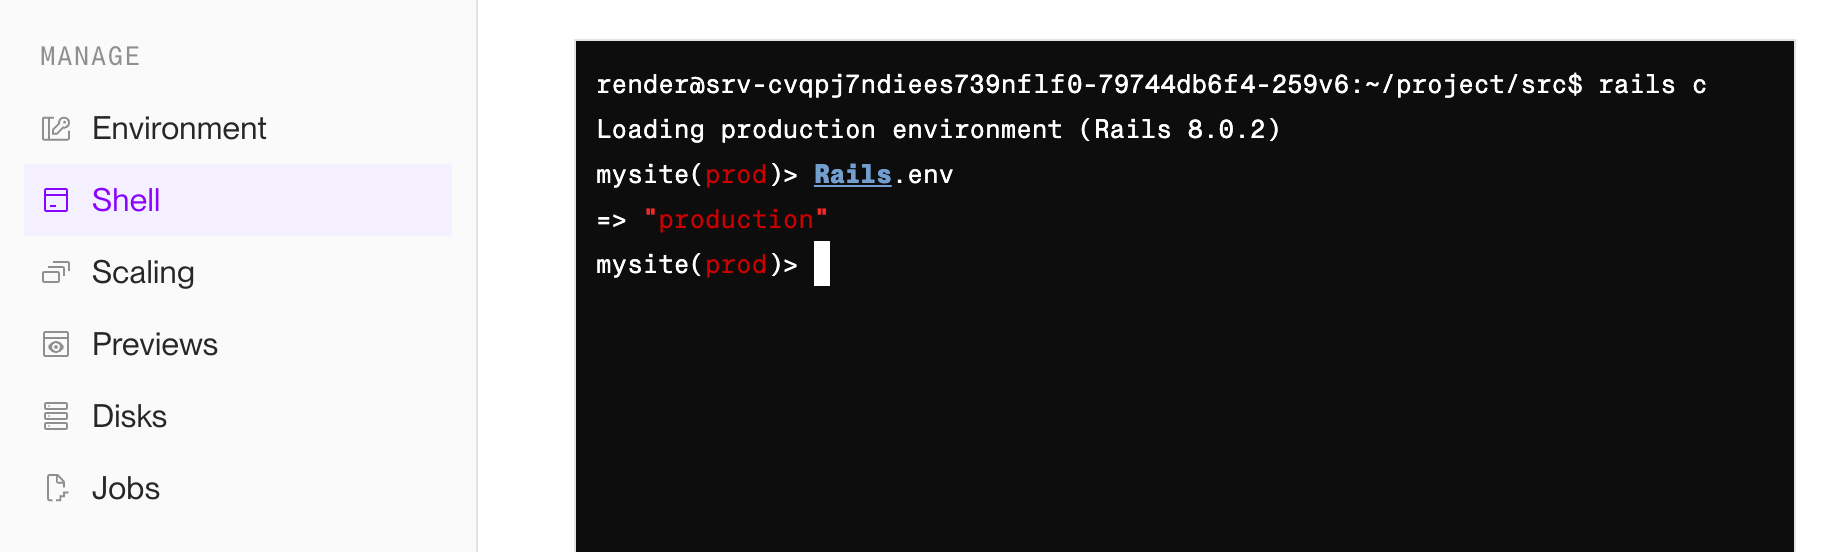
-
Connect to your service using SSH and run
rails c.

Add caching
To speed up your Rails app with a cache, you have multiple options:
- Set up Rails caching with Render Key Value.
- Configure the Rails 8 Solid Cache to cache with your Render Postgres database.
Process background tasks
Render background workers are ideal for processing asynchronous tasks from a queue.
To set up your job queue, you have multiple options:
- Set up Sidekiq to process jobs with a Render Key Value cache.
- Configure the Rails 8 Solid Queue to process jobs with your Render Postgres database.
Set a Ruby version
See Setting your Ruby Version to customize the version of Ruby used for your app.