Deploying on Render
Understand how deploys work.
Render can automatically deploy your application each time you merge a change to your codebase:

You can also trigger manual deploys, both programmatically and in the Render Dashboard.
All service types redeploy with zero downtime, unless they attach a persistent disk.
Automatic deploys
As part of creating a service on Render, you link a branch of your GitHub/GitLab/Bitbucket repo (such as main or production). Whenever you push or merge a change to that branch, by default Render automatically rebuilds and redeploys your service.
Auto-deploys appear in your service's Events timeline in the Render Dashboard:

If needed, you can skip an auto-deploy for a particular commit, or even disable auto-deploys entirely.
Auto-deploys require a connected GitHub, GitLab, or Bitbucket account. Services that use a prebuilt Docker image or a public Git repository URL must be deployed manually.
Configuring auto-deploys
Configure a service's auto-deploy behavior from its Settings page in the Render Dashboard:

Under Auto-Deploy, select one of the following:
| Option | Description |
|---|---|
|
On Commit |
Render triggers a deploy as soon as you push or merge a change to your linked branch. This is the default behavior for a new service. |
|
After CI Checks Pass |
With each change to your linked branch, Render triggers a deploy only after all of your repo's CI checks pass. For details, see Integrating with CI. |
|
Off |
Disables auto-deploys for the service. Choose this option if you only want to trigger deploys manually. |
Integrating with CI
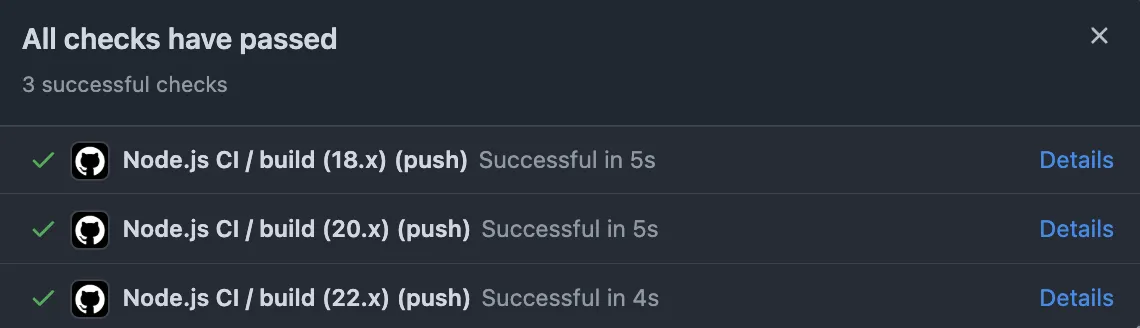
If you set your service's auto-deploy behavior to After CI Checks Pass, Render waits for a new commit's CI checks to complete before triggering a deploy. If all checks pass, Render proceeds with the deploy.
For GitHub checks, Render considers a check "passed" if its conclusion is any of success, neutral, or skipped.
Render does not trigger a deploy if:
- Zero checks are detected for the new commit
- At least one CI check fails for the new commit
If your repo doesn't run CI checks, use On Commit instead of After CI Checks Pass to enable auto-deploys.
Select the tab for your Git provider to learn which CI checks are supported:
Render detects the results of CI checks originating from the following:
- GitHub Actions
- Tools that integrate with the GitHub checks API, such as CircleCI
Supported checks appear on commits and pull requests in the GitHub UI:
Render detects the results of jobs executed as part of GitLab CI/CD pipelines.
Render detects the results of steps executed as part of Bitbucket Pipelines.
Skipping an auto-deploy
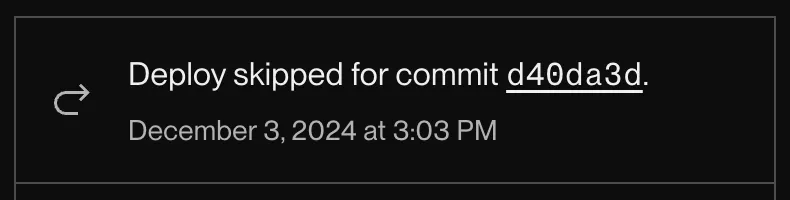
Certain changes to your codebase might not require a new deploy, such as edits to a README file. In these cases, you can include a skip phrase in your Git commit message to prevent the change from triggering an auto-deploy:
The skip phrase is one of [skip render] or [render skip]. You can also replace render with one of the following:
deploycd
When an auto-deploy is skipped, a corresponding entry appears on your service's Events page:
For additional control over auto-deploys, configure build filters.
With build filters, Render triggers an auto-deploy only if there are changes to particular files in your repo (no skip phrase required). See details.
Manual deploys
You can manually trigger a Render service deploy in a variety of ways:
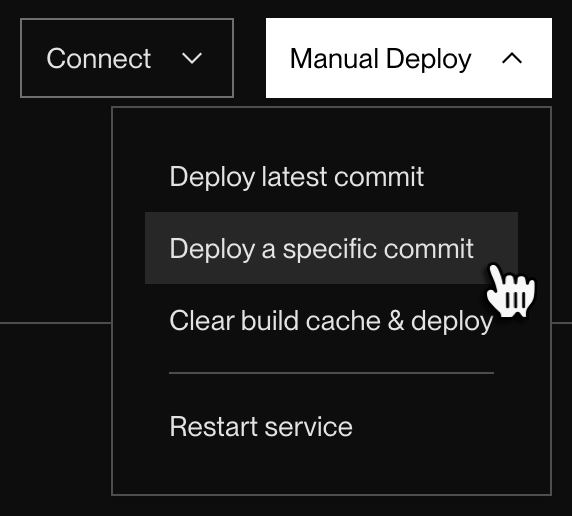
From your service's Events page in the Render Dashboard, open the Manual Deploy dropdown:

Select a deploy option:
| Option | Description |
|---|---|
|
Deploy latest commit |
Deploys the most recent commit on your service's linked branch. |
|
Deploy a specific commit |
Deploys a specific commit from your service's linked repo. Specify a commit by its SHA, or by selecting it from a list of recent commits. This disables automatic deploys for the service. This is because an automatic deploy might reintroduce commits you wanted to exclude from this deploy. Learn more about deploying a specific commit. |
|
Clear build cache & deploy |
Similar to Deploy latest commit, but first clears the service's build cache. This way, the new deploy doesn't reuse any artifacts generated during a previous build. Use this option to incorporate changes to your service's build command, or to refresh stale static assets. |
|
Restart service |
Deploys the same commit that's currently deployed for the service, with the same values for user-defined environment variables. For details, see Restarting a service. |
Run the Render CLI's deploys create command:
This opens an interactive menu that lists the services in your workspace. Select a service to deploy, then proceed through the prompts.
Each Render service has a unique Deploy Hook URL available on its Settings page in the Render Dashboard:

You can trigger a manual deploy by sending an HTTP GET or POST request to this URL. For details, see Deploy Hooks.
Send a POST request to the Render API's Trigger Deploy endpoint.
This endpoint accepts optional body parameters for clearing the service's build cache and/or deploying a specific commit. For services that pull a Docker image, you can specify the URL of the image to pull.
Deploying a specific commit
When deploying manually, you can optionally specify a commit SHA. If you do, Render builds and deploys the specified commit instead of the latest commit from your service's linked branch.
If you deploy a specific commit SHA, you should also disable automatic deploys for your service.
Some deploy methods do this for you automatically. For details, see Effect on automatic deploys.
Learn how to provide a commit SHA using each deploy method:
-
From your service's Events page in the Render Dashboard, click Manual Deploy > Deploy a specific commit:
-
In the dialog that appears, select a commit from the list. You can also paste a commit SHA into the text field.
-
Click Deploy Commit. Render immediately kicks off a deploy.

This method disables automatic deploys for the service.
To deploy a specific commit using deploy hooks, include a ref query parameter that specifies the commit SHA to deploy:
- As shown, you can provide either a full or short commit SHA.
- This method disables automatic deploys for the service.
After you run render deploys create and select a service, the Render CLI prompts you for an optional commit ID. Paste the SHA you want to deploy.
In non-interactive environments, you can specify the commit SHA with the --commit flag:
Using this method does not disable automatic deploys for the service. To disable, follow up with the render services update command (set the --auto-deploy field to false).
In your request to the Trigger Deploy endpoint, include the commitId field in the request body:
Using this method does not disable automatic deploys for the service. To disable, follow up with a request to the Update service endpoint (set the autoDeploy field to no).
Effect on automatic deploys
In almost all cases when you deploy a specific commit for your service, you should also disable automatic deploys for it. This is because automatic deploys always use the most recent commit from your service's linked branch, replacing the commit you had just deployed.
Some deploy methods disable automatic deploys for you when you provide a commit SHA:
| Method | Behavior |
|---|---|
|
Dashboard |
Disables auto-deploys |
|
Deploy hook |
Disables auto-deploys |
|
CLI |
Does not disable auto-deploys |
|
API |
Does not disable auto-deploys |
If you deploy a specific commit with the Render CLI or API, you can disable automatic deploys in the Render Dashboard (see Configuring auto-deploys), or with a follow-up action using the same tool (see the tabs above).
If you later reenable automatic deploys for your service, Render once again deploys the most recent commit from your linked branch.
Deploy steps
With each deploy, Render proceeds through the following commands for your service:
*Consumes pipeline minutes while running. View your usage.
You specify these commands as part of creating your service in the Render Dashboard. You can modify these commands for an existing service from its Settings page:

Each command is described below.
If any command fails or times out, the entire deploy fails. Any remaining commands do not run. Your service continues running its most recent successful deploy (if any), with zero downtime.
Command timeouts are as follows:
|
Command |
Timeout |
|---|---|
|
Build command |
120 minutes |
|
Pre-deploy command |
30 minutes |
|
Start command |
15 minutes |
Build command
Performs all compilation and dependency installation that's necessary for your service to run. It usually resembles the command you use to build your project locally.
This command consumes pipeline minutes while running.
You receive an included amount of pipeline minutes each month and can purchase more as needed. View your usage.
Example build commands for each runtime
| Runtime | Example Build Command(s) |
|---|---|
| Node.js |
|
| Python |
To use |
| Ruby |
|
| Go |
|
| Rust |
|
| Elixir |
|
| Docker |
You can't set a build command for services that use Docker. Instead, Render either:
|
Pre-deploy command
If defined, the pre-deploy command runs after your service's build finishes, but before that build is deployed. Recommended for tasks that should always precede a deploy but are not tied to building your code, such as:
- Database migrations
- Uploading assets to a CDN
The pre-deploy command executes on a separate instance from your running service.
Changes you make to the filesystem are not reflected in the deployed service. You do not have access to a service's attached persistent disk (if it has one).
The pre-deploy command is available for paid web services, private services, and background workers.
If you don't define a pre-deploy command for a service, Render proceeds directly from the build command to the start command.
This command consumes pipeline minutes while running.
You receive an included amount of pipeline minutes each month and can purchase more as needed. View your usage.
Start command
Render runs this command to start your service when it's ready to deploy.
Example start commands for each runtime
| Runtime | Example Start Command(s) |
|---|---|
| Node.js |
|
| Python |
|
| Ruby |
|
| Go |
|
| Rust |
|
| Elixir |
|
| Docker |
By default, Render runs the To run multiple commands with Docker, provide those commands to For example, here's a Docker Command for a Django service that runs database migrations and then starts the web server: |
Managing deploys
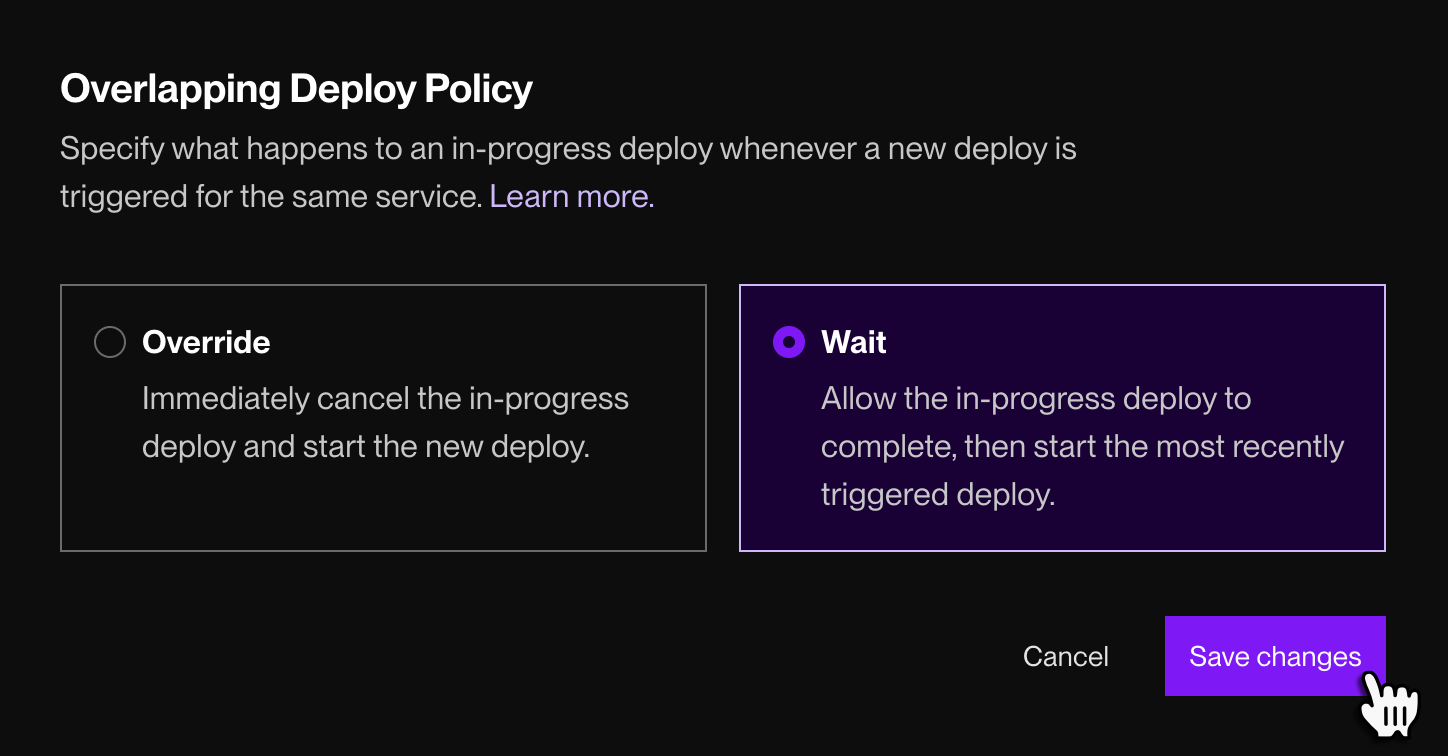
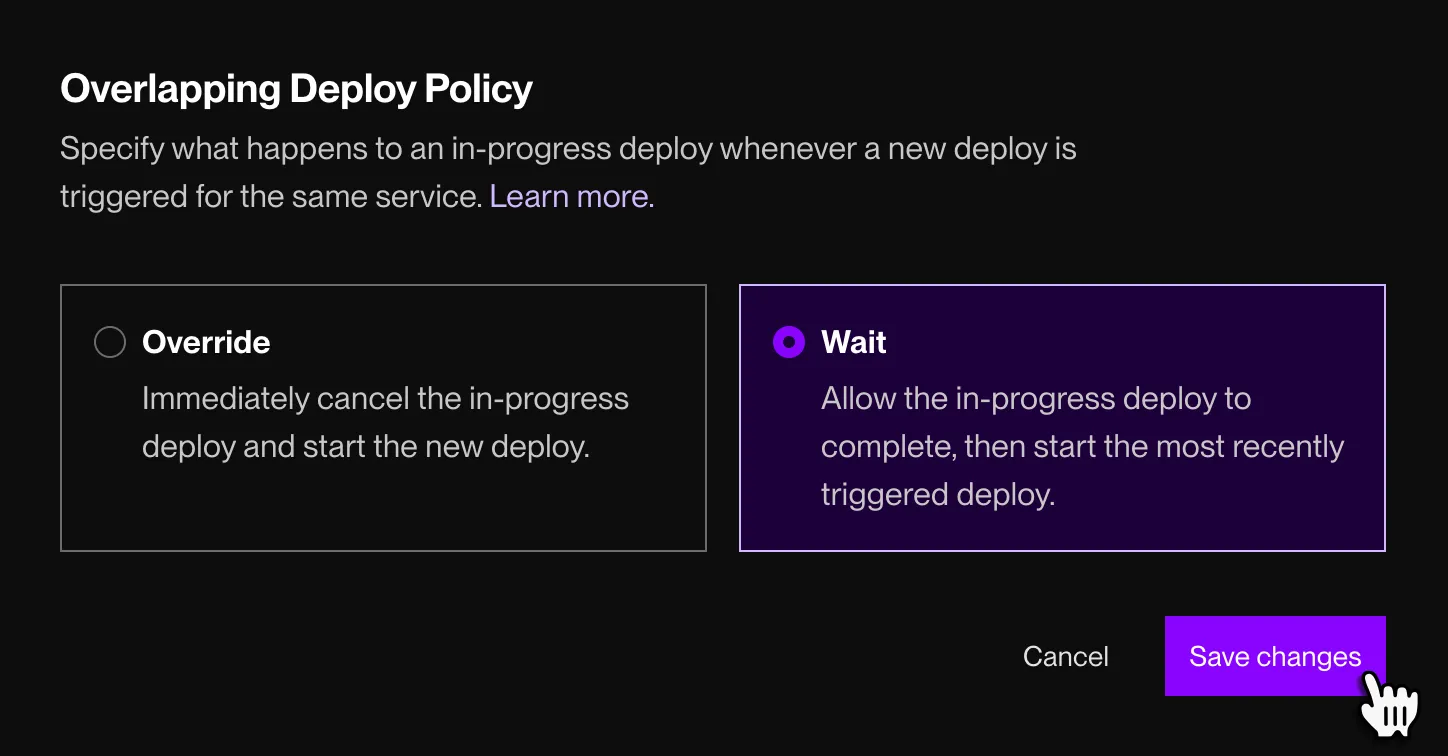
Handling overlapping deploys
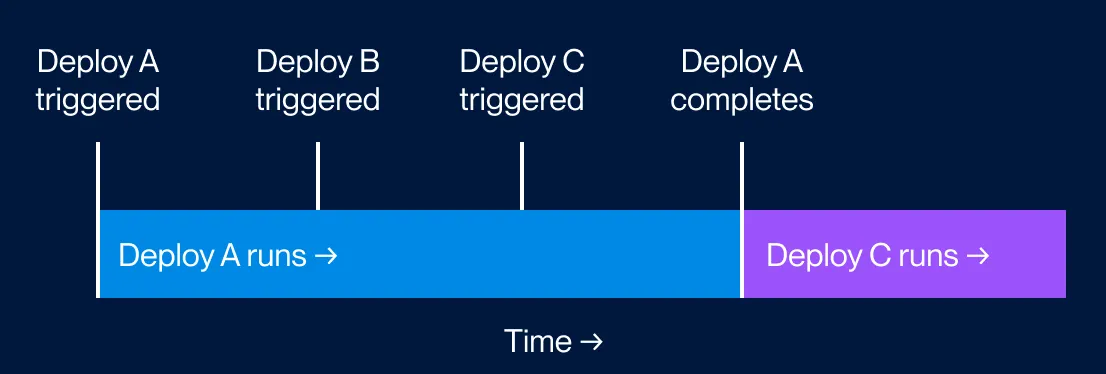
Only one deploy can run at a time per service. Sometimes, a deploy will trigger while another deploy is still in progress. When this occurs, your service can do one of the following:
| Policy | Description |
|---|---|
| Wait |
Allow the in-progress deploy to finish, then proceed directly to the most recently triggered deploy:
|
| Override |
Immediately cancel the in-progress deploy and start the new one.
|
You can set which of these policies to use for your workspace:
-
In the Render Dashboard, open your workspace's Settings page.
-
Scroll down to the Overlapping Deploy Policy section and click Edit:
-
Select an option and click Save changes.
Canceling a deploy
You can cancel an in-progress deploy in the Render Dashboard:
-
Go to your service's Events page and click the word Deploy in the corresponding event entry.
- This opens the deploy's details page.
-
Click Cancel deploy:


If you cancel an in-progress deploy while another deploy is waiting, Render immediately kicks off the waiting deploy.
Restarting a service
If your service is misbehaving, you can perform a restart from the service's page in the Render Dashboard. Click Manual Deploy > Restart service:
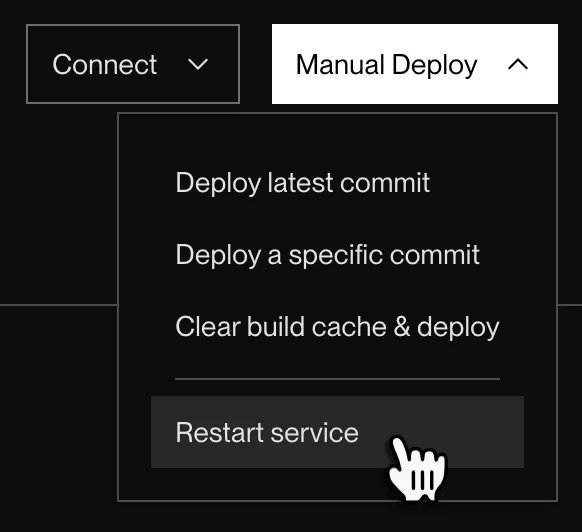
On Render, a service restart is actually a special form of manual deploy:
- Like any other deploy, Render creates a completely new instance of your service and swaps over to it when it's ready.
- This makes restarting a zero-downtime action.
- If your service is scaled to multiple instances, a restart applies to all instances.
- Unlike other deploys, the new instance always uses the exact same Git commit and configuration as the running instance at the time of the restart.
- This means that if you've recently updated your service's environment variables but haven't redeployed since then, restarting does not incorporate those changes.
Rolling back a deploy
See Rollbacks.
Deployment concepts
Ephemeral filesystem
By default, Render services have an ephemeral filesystem. This means that any changes a running service makes to its filesystem are lost with each deploy.
To persist data across deploys, do one of the following:
- Create and connect to a Render-managed datastore (Render Postgres or Key Value).
- Create and connect to a custom datastore, such as MySQL or MongoDB.
- Attach a persistent disk to your service.
- Note the limitations of persistent disks.
Zero-downtime deploys
Whenever you deploy a new version of your service, Render performs a sequence of steps to make sure the service stays up and available throughout the deploy process, even if the deploy fails.
This zero-downtime deploy sequence applies to web services, private services, background workers, and cron jobs. Static sites also update with zero downtime, but they're backed by a CDN and don't involve service instances. Learn more about service types.
Adding a persistent disk to your service disables zero-downtime deploys for it. See details.
Sequence of events
-
When you push up a new version of your code, Render attempts to build it.
- If the build fails, Render cancels the deploy, and your original service instance continues running without interruption.
-
If the build succeeds, Render attempts to spin up a new instance of your service running the new version of your code.
- For web services and private services, your original instance continues to receive all incoming traffic while the new instance is spinning up:
-
If the new instance spins up successfully (for web services, you can help verify this by setting up health checks), Render updates your current deployed commit accordingly.
- For web services and private services, Render also updates its networking configuration so that your new instance begins receiving all incoming traffic:
-
After 60 seconds, Render sends a
SIGTERMsignal to your app's process on the original instance.- This signals your app to perform a graceful shutdown.
-
If your app's process doesn't exit within its specified shutdown delay (default 30 seconds), Render sends a
SIGKILLsignal to force the process to terminate.-
You can extend your service's shutdown delay. See details.
-
-
For web services with edge caching enabled, Render purges all of the service's cache entries.
- This helps ensure that clients receive up-to-date content. See details.
-
The zero-downtime deploy is complete.
For services that are scaled to multiple instances, Render performs steps 2-5 for one instance at a time. If any new instance fails to become healthy during this process, Render cancels the entire deploy and reverts to instances running the previous version of your service.
Graceful shutdown
As part of deploying your service to a new instance, Render triggers a shutdown of the current instance by sending your application a SIGTERM signal. Your application should define logic to perform a graceful shutdown in response to this signal.
Common shutdown actions include:
- Responding to remaining in-flight HTTP requests
- Completing in-progress worker tasks (or marking them as failed so they're retried by other workers)
- Terminating outbound connections to external services
- Exiting with a zero status after other cleanup actions are complete
If your service is still running after its configured shutdown delay (default 30 seconds), Render sends your application a SIGKILL signal. This terminates the application immediately with a non-zero status.
Setting a shutdown delay
If your service needs more than 30 seconds to complete a graceful shutdown, you can specify a longer shutdown delay (up to a maximum of 300 seconds) in one of the following ways:
- Call the Render API's Update service endpoint and set the
maxShutdownDelaySecondsfield to the desired value. - Add the
maxShutdownDelaySecondsfield to your service's associatedrender.yamlconfiguration.- Use this method if you manage your service with a Blueprint.
Need more than 300 seconds for graceful shutdown?
Reach out to our support team in the Render Dashboard.