Render Key Value
Provision Redis®-compatible datastores for caching and job queues.
Render Key Value provides low-latency in-memory storage that's ideal for shared caches and job queues. Key Value instances are compatible with virtually all clients that interact with Redis®*.
Paid Key Value instances support disk-backed persistence and enable it by default.
Underlying libraries
-
Newly created Render Key Value instances run Valkey 8.
-
Legacy Key Value instances (created before Feburary 12, 2025) run Redis 6.
- Legacy instances no longer receive version updates, but they will continue to operate as usual.
Quickstarts
These Render quickstarts include steps for provisioning a Key Value instance:
- Deploy a Celery background worker
- Deploy Rails with Sidekiq
- Rails caching with Redis
- Connecting to Render Key Value with ioredis
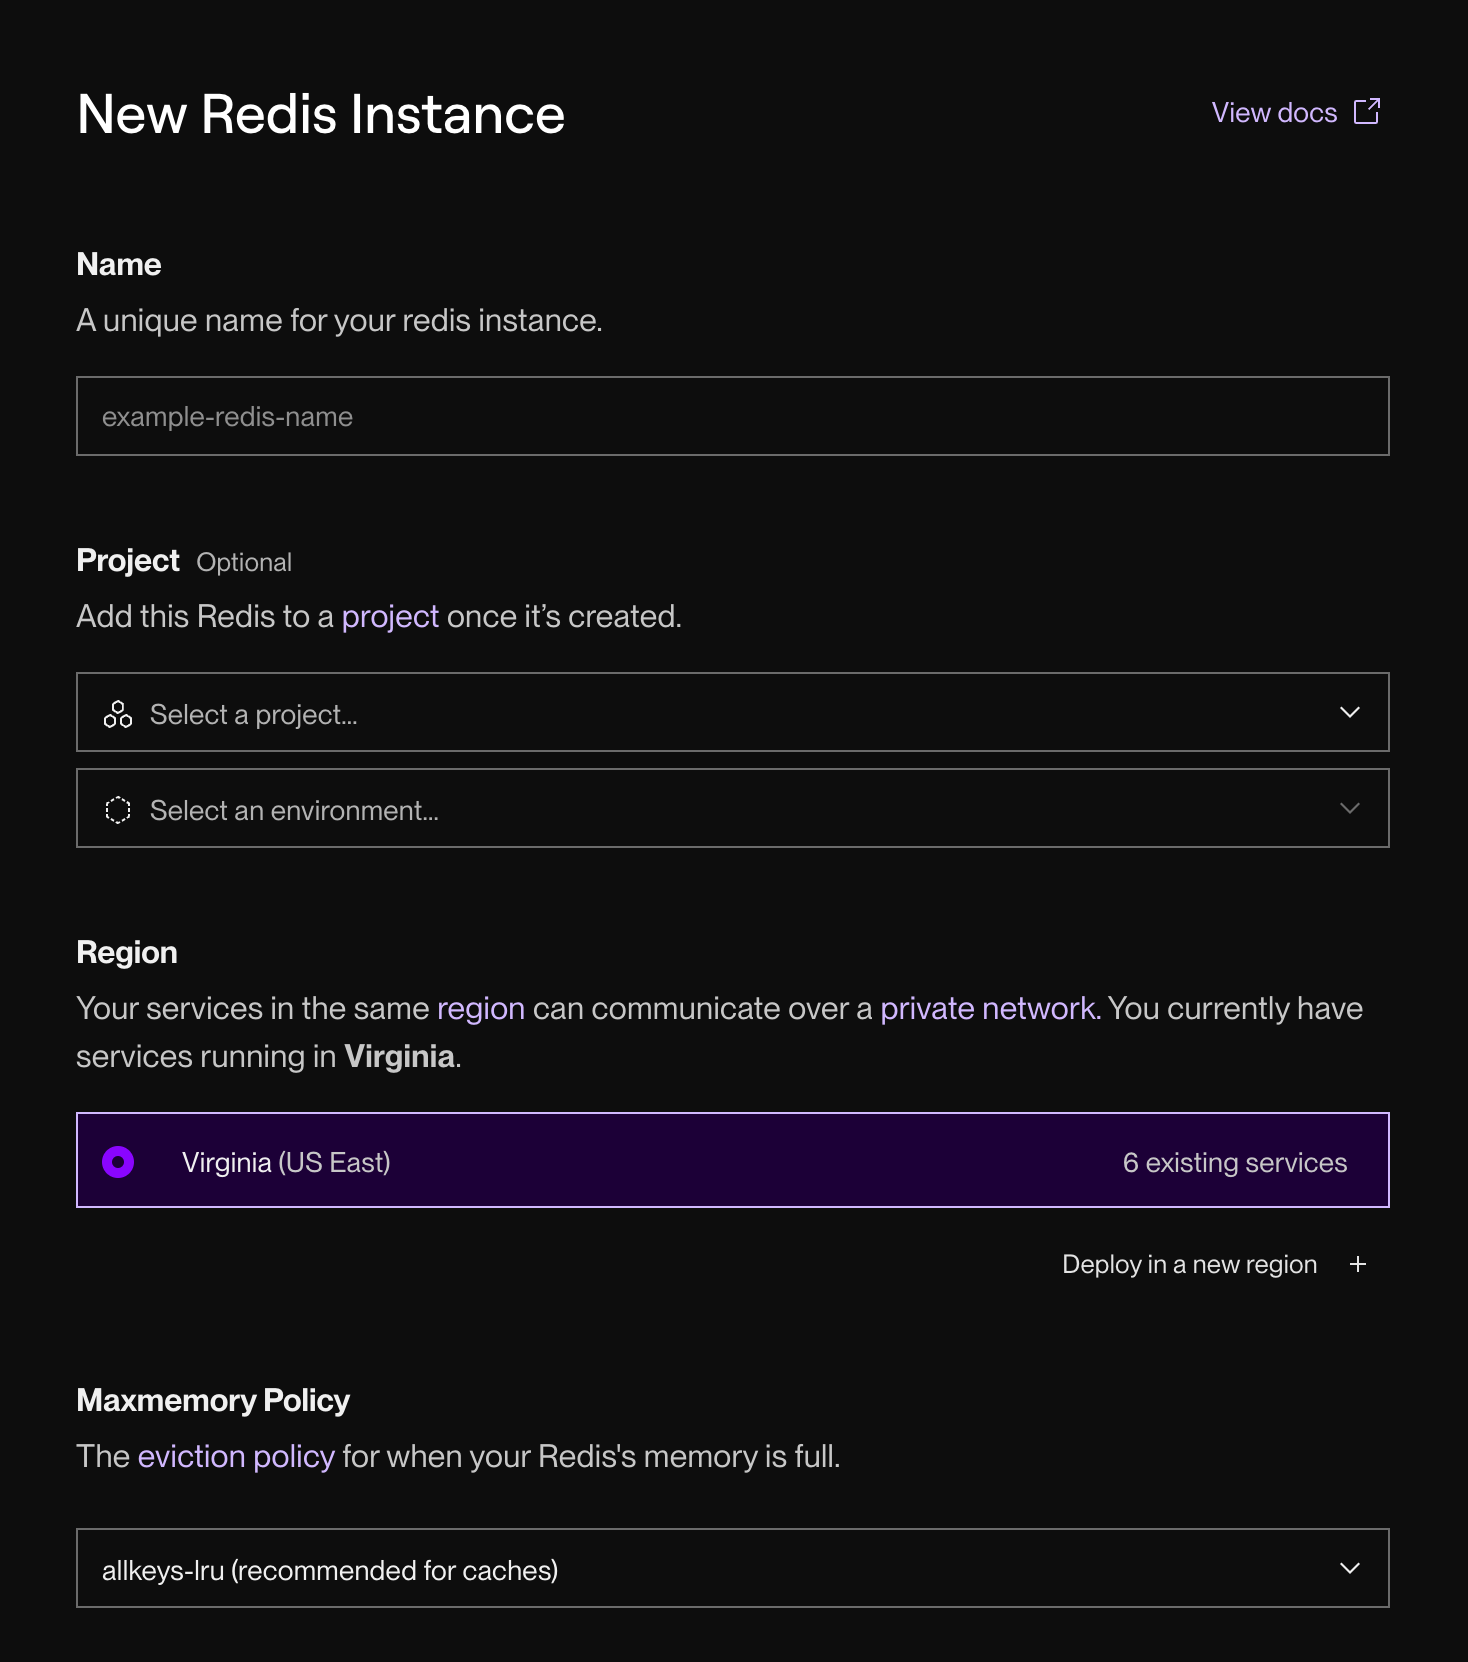
Create your Key Value instance
-
Go to dashboard.render.com/new/redis, or select New > Key Value in the Render Dashboard.
This form appears:
-
Provide a helpful Name for your instance.
- You can change this value at any time.
-
Choose a Region to run your instance in.
- Choose the same region as your services that will connect to the instance. This minimizes latency and enables communication over your private network.
-
Optionally change the instance's Maxmemory Policy.
-
Optionally set the instance's Persistence Mode.
-
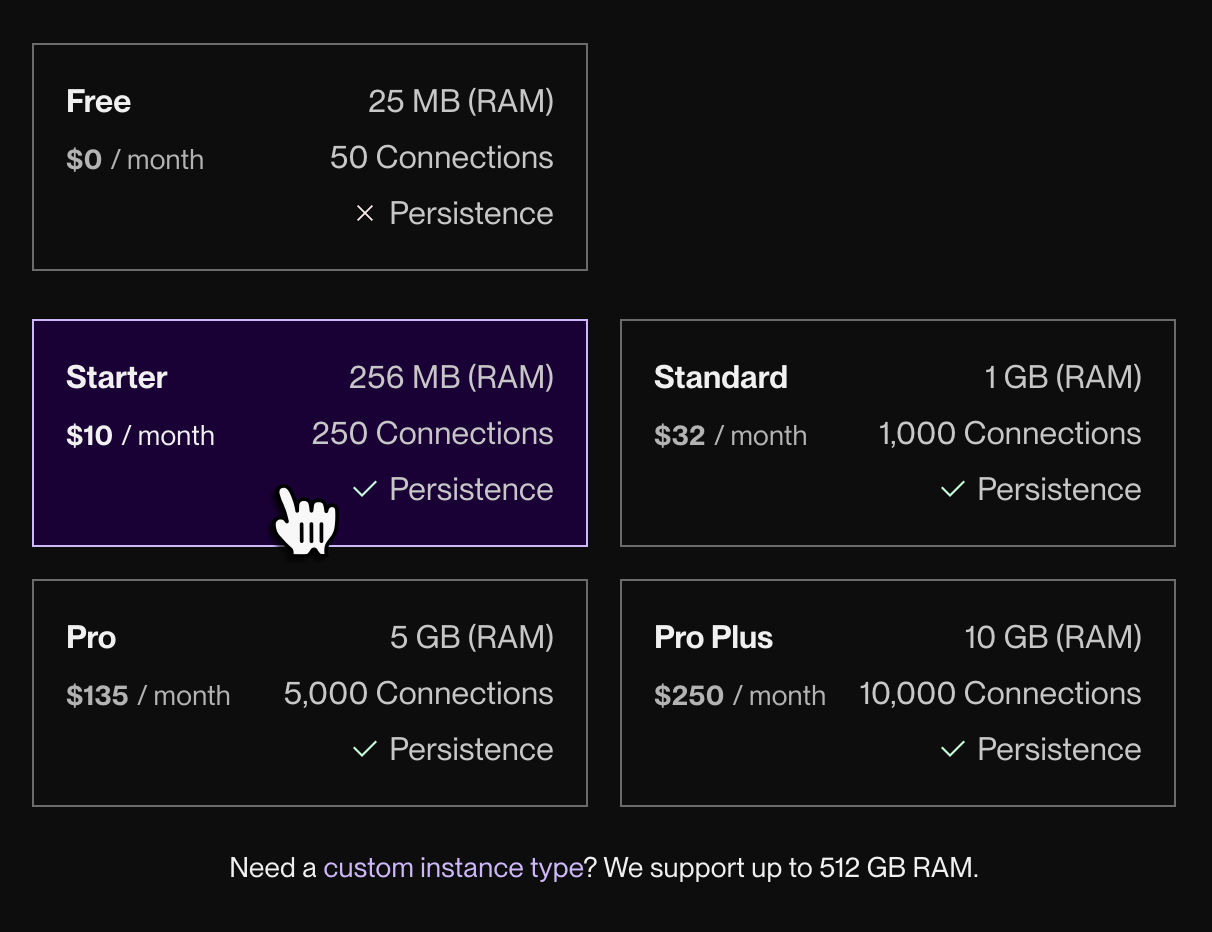
Scroll down and select an instance type. This determines its available RAM and connection limit.
-
Click Create Key Value.


You're all set! Your new instance's status updates to Available in the Render Dashboard when it's ready to use.
Connect to your Key Value instance
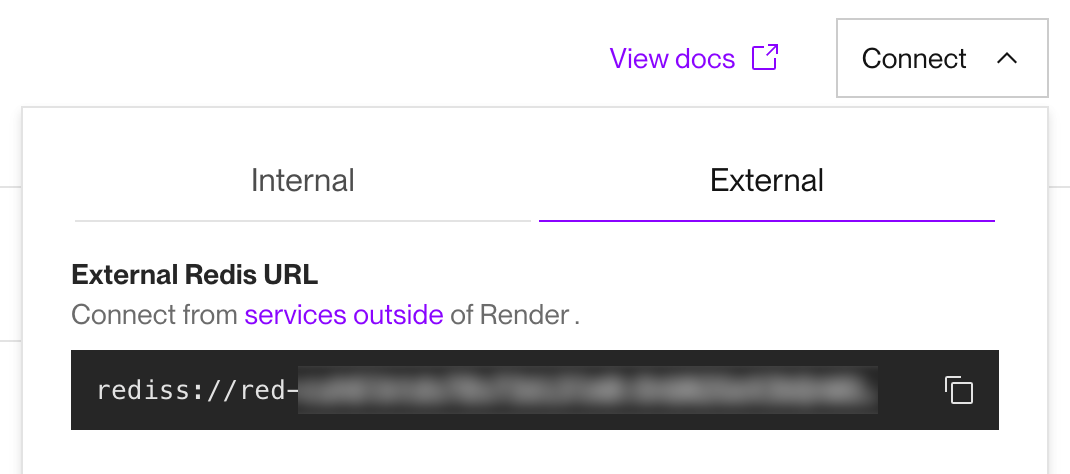
Every Key Value instance has two different URLs for incoming connections:
- An internal URL for connections from your other Render services running in the same region
- Connections using the internal URL are unauthenticated by default. You can optionally require authentication for internal connections.
- An external URL for connections from everything else
- Before you can use the external URL, you must first enable external connections for your Key Value instance.
Use the internal URL wherever possible. It minimizes latency by enabling communication over your private network.
Both URLs are available from the Connect menu in the top-right corner of your instance's page in the Render Dashboard:
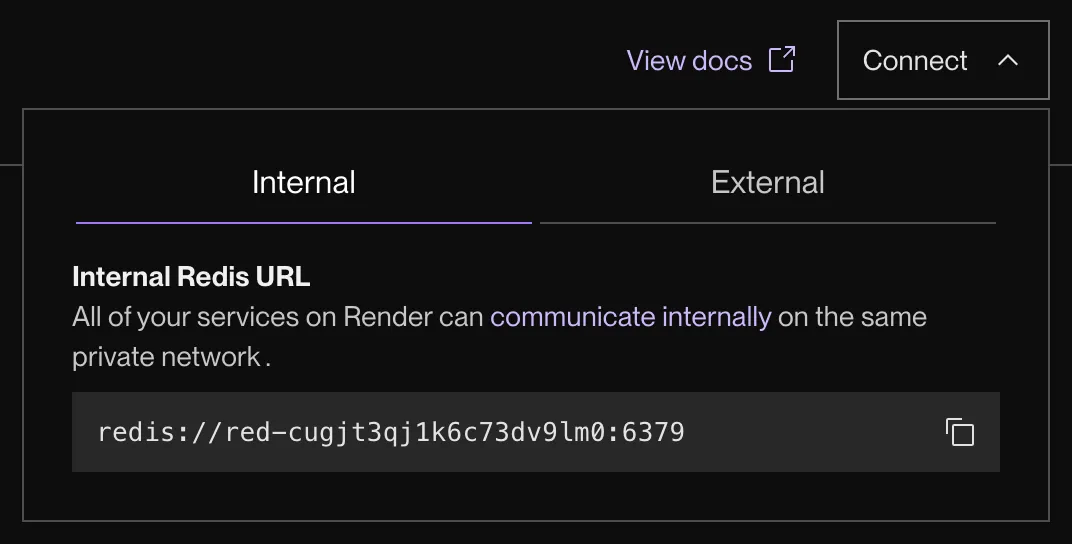
Key Value instances use redis:// and rediss:// URL schemes. You can connect to your instance using any Redis-compatible client that supports these schemes.
Internal connection examples
To connect with your internal URL, your Key Value instance and your connecting service must belong to the same workspace and run in the same region.
Enabling external connections
By default, newly created Key Value instances are not reachable at their external URL. To keep your instance secure, you can grant external access to specific sets of IPs.
In the Render Dashboard, go to your Key Value instance's Info page and scroll down to the Networking section:

Here you can specify IP address blocks using CIDR notation. The example above grants access to two example blocks: one for an office network and another for a single development machine.
These rules apply only to connections that use your Key Value instance's external URL.
Your Render services in the same region as your Key Value instance can always connect using your instance's internal URL.
If you attempt to connect from a disallowed IP address, your client will display an error like the following:
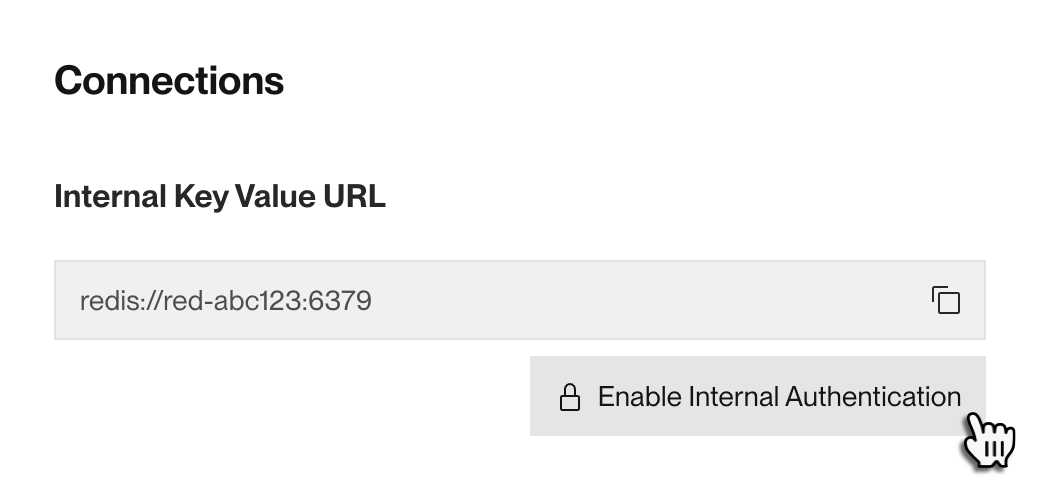
Requiring auth for internal connections
By default, Key Value instances do not require authentication for internal connections over your private network. This is why the default internal connection URL doesn't include a username or password:
External connections always require authentication.
To enforce additional security or fulfill compliance requirements, your Key Value instance can require authentication for internal connections:
-
From your Key Value instance's Info page in the Render Dashboard, scroll down to the Connections section and click Enable Internal Authentication:
Any existing connections that use your unauthenticated URL will break!
Before enabling this feature, we strongly recommend migrating your existing connections to use an authenticated URL. See below.
-
A confirmation dialog appears. Review the advisories, then click Enable Internal Authentication.

After you confirm, Render restarts your Key Value instance (it will be unavailable for a few seconds).
After the restart:
- Your Key Value instance now requires authentication for all connections.
- In the Render Dashboard, your instance's internal connection URL now includes a username and password.
Migrating unauthenticated Key Value connections
Before you require authentication for internal Key Value connections, you can update all of your existing connections to use an authenticated URL. This will prevent those connections from breaking when you enable authentication.
-
Obtain your Key Value instance's external connection URL from the Connect menu:
External URL isn't shown?
You first need to add at least one IP range to your instance's access control list. To continue blocking all external connections, you can add the dummy IP range
0.0.0.0/32. -
Extract the password from your external connection URL. The password starts just after the colon (
:) and ends just before the "at" symbol (@): -
For each service that connects to your Key Value instance with the internal URL, modify its connection string as shown below:
Specifically, you add the username
defaultand the password you extracted in the previous step. Every Key Value instance has a user nameddefault, and this user can accept any password until auth is required. -
Redeploy your modified services (unless they automatically redeployed when you updated their configuration).
-
You can now proceed through the steps to require authentication for internal connections.

After your Key Value instance restarts with authentication enabled, the default user now requires the exact password you provided. Because you've updated your connections accordingly, they remain functional.
Connecting with CLI tools
The redis-cli is a useful administrative tool for exploring and manipulating data on your Redis instance. There are 2 ways you can use redis-cli with your Redis instance:
-
If you have a running non-Docker service,
redis-cliwill be available as part of the environment and is accessible from the service's Shell page. The service must be in the same region as the Redis instance. You can also SSH into that service and runredis-clifrom there. -
You can run
redis-clilocally on your machine. You first need to installredis-clionto your machine. A copy and pastableredis-clicommand is available in theExternal Accesssection of your Redis settings. Note that you first need to enable external connections for your Redis instance.
External connections are TLS secured. The Redis CLI command provided will include the --tls flag.
After you connect, you can set and get keys using various commands:
Configure your Key Value instance
Maxmemory policy
Your Key Value instance's maxmemory policy determines which data it evicts to free space when it reaches its memory limit. You select a policy on instance creation and can change it later.
- For caching use cases, we recommend using
allkeys-lru. - For job queues, we recommend using
noevictionto ensure that queued jobs are not lost. - For other use cases, select a policy from the table below based on your requirements.
You can select any of the following policies:
|
Option |
Description |
Can memory fill up? |
|---|---|---|
|
|
Evict any key using approximated Least Recently Used (LRU). |
No |
|
|
Don't evict data. Instead, return an error on write operations whenever the instance is out of memory. |
Yes |
|
|
Evict using approximated LRU, only keys with an expire set. | Yes |
|
|
Evict using approximated Least Frequently Used (LFU), only keys with an expire set. |
Yes |
|
|
Evict any key using approximated LFU. |
No |
|
|
Remove a random key having an expire set. |
Yes |
|
|
Remove a random key, any key. |
No |
|
|
Remove the key with the nearest expire time (minor TTL) |
Yes |
Data persistence
Data persistence is not available for free Key Value instances.
Paid Key Value instances can write their state to disk to preserve data across restarts, upgrades, and other interruptions.
You set one of the following persistence modes on instance creation:
|
Persistence mode |
Description |
AOF |
RDB |
|---|---|---|---|
|
Journal + Snapshot |
Append all writes to a journal and periodically save a snapshot to disk. Journal writes occur once per second via the configuration Recommended for most non-caching use cases. |
☑️ |
☑️ |
|
Snapshot only |
Periodically save a snapshot to disk. Data since the most recent snapshot is lost on restart or failure. |
➖ |
☑️ |
|
Off |
Disable persistence completely to prioritize write performance. All data is lost on restart or failure. Recommended for caching use cases. |
➖ |
➖ |
- For caching use cases, we recommend turning persistence Off. This maximizes write performance when working with loss-tolerant data.
- For all other use cases, we recommend using Journal + Snapshot to maximize data retention.
Changing an existing Key Value instance's persistence mode triggers a restart, during which your instance is unavailable for a few seconds. Note that if you change your mode to or from Off, your instance's data is lost after the restart.
Changing instance types
You can upgrade your Key Value instance to a larger instance type with more RAM and a higher connection limit.
Note all of the following before you upgrade:
- It is not currently possible to downgrade a Key Value instance.
- Your instance will be unavailable for a minute or two during the upgrade.
- Upgrading requires a restart. This can result in data loss based on your instance's persistence mode.
- Free instances don't support data persistence, so their data is always lost on upgrade.
-
In the Render Dashboard, open your instance's Info page and scroll down to the Key Value Instance section.
-
Under Instance Type, click Update.
-
Select a new instance type and click Save Changes.
Need an instance with more than 10 GB of RAM?
Please reach out to our support team in the Render Dashboard.
Blueprint configuration
As with your other services, you can manage your Key Value instances with Blueprints, Render's infrastructure-as-code model. For details and examples, see the Blueprint YAML Reference.
Metrics
Metrics for memory usage, CPU load, and active connections are available from your Key Value instance's Metrics page in the Render Dashboard:

For details, see Service Metrics.
*Redis is a registered trademark of Redis Ltd. Any rights therein are reserved to Redis Ltd. Any use by Render Inc is for referential purposes only and does not indicate any sponsorship, endorsement or affiliation between Redis and Render Inc.