
Pattern 3 deploys as two services. A gateway web service receives PR submissions and dispatches workflow runs. A workflow service registers and runs the tasks. The Blueprint creates the gateway; the workflow service is a separate Dashboard step because Blueprints do not yet create or manage Workflows.
flowchart LR
  pr(["PR URL"])
  gw["Gateway<br/>web service"]
  wf["Workflow service<br/>runs the tasks"]

  pr --> gw
  gw -->|dispatch run| wf
  wf --> cr["code-review task"]
Inside the run, the built-in code-review task runs prepare diff and filter diff as plain functions, then fans out security, performance, and ux (frontend only) as their own tasks, and ends with judge.
1. Deploy the gateway Blueprint
The Pattern 3 Blueprint provisions the gateway web service and a Postgres database.
Use packages/workflow-agents/render.yaml.
projects:  - name: workflow-agents    environments:      - name: production        databases:          - name: <YOUR_USERNAME>-workflow-agents-db            plan: basic-256mb            region: oregon            postgresMajorVersion: "18"
        services:          - type: web            name: <YOUR_USERNAME>-agents-gateway            runtime: node            region: oregon            plan: starter            buildCommand: npm ci            startCommand: npm run start --workspace @workshop/workflow-agents            healthCheckPath: /healthz            envVars:              - key: DATABASE_URL                fromDatabase:                  name: <YOUR_USERNAME>-workflow-agents-db                  property: connectionString              - fromGroup: workflow-shared-keys              - key: NODE_ENV                value: production
Use packages/workflow_agents/render.yaml.
projects:  - name: workflow-agents    environments:      - name: production        databases:          - name: <YOUR_USERNAME>-workflow-agents-db            plan: basic-256mb            region: oregon            postgresMajorVersion: "18"
        services:          - type: web            name: <YOUR_USERNAME>-agents-gateway            runtime: python            region: oregon            plan: starter            buildCommand: pip install uv && uv sync --frozen --no-dev --package workshop-workflow-agents            startCommand: uv run python -m workflow_agents.server            healthCheckPath: /healthz            envVars:              - key: DATABASE_URL                fromDatabase:                  name: <YOUR_USERNAME>-workflow-agents-db                  property: connectionString              - fromGroup: workflow-shared-keys              - key: NODE_ENV                value: production              - key: PYTHON_VERSION                value: "3.12"
The gateway writes review rows to Postgres and dispatches real Render Workflow runs. DATABASE_URL comes from <YOUR_USERNAME>-workflow-agents-db. Shared secrets such as RENDER_API_KEY and OPENAI_API_KEY come from the workflow-shared-keys environment group.
- Start a new Blueprint In the Render Dashboard, click
+ New, thenBlueprint. If you haven’t connected GitHub yet, clickConnect GitHuband authorize the Render app for your fork. - Select your fork Pick your workflow workshop fork from your connected repos.
- Set the Blueprint Path Set it to your track’s Pattern 3 path, exactly:
packages/workflow-agents/render.yaml(TypeScript) orpackages/workflow_agents/render.yaml(Python). Mind the hyphen vs underscore. There’s no rootrender.yaml. - Create all as new services
Then click
Deploy Blueprint. You get the gateway web service and Postgres.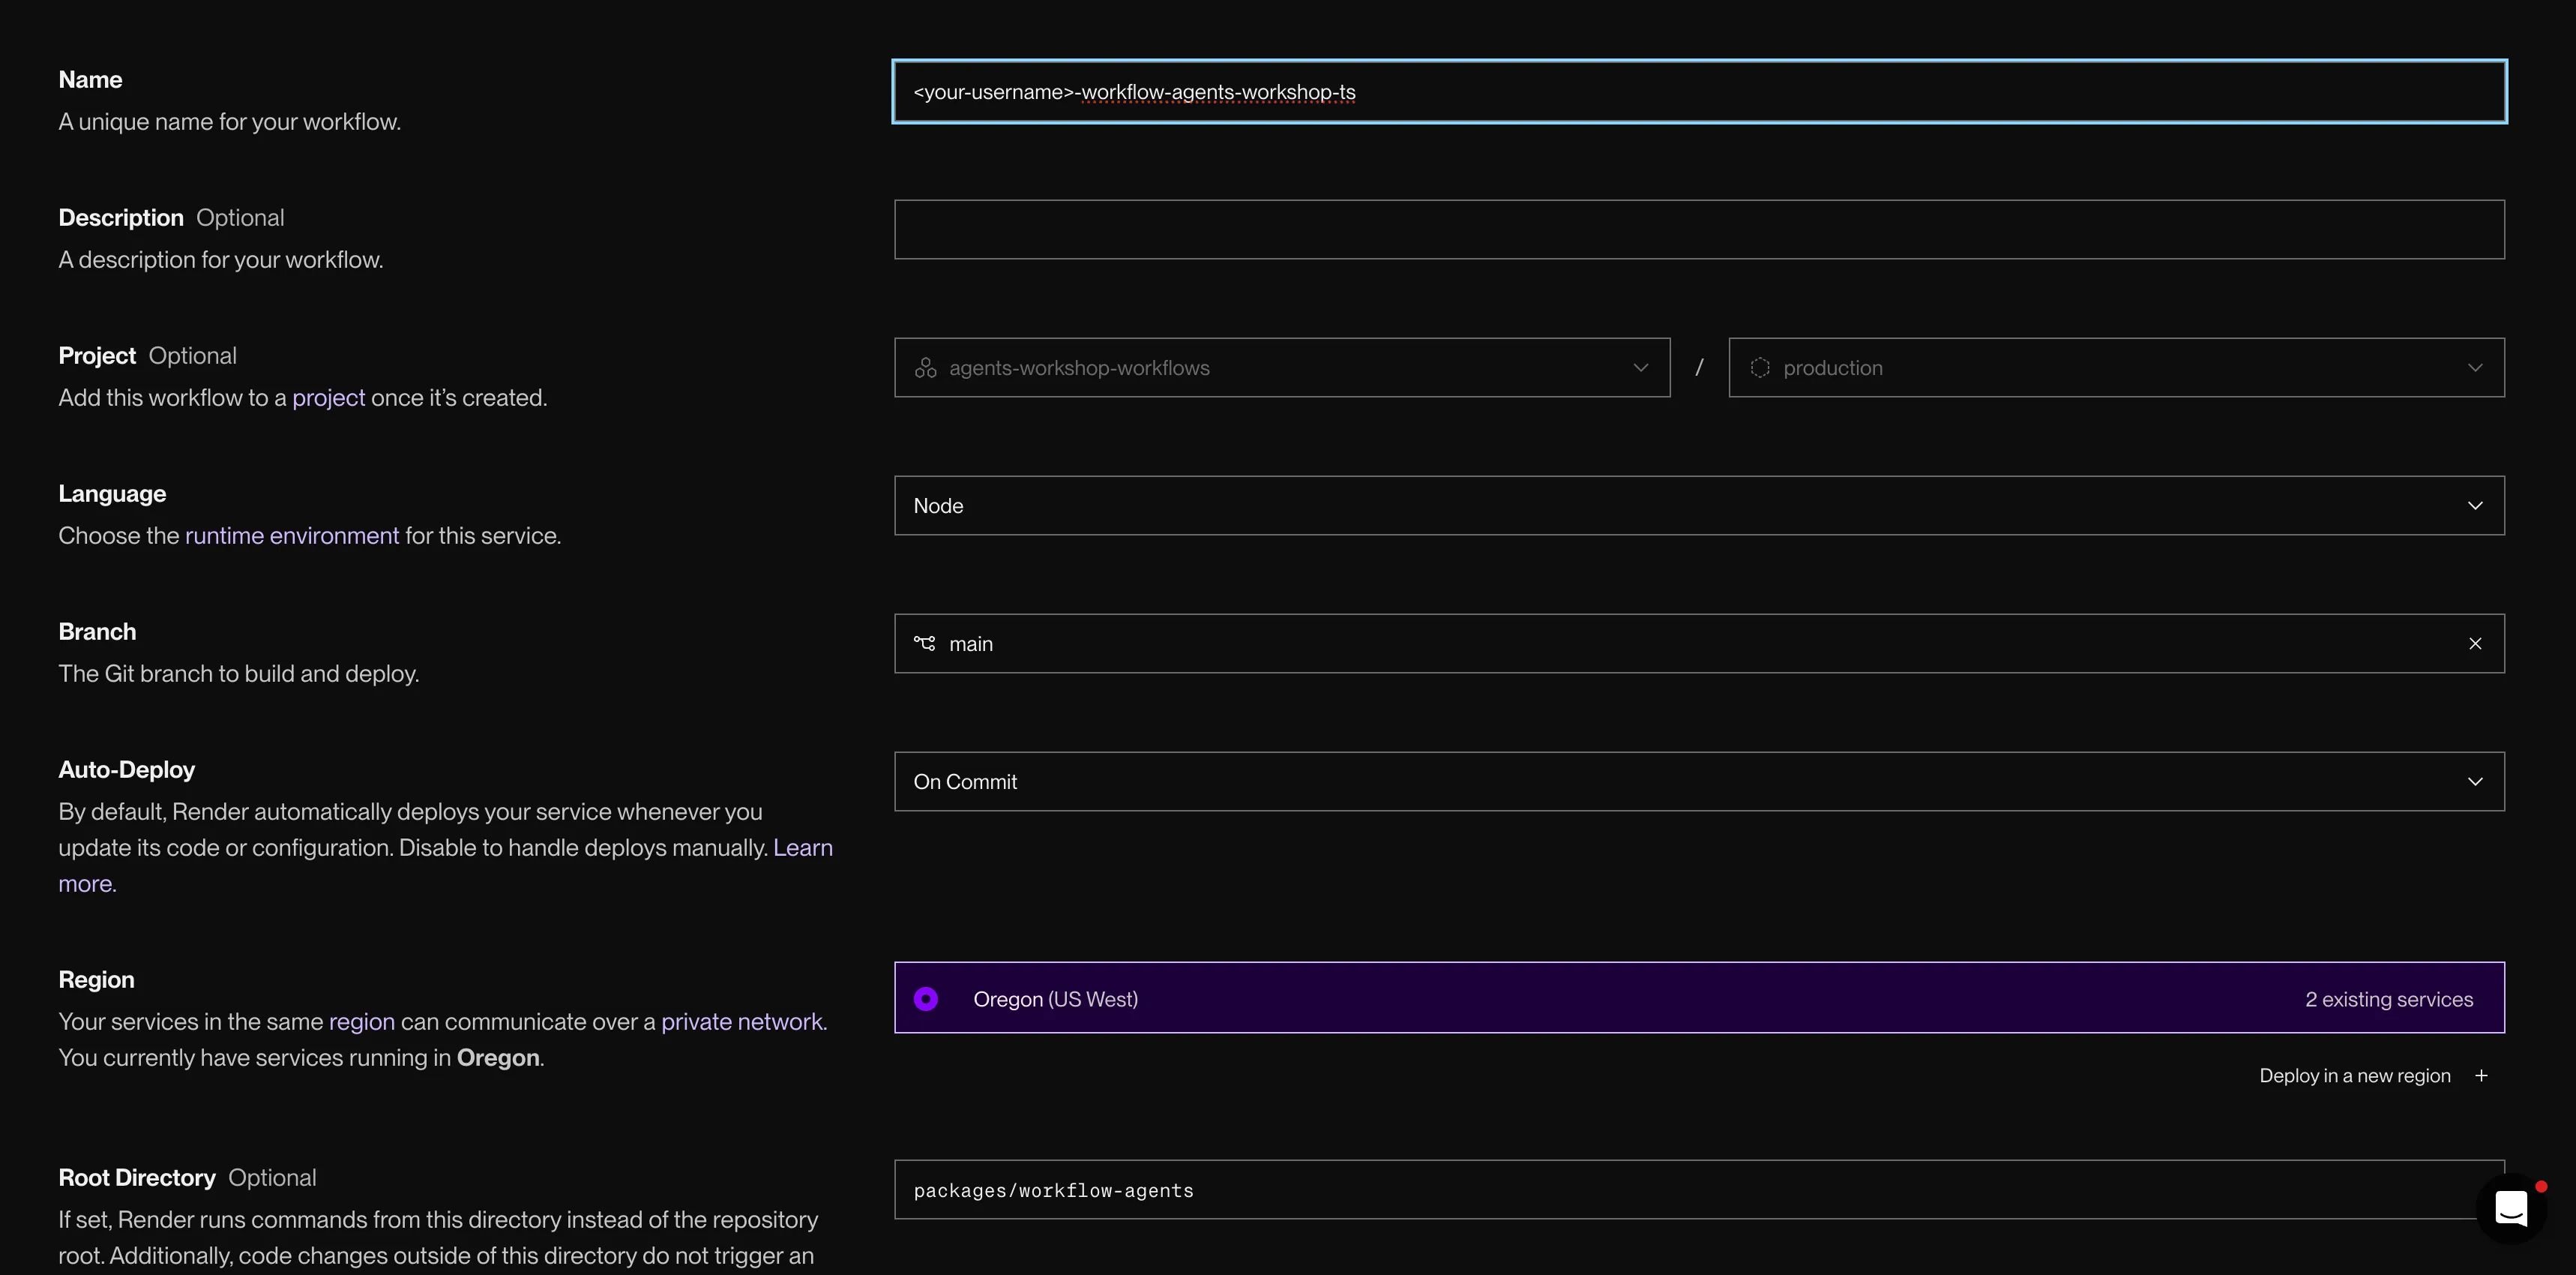
Deploy the Pattern 3 Blueprint to create the gateway web service and Postgres.
2. Create the workflow service
This is the step that is easy to miss. The workflow service runs the workflow entrypoint, which registers and executes the tasks. The Blueprint does not create it.
Name the service workflow-agents to match the slug you’ll wire into the gateway.
The CLI is the fastest route. One command sets every field, so there’s nothing to mistype in a form. First make sure you’re logged in and pointed at your workspace (see the CLI setup note in Section 3), then have your repo URL, branch, and the internal connection string for workflow-agents-db ready.
render workflows create \ --name workflow-agents \ --repo <your-repo-url> \ --branch <your-branch> \ --root-directory packages/workflow-agents \ --runtime node \ --region oregon \ --build-command "cd ../.. && npm ci" \ --run-command "cd ../.. && npm run start:workflow --workspace @workshop/workflow-agents" \ --env-var DATABASE_URL=<internal-postgres-connection-string> \ --env-var NODE_ENV=production \ --output json \ --confirmThe cd ../.. on both commands is not optional. The service builds from packages/workflow-agents, but npm ci has to run from the monorepo root to read the root lockfile and workspaces. Drop it and the build fails.
render workflows create \ --name workflow-agents \ --repo <your-repo-url> \ --branch <your-branch> \ --root-directory packages/workflow_agents \ --runtime python \ --region oregon \ --build-command "pip install uv && uv sync --frozen --no-dev" \ --run-command "uv run python -m workflow_agents.workflow" \ --env-var DATABASE_URL=<internal-postgres-connection-string> \ --env-var PYTHON_VERSION=3.12 \ --output json \ --confirmKeep the uv run on the start command. Bare python can’t see the uv workspace packages, and the service crash-loops with ModuleNotFoundError.
Confirm the service exists and read back its slug:
render workflows listIt should list workflow-agents. That exact slug is what you wire into the gateway in Section 3.
Provider keys (OPENAI_API_KEY / ANTHROPIC_API_KEY) are optional: without them the task uses the mock model. For real findings, add --env-var OPENAI_API_KEY=<key> to the command, or set them on the service’s Environment tab in the Dashboard.
Prefer the Dashboard? Create the service by clicking
The Dashboard route is more steps, but it shows you every field as you go. The key thing to get right: attach the service to your project.
First, get to the New Workflow form:
- Open your project Click into the project the Blueprint just created.
- Add a new service From inside the project, click
+ New serviceand chooseWorkflow. Starting from inside the project pre-fills theProjectfield, so the service lands next to the gateway and database. If you start from the top nav instead, the field is empty and you must pick your project from theProjectdropdown before you deploy, or the services split apart. - Select your fork
Choose your connected workflow workshop repo.
The New Workflow form. Set each field to the value in the table for your track.
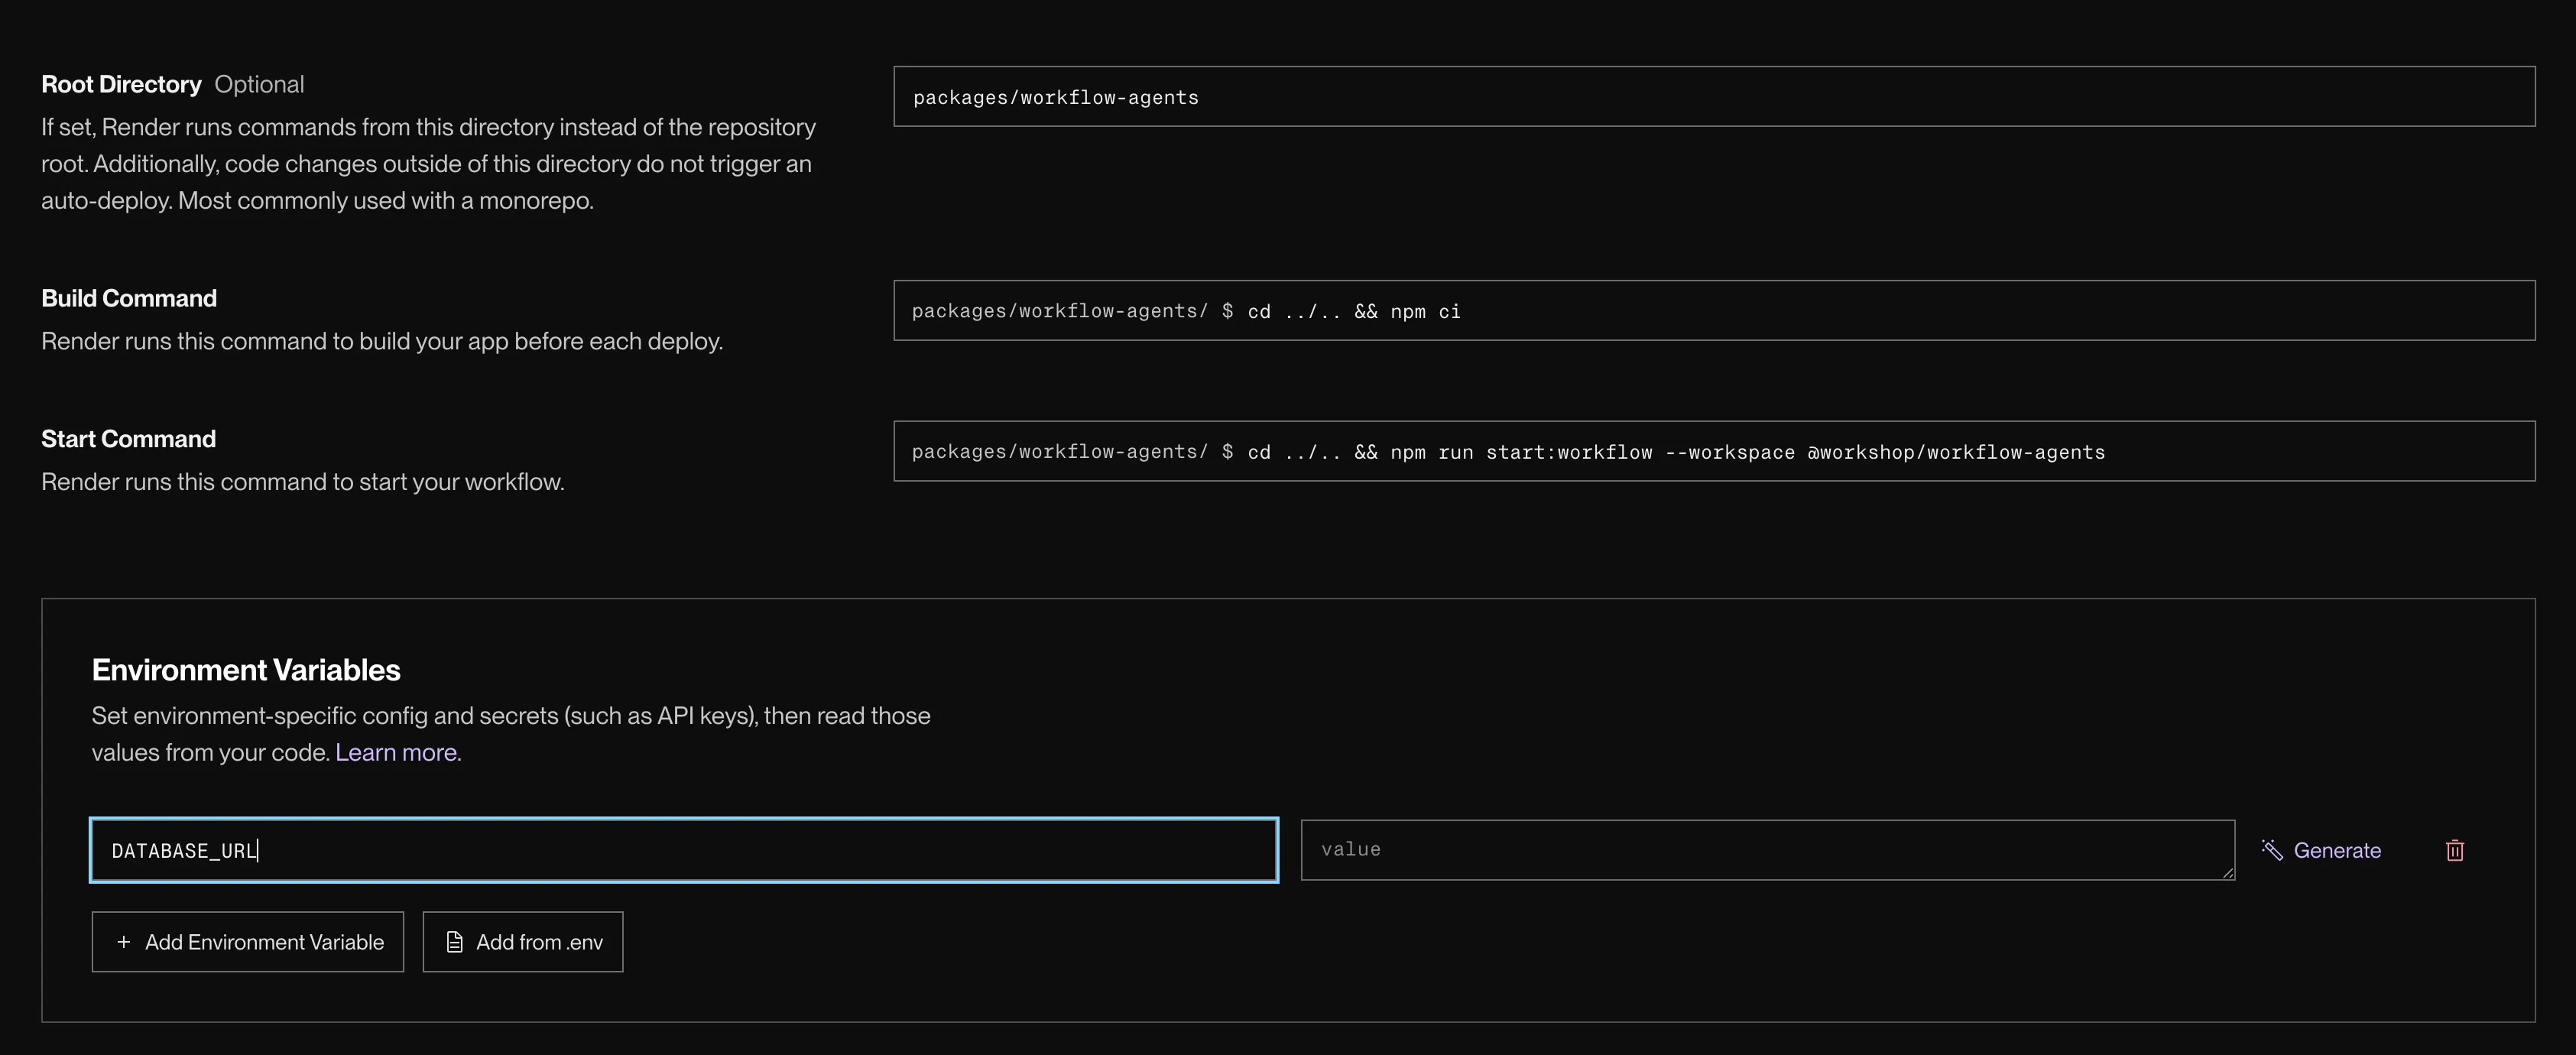
Then set every field. Type each value exactly, character for character. Root Directory, Build Command, and Start Command are where mistakes happen, and a wrong value here is what fails the build later.
| Field | Value |
|---|---|
| Name | workflow-agents |
| Region | Oregon (match the gateway and database) |
| Language | Node |
| Root Directory | packages/workflow-agents |
| Build Command | cd ../.. && npm ci |
| Start Command | cd ../.. && npm run start:workflow --workspace @workshop/workflow-agents |
The cd ../.. on both commands is not optional. The service builds from packages/workflow-agents, but npm ci has to run from the monorepo root to read the root lockfile and workspaces.
| Field | Value |
|---|---|
| Name | workflow-agents |
| Region | Oregon (match the gateway and database) |
| Language | Python |
| Root Directory | packages/workflow_agents |
| Build Command | pip install uv && uv sync --frozen --no-dev |
| Start Command | uv run python -m workflow_agents.workflow |
Keep the uv run on the start command. Bare python can’t see the uv workspace packages, and the service crash-loops with ModuleNotFoundError.
With the fields set, finish the service:
- Wire DATABASE_URL On the
Environmenttab, setDATABASE_URLto the internal connection string forworkflow-agents-db, the same database the gateway uses. - Deploy Click
Deploy workflow. The first deploy takes a couple of minutes.
Confirm the workflow service landed in the same project as the gateway. If the two services split apart, you started the + New flow from outside the project.
3. Set the workflow slug on the gateway
The gateway needs one value from you: RENDER_WORKFLOW_SLUG, the name of the workflow service you just created. Everything else is already wired:
| Variable | Where it comes from |
|---|---|
RENDER_WORKFLOW_SLUG | You set it on the gateway, below |
RENDER_API_KEY | sync: false on the gateway; set it to a Render API key from your account |
OPENAI_API_KEY / ANTHROPIC_API_KEY | Optional; set on the workflow service for real reviews |
DATABASE_URL | The gateway from its Blueprint database, the workflow service from the connection string you set in Section 2 |
Set the slug:
- Copy the workflow slug
Open your workflow service’s page. Next to
Workflow Slug, click the copy icon. It should readworkflow-agents.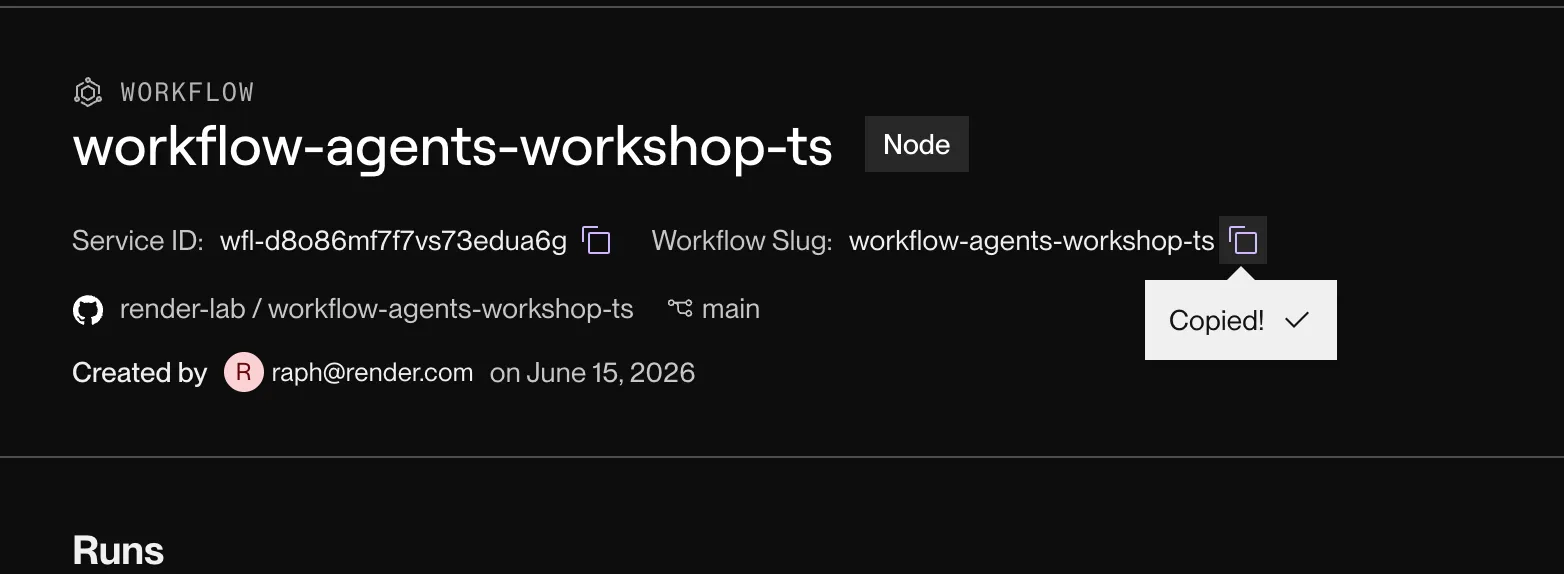
Copy the Workflow Slug from your workflow service's page. - Add the env var on the gateway Open the
<your-username>-agents-gatewayweb service, go to theEnvironmenttab, and click+ Add variable. - Type the key and paste the slug
In the
KEYfield, typeRENDER_WORKFLOW_SLUGexactly. In theVALUEfield, paste the slug you copied. Don’t type it from memory: a typo dispatches to a slug that doesn’t exist.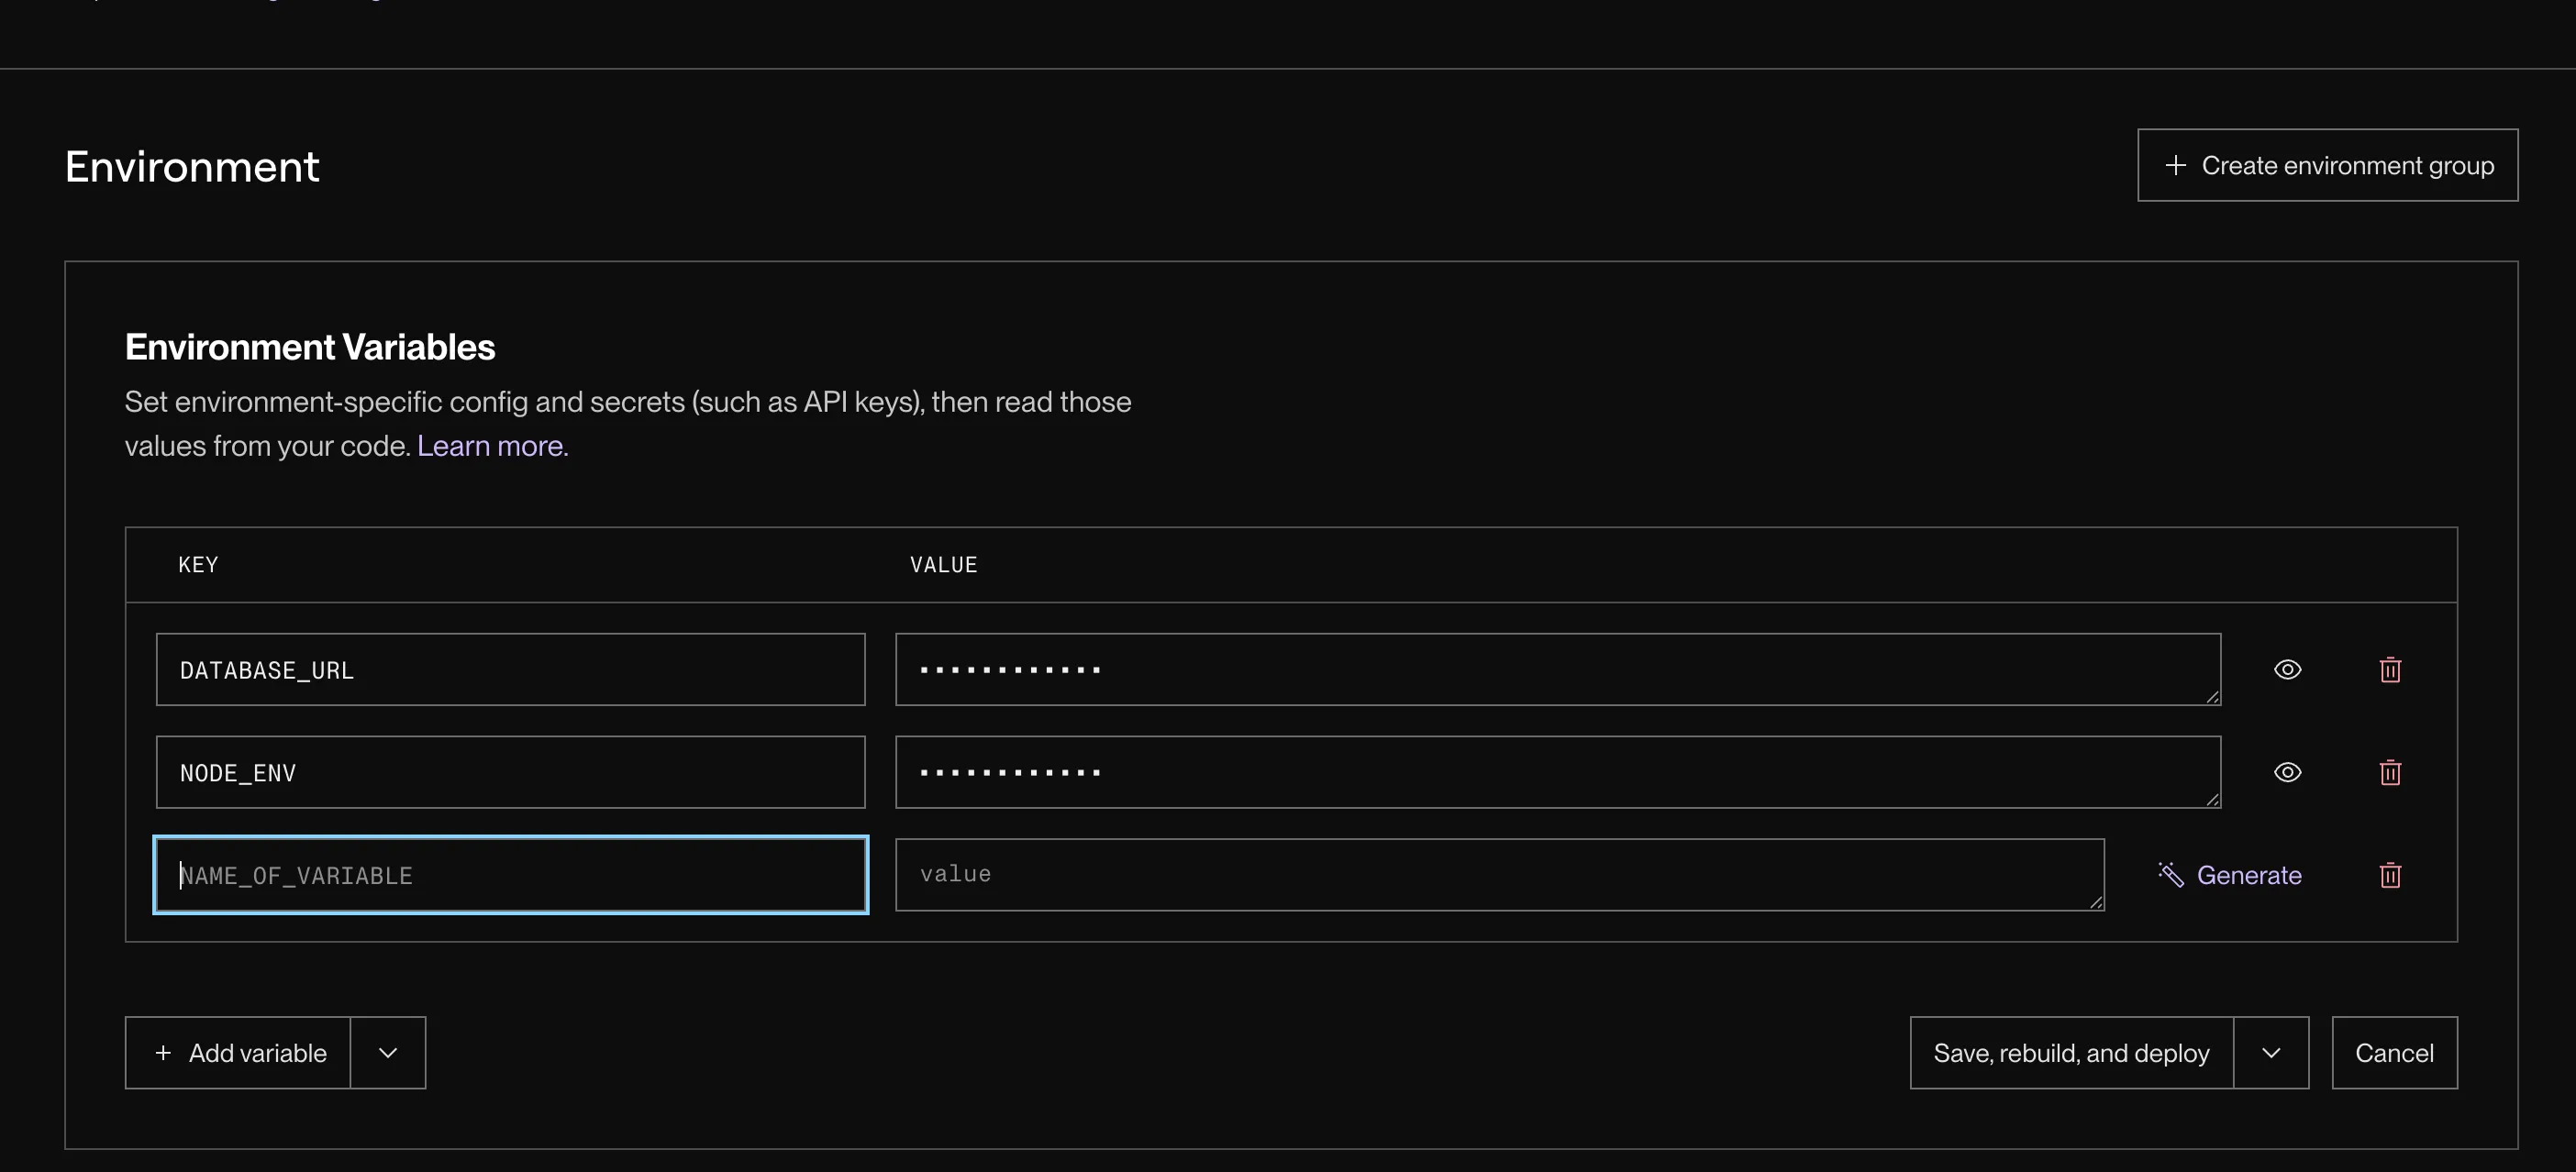
On the gateway, add RENDER_WORKFLOW_SLUG and paste the slug as its value. - Save and redeploy Click
Save, rebuild, and deploy.
Set RENDER_WORKFLOW_SLUG to workflow-agents (the name of the workflow service you created in Section 2).
After the Workflow service deploys, confirm the task is registered:
render workflows tasks listIn the interactive CLI, this opens a short wizard: pick your workflow (for example <your-username>-workflow-agents), then pick the ready version, then read the Tasks table. The first screen looks like a workflow list; that is expected. Success means you reach Tasks and see names such as code-review, security, performance, ux, judge, my-reviewer, and your-review.
In a non-interactive terminal (some IDE shells), pass the version id explicitly:
render workflows versions list <your-username>-workflow-agents -o textrender workflows tasks list <wfv-id> -o textThese commands hit the Render API, not localhost: do not pass --local.
4. Paste a PR link into the gateway and read the trace
You don’t open a pull request here. You paste the URL of an existing PR into the gateway dashboard, and the gateway reviews it for you.
Open the gateway’s *.onrender.com URL. You’ll see the Workflow Agents dashboard. Copy the link to the LlamaIndex baseline PR and paste it into the dashboard. The gateway dispatches the hosted code-review workflow and creates a review row immediately.
- Paste the PR link Paste the PR URL into the field in the gateway dashboard and click
Review. The gateway returns quickly and creates a review row instead of blocking on the whole run. - Open the run trace In the Render Dashboard, open the workflow service and find the run.
- Read the fan-out Each reviewer is its own task. The parallel reviewers fan out, each in its own isolated container, then
judgemerges their findings.
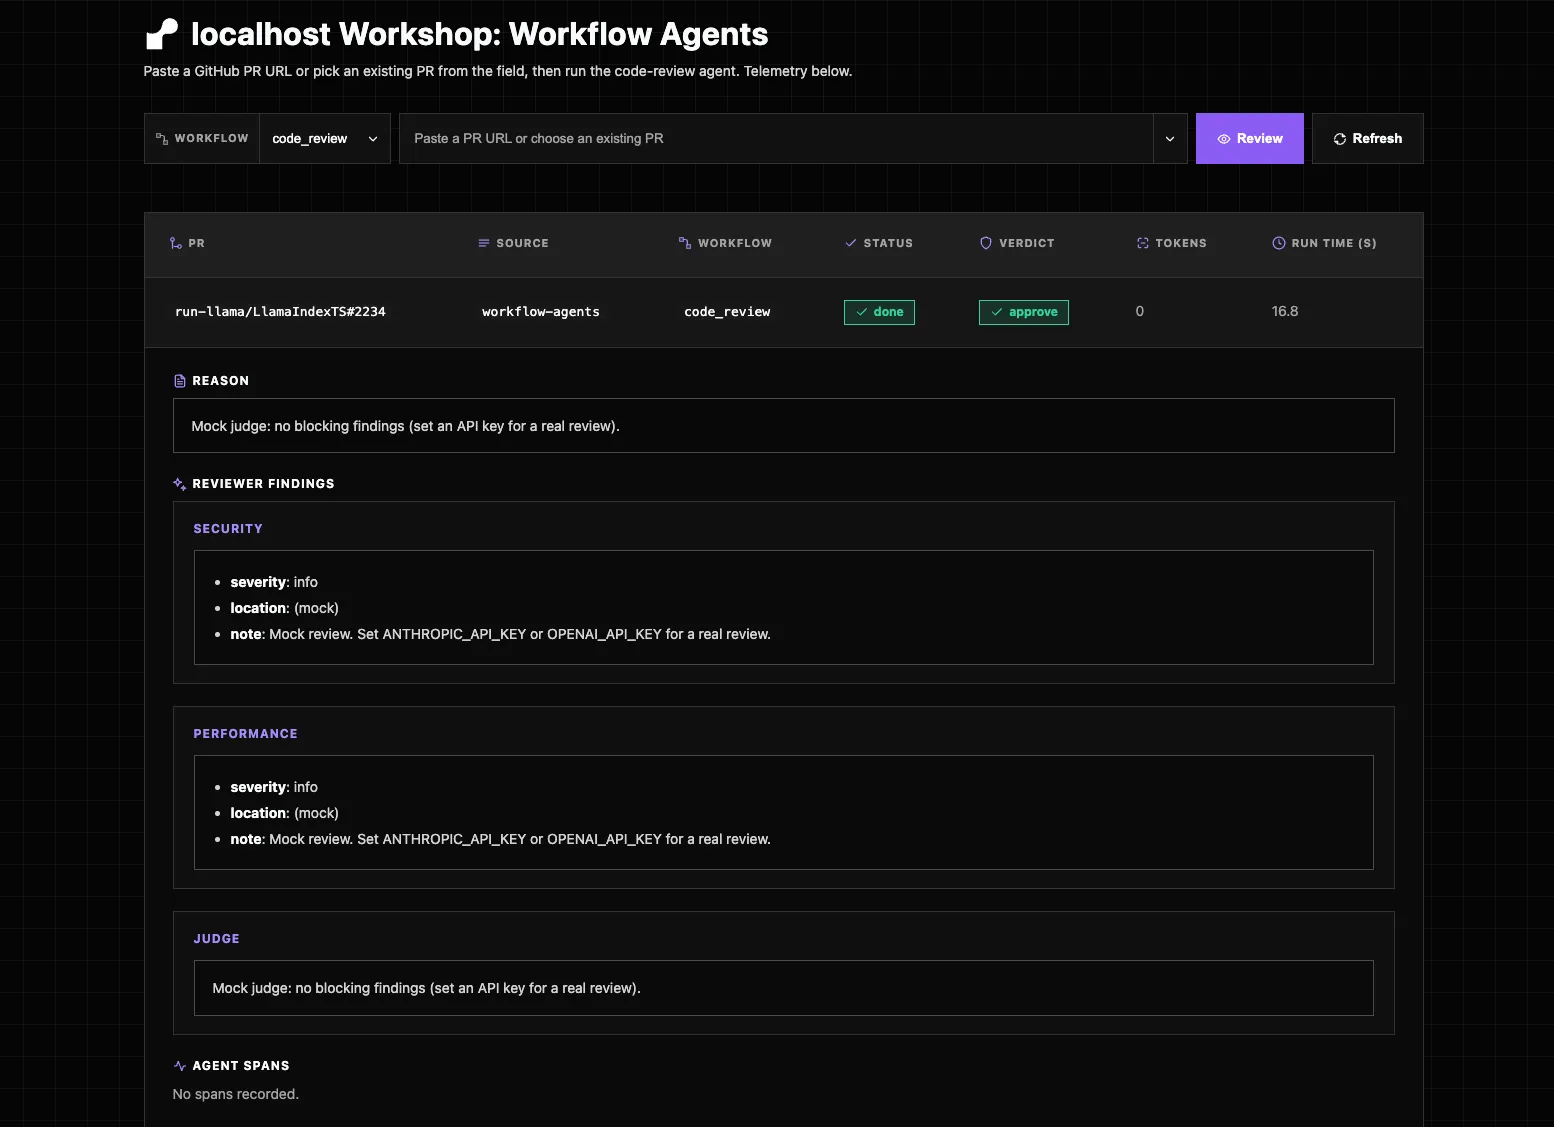
The gateway dashboard is useful for the review record: status, verdict, tokens, run time, reason, findings, and spans. The Render Dashboard is where you inspect the Workflow run trace itself.
flowchart TB
  cr["code-review<br/>task"]
  cr --> sec["security<br/>task"]
  cr --> perf["performance<br/>task"]
  cr --> ux["ux<br/>task (frontend only)"]
  sec --> judge["judge<br/>task"]
  perf --> judge
  ux --> judge
The LlamaIndex baseline touches backend files, so security and performance run but ux is skipped. Paste the Mastra frontend PR link into the dashboard, or pick it from the dashboard picker, to watch the ux task join the fan-out.
Everything you see in that trace, the queueing, the per-task retries and timeouts, the isolation, the parallel fan-out, is what you hand-wrote in the queue helper for Pattern 2. Here it’s the platform.
Troubleshooting
Find the symptom that matches what you’re seeing, then apply the fix.
Reviews fail with a GitHub 403. GitHub’s API allows only 60 unauthenticated requests per hour per IP, and that limit exhausts fast. prepare-diff returns 403 rate limit exceeded. Create a fine-grained GitHub PAT with public-repo read access and set it as GITHUB_TOKEN on the gateway web service and the workflow service. That raises the limit to 5,000 requests per hour.
The review row never advances and no run trace appears. You deployed the Blueprint but skipped Section 2. Pattern 3 is two services: the Blueprint creates only the gateway and Postgres. Without the separate Workflow service, the gateway dispatches to a slug that doesn’t exist. Go into the project, + New service → Workflow, configure it, deploy, then re-run the review.
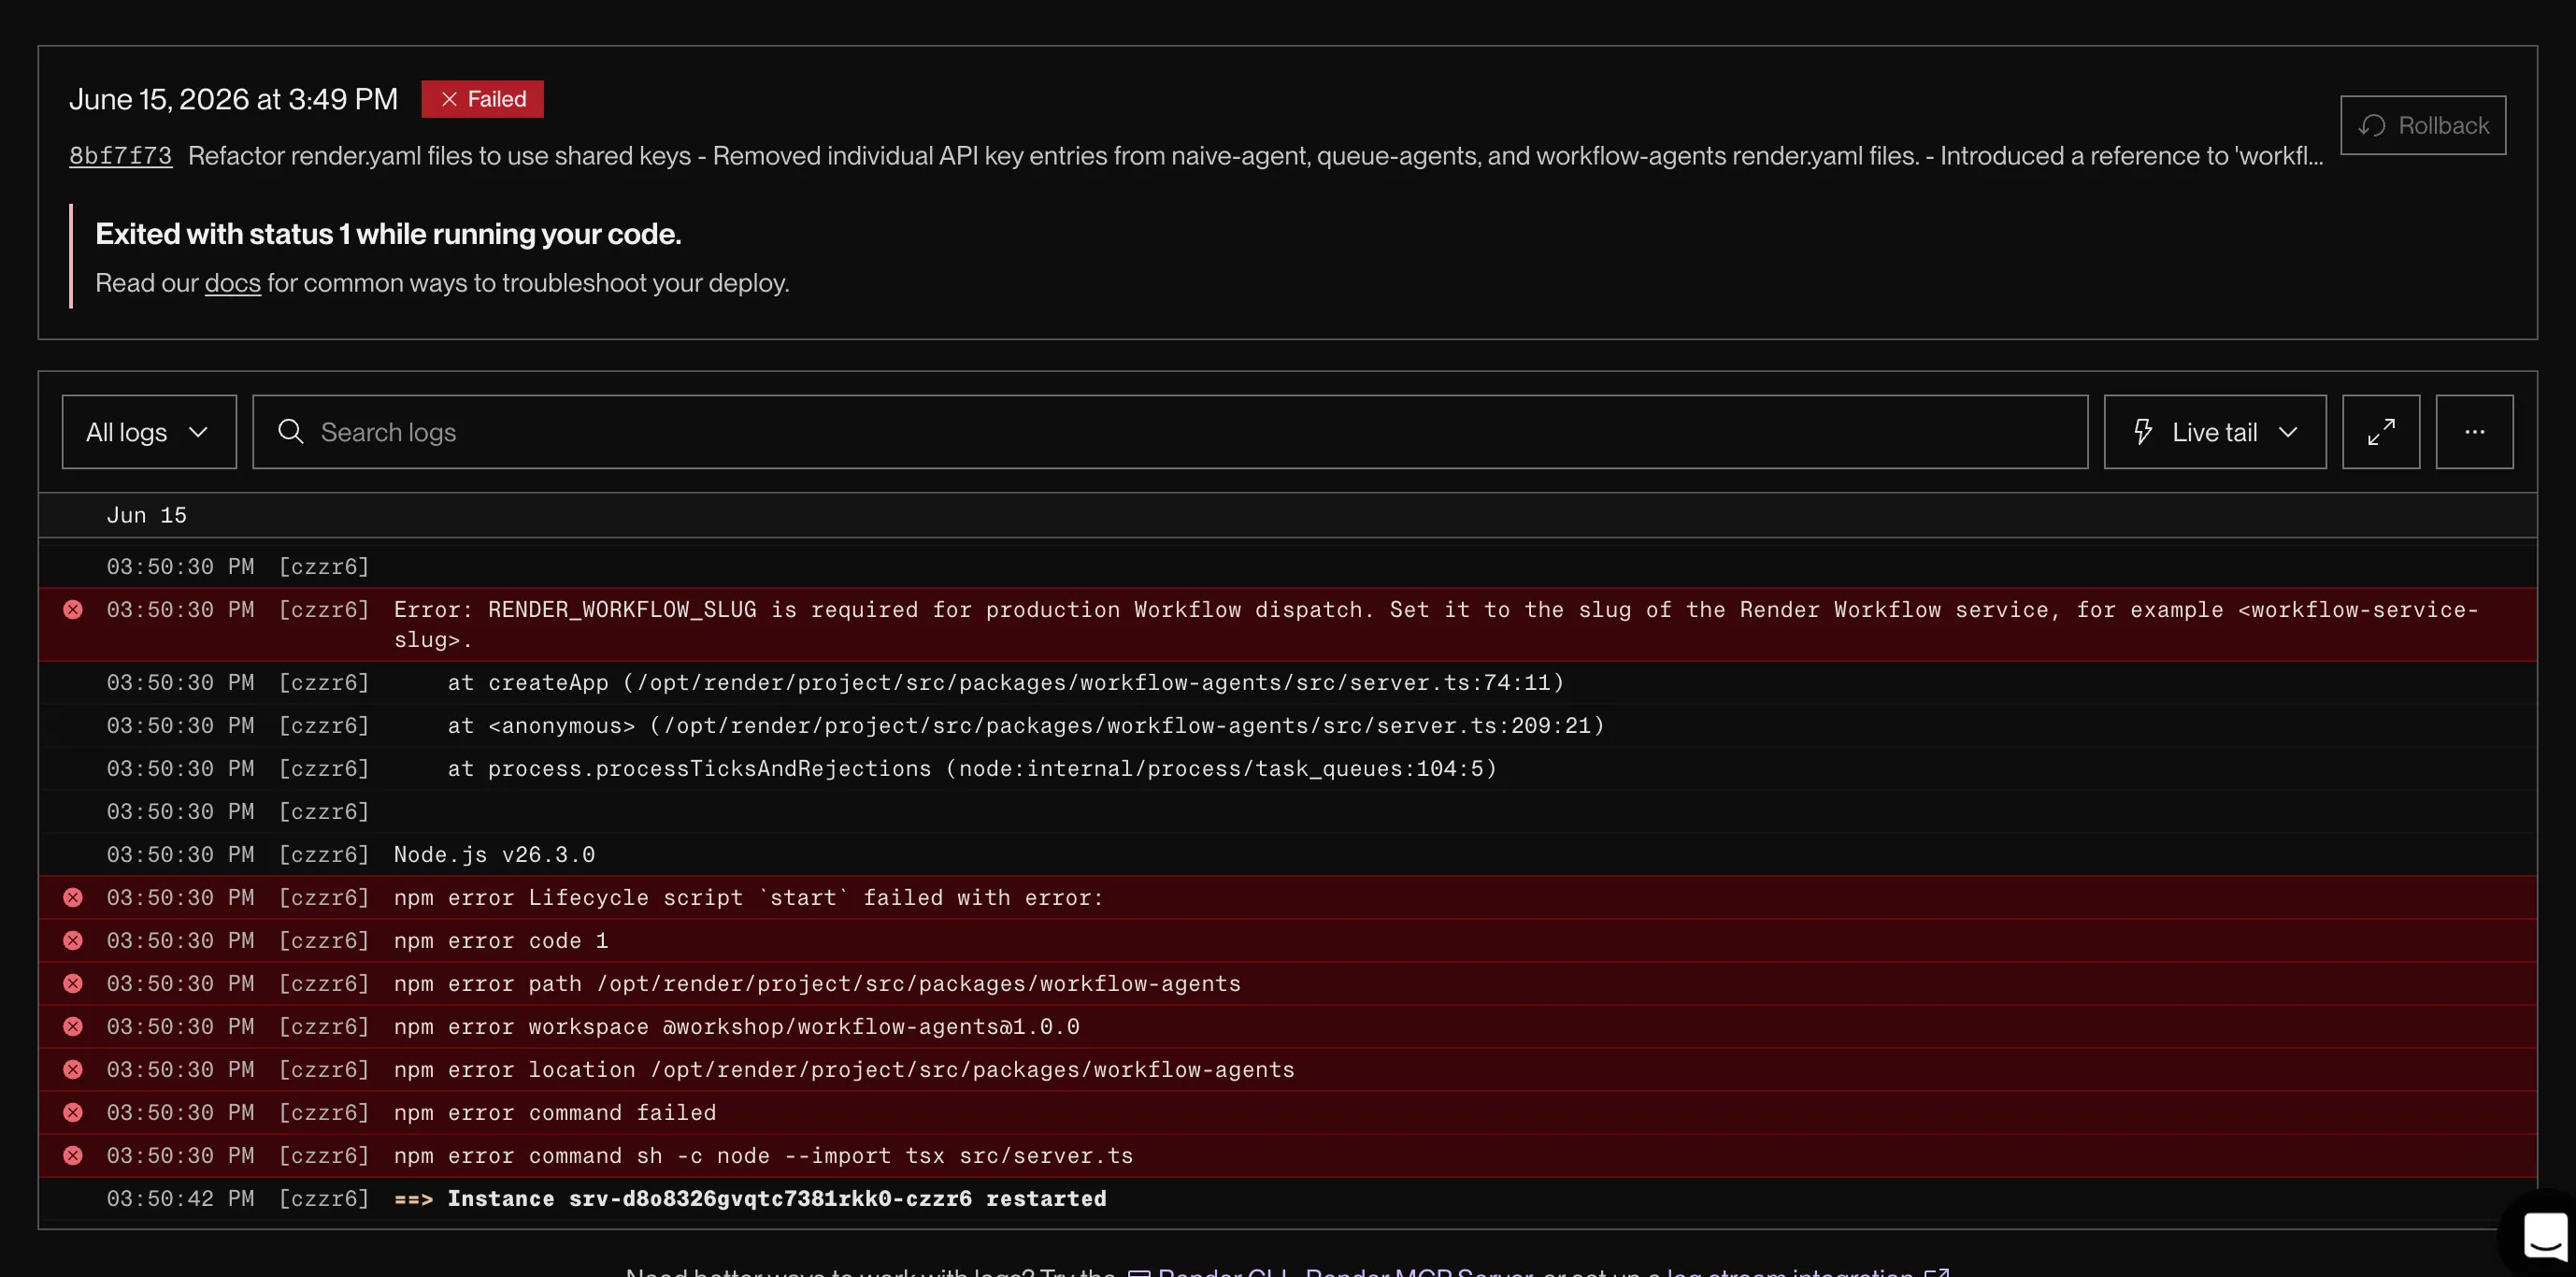
Gateway crashes with RENDER_WORKFLOW_SLUG is required. Both Blueprints set NODE_ENV=production, which makes the gateway require this value. On the gateway service, set RENDER_WORKFLOW_SLUG to workflow-agents, the slug of the Workflow service you created in Section 2. Confirm your slug with render workflows list.
Dispatch returns unauthorized or 401. Set RENDER_API_KEY on the gateway to a valid Render API key from your account.
A run executes in the trace but the gateway shows no findings. The gateway and Workflow service are reading different databases. Wire the Workflow service’s DATABASE_URL to the internal connection string of workflow-agents-db (the same DB the gateway uses), and make sure the Workflow service is in the Oregon region so the internal host resolves.
The Workflow service landed in a different project. You started + New from the top nav instead of + New service from inside the project, so the Project field wasn’t pre-filled. Delete it and recreate from inside the project the Blueprint made.
Blueprint step won’t proceed. Set the Blueprint Path explicitly: packages/workflow-agents/render.yaml (TypeScript) or packages/workflow_agents/render.yaml (Python). There’s no root render.yaml.
render workflows list returns nothing or unknown command. Unlike --local commands, this hits the API: run render login, then render workspace set and pick your workspace. If render workflows is unknown, your CLI is older than 2.11; reinstall from the releases page.
unknown flag: --env-var on workflows create. Your CLI is older than 2.20. Run brew upgrade render, confirm render --version, and check which render is not a stale install earlier on your PATH.
Build fails with a lockfile or workspace error. Keep the cd ../.. on both commands. The Root Directory scopes to the package, but npm ci must run from the repo root to read the root lockfile and workspaces.
# Build Commandcd ../.. && npm ci
# Start Commandcd ../.. && npm run start:workflow --workspace @workshop/workflow-agents
Workflow service crash-loops with ModuleNotFoundError. The Start Command needs uv run: set it to uv run python -m workflow_agents.workflow. Bare python can’t see the uv workspace packages.
What you learned
- Deployed the Pattern 3 Blueprint: the gateway web service and Postgres
- Created the workflow service by hand because Blueprints do not manage Workflows yet
- Set `DATABASE_URL` from Postgres and added service-specific secrets only where needed
- Submitted a public PR and read the run trace: each reviewer is its own task, fanned out in parallel